Mobility, Intelligent Traffic Systems
Sopers Lane, Poole, Dorset, BH17 7ER
Security
classification Unrestricted
Page
30 of 92
Version
3
Status
Issued
Last Editor
Alan Doyle
Date
05-Oct-2017
Document Name
Stratos Outstation General and ICM Handbook Document No. 667/HB/52250/000
Copyright © Siemens plc 2014. All Rights Reserved. Mobility and Logistics is a division of Siemens Plc
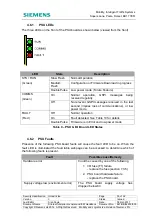
4.4.1 CPU
LEDs
LED
State
Description
SYSTEM
(Green)
Slow flash
Normal operation
Medium flash Normal operation, Fault present
Very fast
flash
Restricted mode*
COMMS
Communications
(Green)
On
Under UTC control, pulses off indicate receipt of
messages
Off
Not under UTC control, pulses on indicate receipt of
messages
BUSY
(Red)
Off
Normally off
Flashing
Flashes to indicate the system is busy performing an
operation that must not be interrupted, for example
start up, upgrade, USB "memory stick" style interface
is busy. Do not remove USB device or switch off the
outstation while this LED is flashing.
Ethernet
Connectivity
(2x Green
inboard)
On / Flashing Indicate activity for the two Ethernet interfaces. Top
and Bottom
Modem Power
(inboard)
On
Indicates that the Modem Power is on.
Off
Indicates that the Modem Power is off.
* Restricted mode is similar to safe mode on a PC where the user can access the unit to
examine logs, diagnose problems and perform firmware updates.
Table 7 – CPU Board LED States
4.4.2 Changing the Heart
The heart should only ever need to be replaced under the following circumstances:
1. CPU Board or unit is faulty and needs to be replaced.
2. Heart (SD Card) is faulty.
Should the heart need to be removed or replaced the following procedure should be
followed:
1. Power down the Stratos Outstation.
2. Unplug connectors and slide the unit free of any rack so that the top edge of the CPU
board can be accessed.
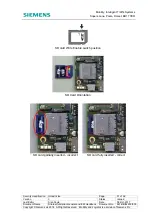
3. Push the card into the socket slightly until it ‘clicks’ then release pressure. The card
can now be pulled from the socket.
4. To insert a card, align it with the socket with the contacts facing PCB and closest to
the socket. Slide it into the socket and apply slight pressure until it ‘clicks’. The card is
now located correctly. The photos below show the correct orientation for the card.
Note: It is important that the card is not write-protected. The ‘lock’ switch must be in the
position shown in the following diagram.

