


18
* Dependent on model
e)
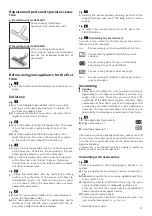
Professional upholstery nozzle
For gently and thoroughly cleaning upholstered fur-
niture, curtains, etc.
For cleaning the professional upholstery nozzle, sim-
ply vacuum it using the handle.
f)
Hard-floor nozzle
- with clip-in edge cleaning bristles:
For gentle but effective cleaning of hard floor
coverings (tiles, parquet, etc.)
- without edge cleaning bristles:
For cleaning dirt in gaps and cracks
The edge cleaning bristles can be removed by
pushing the two catches in the direction of the
arrows.
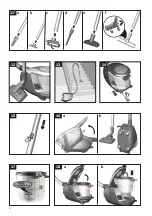
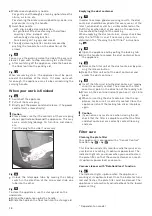
Fig.
12
You can use the parking aid on the side of the vacuum
cleaner if you wish to stop vacuuming for a short time.
After switching off the appliance, slide the hook on
the floor tool into the parking aid.
Fig.
13*
When vacuuming stairs, the appliance must be positi-
oned at the bottom of the stairs. If it does not reach
far enough, the appliance can also be carried using the
carrying handle.
When your work is finished
Fig.
14
Switch off the appliance.
Pull out the mains plug.
Briefly pull the power cord and release. (The power
cord retracts automatically).
!
Caution
Please make sure that the contacts of the mains plug
do not protrude out beyond the appliance. This may
cause scratching/damage to furniture and doors,
etc.
Turn the plug to the side if necessary.
Fig.
15
Unlock the telescopic tube by moving the sliding
switch in the direction of the arrow and slide one
tube into the other.
Fig.
16
To store the appliance, use the storage aid on the
underside.
a)
Stand the appliance up by the handle.
b)
Slide the hook on the floor tool into the storage aid.
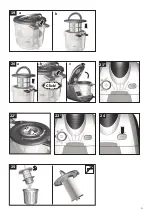
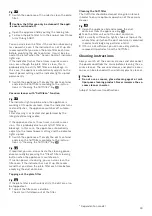
Emptying the dust container
Fig.
17
In order to achieve good vacuuming results, the dust
container should be emptied after every use or, at the
latest, when dust or dirt has visibly collected on the
fluff filter or when dust at one point in the container
has reached the height of the marking.
When emptying the dust container, always check how
dirty the fluff filter is and, if necessary, clean it as
detailed in the "Cleaning the fluff filter" instructions.
Fig.
26
Fig.
18
a)
Open the appliance lid by pulling the locking tab.
b)
Use the handle to remove the dust container from
the appliance.
Fig.
19
a)
Release the filter unit of the dust container by pres-
sing the release button.
b)
Take the filter unit out of the dust container and
empty the dust container.
Fig.
20
a)
Insert the filter unit into the dust container, making
sure it is correctly seated. The arrow on the filter
cover must point in the direction of the locking tab.
b)
Press on the container lid until you hear it click into
place.
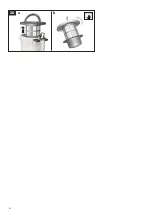
c)
When reinserting the dust container into the ap-
pliance, make sure it is correctly seated. Close the
appliance lid until the locking tab clicks into place
again.
!
Caution
If you notice any resistance when closing the lid,
check that the filter is complete and that the filter
and dust container are correctly seated.Cleaning
and care
Filter care
Cleaning the plate filter
Your appliance is equipped with a "Sensor Control"
Function.
Fig.
21*
+
Fig.
23*
This function constantly monitors whether your vacu-
um cleaner is reaching its optimum power level. The
indicator light lets you know when you need to clean
the plate filter, so that the vacuum cleaner can reach
its optimum power level once more.
Vacuum cleaner with “RotationClean” function
Fig.
21*
The indicator lights up blue when the appliance is
working at its optimum level. Once the indicator turns
red and flashes, the plate filter must be cleaned. The
appliance is automatically adjusted back to the lowest
power setting.
Summary of Contents for VSX7
Page 2: ...2 22 7 8 9 5 6 14 15 16 17 18 19 20 21 5 2 1 4 A B 3 11 10 12 13 ...
Page 3: ...3 9 7 4 b a 5 8 6 a b 2 b a 3 b a Click 10 1 2 2 1 1 2 1 1 2 Click Click 1 Click ...
Page 4: ...4 12 16 b a 14 13 11 b a d c e 17 b 18 a 15 2 1 1 2 f 2 1 1 ...
Page 5: ...5 24 b 19 a 21 22 Click 20 a b c 23 25 ...
Page 6: ...6 a b 26 1 2 ...
Page 29: ...29 ...
Page 30: ...30 ...


