Installation and Startup
Rev 4 Nov.16
17
4119008
Wiring Diagrams
Recommended Vehicle Installation
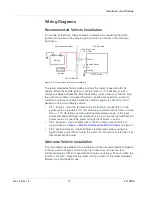
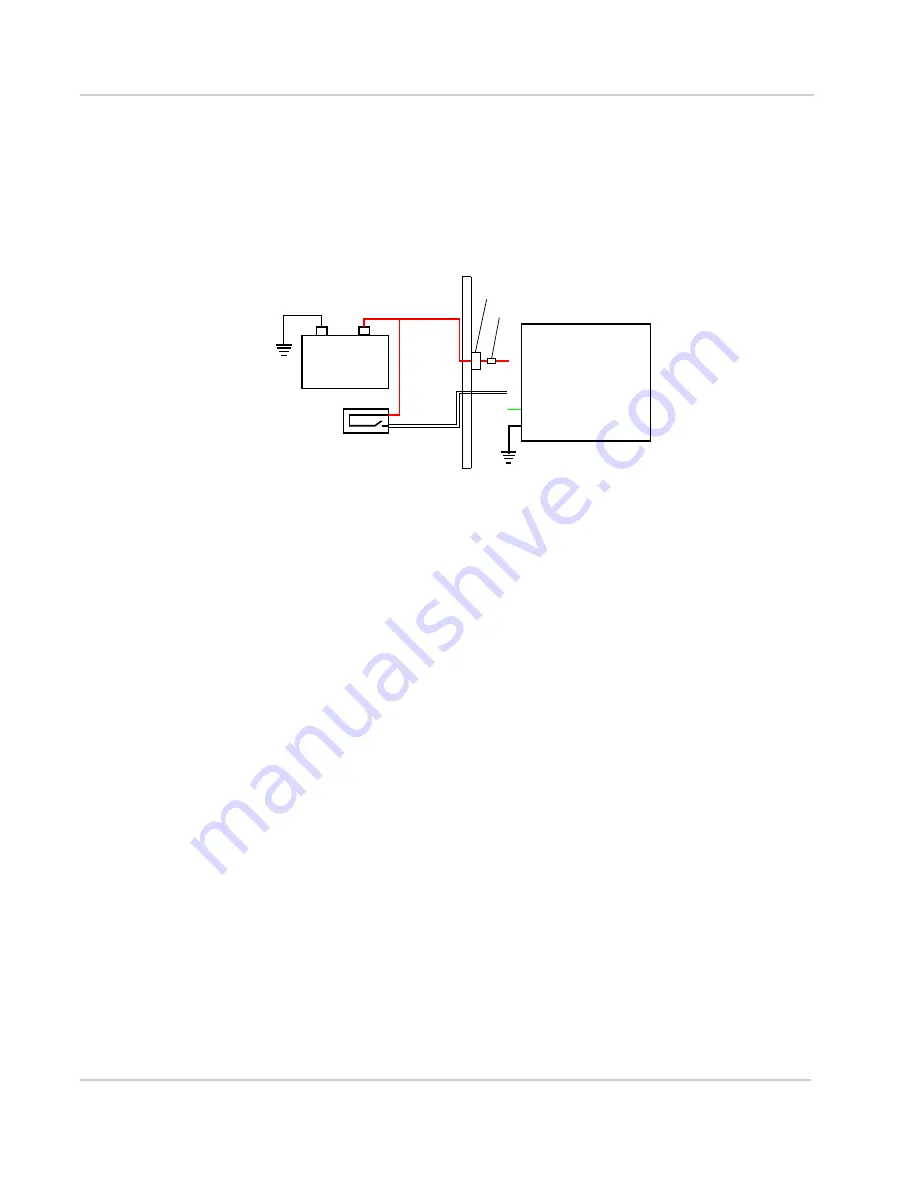
For vehicle installations, Sierra Wireless recommends connecting the white
Ignition Sense wire to the vehicle’s ignition switch, as shown in the following
illustration.
Figure 2-5: Recommended Vehicle Installation
The recommended vehicle installation allows the router to operate with the
vehicle. When the vehicle ignition is off, the router is off. If desired, you can
configure a delay between the time the vehicle’s ignition shuts off, and the time
the router shuts down. A delayed shutdown is especially useful if you want to
maintain a network connection while the vehicle’s engine is shut off for short
periods, such as in a delivery vehicle.
•
Pin 1 (Power) —Use the red wire in the DC cable to connect Pin 1 to the
power source. Include a 7.5 A, fast blow fuse, recommended to have no more
than +/- 10% de-rating over the operating temperature range, in the input
power line. Sierra Wireless recommends using a continuous (unswitched) DC
power source. Connect the power through the vehicle’s fuse box.
•
Pin 2 (Ground)—Use the black wire in the DC cable to connect Pin 2 to
ground. See also
Step 2—Mount and Ground the MP70 Chassis
•
Pin 3 (Ignition Sense) —Sierra Wireless recommends always using the
Ignition Sense wire (Pin 3) to turn the router off. It should not be turned off by
disconnecting the power.
Alternate Vehicle Installation
The main difference between this installation and the standard vehicle installation
is that you can configure a timer to turn the router on at set intervals for a
configured length of time, for example 20 minutes once every 24 hours when the
ignition is off. Also, instead of the router turning on and off, the router alternates
between on and standby mode.
4
MP70 router
Power
Ignition Sense
I/O
Ground
-
+
Battery
Ignition
1
3
2
7.5 A Fuse
Vehicle firewall
Vehicle fuse box
Vehicle cabin
Engine compartment

