background image

1

Country Club Road
P.O. Box 779
Wadesboro, NC 28170 USA
TEL: (800) 477-5003
FAX: (800) 374-6853

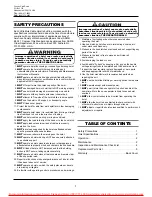
SAFETY PRECAUTIONS

Each Little Mule Cable Hoist is built in accordance with the
specifications contained herein and at the time of manufacture
complies with our interpretation of applicable sections of
American Society of Mechanical Engineers Code (ASME)
B30.21. Copies of this Standard can be obtained from ASME
Order Department, 22 Law Drive, Box 2300, Fairfield, NJ
07007-2300, U.S.A.

1.

NOT

operate a malfunctioning or unusually performing hoist.

2.

NOT

operate the hoist until thoroughly reading and

understanding the manufacturer’s Operating and Maintenance
Instructions or Manuals.

3.

NOT

operate a hoist which has been modified without the

manufacturer’s approval or certification to be in conformity with
applicable OSHA regulations.

4.

NOT

lift or pull more than rated capacity of the hoist.

5.

NOT

use damaged hoist or hoist that is NOT working properly.

6.

NOT

use hoist with damaged or excessively worn cable.

7.

NOT

operate with any handle extension (cheater bar).

8.

NOT

attempt to “free-wheel” the hoist while a load is applied.

9.

NOT

use the hoist to lift, support, or transport people.

10.

NOT

lift loads over people.

11. Protect the hoist’s cable from weld splatter or other damaging

contaminants.

12.

NOT

operate hoist when it is restricted from forming a straight

line from hook to hook in the direction of loading.

13.

NOT

use hoist cable as a sling or wrap around load.

14.

NOT

apply the load to the tip of the hook or to the hook latch.

15.

NOT

apply load unless two wraps of cable are properly

seated on the drum.

16.

NOT

leave load supported by the hoist unattended unless

specific precautions have been taken.

17.

NOT

remove or obscure the warnings on the hoist.

18.

NOT

operate a hoist which has NOT been securely attached

to a suitable support.

19.

NOT

operate a hoist unless load slings or other approved

attachments are properly sized and seated in the hook saddle.

20.

NOT

lift loads that are NOT balanced and that the holding

action is NOT secure, taking up slack carefully.

21.

NOT

operate a hoist unless all persons are and remain clear

of the supported load.

22. Report malfunctions or unusual performances of a hoist, after

it has been taken out of service.

23.

NOT

operate a hoist on which the safety placards or decals

are missing or illegible.

24. Be familiar with operating controls, procedures, and warnings.

1. Maintain a firm footing or be otherwise secured when

operating the hoist.

2. Use hook latches. Latches are to retain slings, chains, etc.

under slack conditions only.

3. Make sure the hook latches are closed and not supporting any

parts of the load.

4. Make sure the load is free to move and will clear all

obstructions.

5. Avoid swinging the load or hook.

6. Avoid handle “fly-back” by keeping a firm grip on the handle

until operating stroke is completed and the handle is at rest.

7. Inspect the hoist regularly, replace damaged or worn parts,

and keep appropriate records of maintenance.

8. Use the hoist manufacturer’s recommended parts when

repairing the unit.

9.

NOT

use the hoist load limiting or warning device to measure

load.

10.

NOT

operate except with manual power.

11.

NOT

permit more than one operator to pull on handle at the

same time. More than one operator is likely to cause hoist
overload.

12.

NOT

allow your attention to be diverted from operating the

hoist.

13.

NOT

allow the hoist to be subjected to sharp contact with

other hoists, structures, or objects through misuse.

14.

NOT

adjust or repair the hoist unless qualified to perform such

adjustments or repairs.

TABLE OF CONTENTS

Safety Precautions  . . . . . . . . . . . . . . . . . . . . . . . . . . . .1

Hoist Specifications  . . . . . . . . . . . . . . . . . . . . . . . . . . . .2

Operation . . . . . . . . . . . . . . . . . . . . . . . . . . . . . . . . . . . .2

Maintenance  . . . . . . . . . . . . . . . . . . . . . . . . . . . . . . . . .2

Inspection and Maintenance Check List  . . . . . . . . . . . .4

Replacement Parts List  . . . . . . . . . . . . . . . . . . . . . . . . .5

Warranty  . . . . . . . . . . . . . . . . . . . . . . . . . . . . .Back Cover

Improper operation of a hoist can create a potentially
hazardous situation which, if not avoided, could result
in death or serious injury. To avoid such a potentially
hazardous situation, THE OPERATOR SHALL:

Improper operation of a hoist can create a potentially
hazardous situation which, if not avoided, could result
in minor or moderate injury. To avoid such a potentially
hazardous situation, THE OPERATOR SHALL:

For more information contact: Sievert Crane and Hoist, (708) 771-1600, parts@sievertelectric.com, www.sievertcrane.com

Summary of Contents for Little Mule 105SB

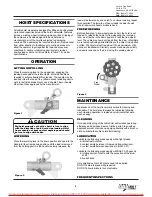
Page 1: ... reference and use Forward this manual to the hoist operator Failure to operate the equipment as directed in the manual may cause injury Should you have any questions regarding this product please call Little Mule at 800 477 5003 Before using the hoist fill in the information below Model No Serial No Purchase Date Follow all instructions and warnings for inspecting maintaining and operating this h...

Page 2: ... secure taking up slack carefully 21 NOT operate a hoist unless all persons are and remain clear of the supported load 22 Report malfunctions or unusual performances of a hoist after it has been taken out of service 23 NOT operate a hoist on which the safety placards or decals are missing or illegible 24 Be familiar with operating controls procedures and warnings 1 Maintain a firm footing or be ot...

Page 3: ...hoist is not loaded To release the cable for free wheeling the reversing lever must first be in the down position Press the free wheel lever The cable may now be stripped from the drum to facilitate more rapid positioning while attaching to the object to be pulled or lifted The hoist will not free wheel if it has a minimum of 40 pounds of load tension Similarly excess slack may be quickly and easi...

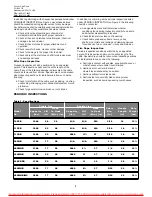
Page 4: ...ll determine whether conditions found during inspection constitute a hazard and whether disassembly is required b Check fasteners for evidence of loosening c Check cable suspension frame levers yokes shafts pins rollers and locking and clamping devices for evidence of wear corrosion cracks and distortion Wire Rope Inspection Periodic inspections shall be performed by an appointed person This inspe...

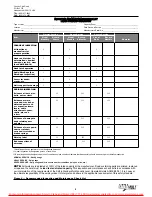
Page 5: ...ed cracked or distorted parts such as suspension frame levers cable attachments yokes shafts pins and rollers Evidence of damage to hook retaining nuts and pins Evidence of worn pawls cams or ratchet corroded stretched or broken springs Warning label End connections of wire rope NORMAL SERVICE Weekly usage HEAVY SERVICE Daily usage SEVERE SERVICE Daily usage and or in severe weather conditions rai...

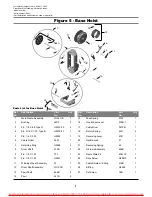
Page 6: ...51 1 11 Winding Wheel Assembly 32 1 12 Drum Shaft Assembly LG107B 1 13 Pawl Shaft 445B 2 14 Pawl 241B 2 15 Pawl Spring 23L2 1 16 Free Wheel Lever 279B 1 1 17 Cable Drum 3475B 1 18 Return Spring 23L1 2 19 Reversing Lever 47B 1 20 Handle Lock 51 1 21 Reversing Spring 42 1 22 U Frame Assembly 446B 1 23 Name Plate Kit 676L1K 1 24 Drive Screw H2861P 2 25 Cable Shield w E Ring 418B 1 26 E Ring H5595 1 2...

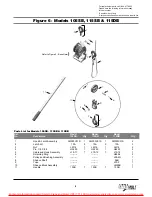
Page 7: ...C01S 2 2 Latch Kit 10A 2 10A 2 10A 3 3 Nut LM16 1 LM16 1 LM16 2 4 Pin 1 8 X 88 H5250 1 H5250 1 H5250 2 5 Cable and Hook Assembly L19 11 1 L19 12 1 L19 12 1 6 Retaining Ring H5596 2 7 Pulley and Bushing Assembly L28 2G 1 8 Sheave Shaft 96B 1 9 Yoke L30 3 1 10 Sheave Block Assembly LM99B 1 11 Handle 150B 1 150B 1 150B 1 Refer to Figure 5 Base Hoist 6 Ref Model Model Model No Description 105SB Qty 11...

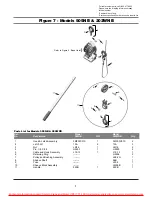
Page 8: ...y 3M003C01S 1 3M003C01S 2 2 Latch Kit 10A 2 10A 3 3 Nut LM16 1 LM16 2 4 Pin 1 8 X 88 H5250 1 H5250 2 5 Cable and Hook Assembly L19 13 1 L19 13 1 6 Retaining Ring H5596 2 7 Pulley and Bushing Assembly L28 2G 1 8 Sheave Shaft 96B 1 9 Yoke L30 3 1 10 Sheave Block Assembly LM99B 1 11 Handle 250B 1 250B 1 Ref Model Model No Description 505NB QTY 202WNB Qty Refer to Figure 5 Base Hoist For more informat...

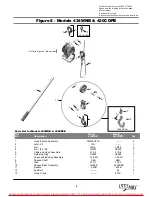
Page 9: ...ut LM16 LM16 2 4 Pin 1 8 X 88 H5250 H5250 2 5 Cable and Hook Assembly L19 5 L19 6 1 6 Retaining Ring H5596 H5596 2 7 Pulley and Bushing Assembly L28 2G L28 2G 1 8 Sheave Shaft 96B 96B 1 9 Yoke L30 3 L30 3 1 10 Sheave Block Assembly LM99B 499CDPB 1 11 Handle 250B 250B 1 12 Eye Bolt 25 2 13 Hook Clevis 474C 1 Ref Model Model No Description 434WNB 430CDPB Qty Refer to Figure 5 Base Hoist 12 13 13 CDP...

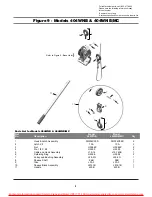
Page 10: ...250 H5250 2 5 Cable and Hook Assembly L19 14 L19 14SS 1 6 Retaining Ring H5596 H5596 2 7 Pulley and Bushing Assembly L28 2G L28 2G 1 8 Sheave Shaft 96B 96B 1 9 Yoke L30 3 L30 3 1 10 Sheave Block Assembly L914 1B L914 1B 1 11 Handle 450B 450B 1 Ref Model Model No Description 404WNB 404WNB MC Qty Parts List for Models 404WNB 404WNB MC 2 1 3 4 5 7 9 8 4 3 2 6 1 10 11 6 2 Refer to Figure 5 Base Hoist ...

Page 11: ...Please have the following information ready Model number Serial number if any Part description and number as shown in parts list NOTES For more information contact Sievert Crane and Hoist 708 771 1600 parts sievertelectric com www sievertcrane com ...

Page 12: ...nted in USA 08 03 WARRANTY Every hoist is thoroughly inspected and performance tested prior to shipment from the factory If any properly installed maintained and operated hoist as outlined in the applicable accompanying Little Mule manual develops a performance problem due to defective materials or workmanship as verified by Coffing Hoists Little Mule repair or replacement of the hoist will be mad...

Reviews: