background image

2

Country Club Road
P.O. Box 779
Wadesboro, NC 28170 USA
TEL: (800) 477-5003
FAX: (800) 374-6853

HOIST SPECIFICATIONS

All cable hoist models are designed for lifting and pulling loads
up to rated capacities listed on the hoist nameplate. Features
include a winding wheel for taking up slack or free stripping of
the cable and a handle designed to bend before any
mechanical part of the hoist is subjected to damaging
overload. The handle may be inserted into the U-Frame socket
from either direction to facilitate use in confined areas or to
allow the operator to pull against the load under unusual
conditions. A double, interlocking pawl system provides
positive load control at all times. Refer to Table 1 for model
specifications.

OPERATION

LIFTING OR PULLING 

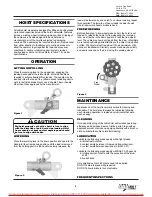
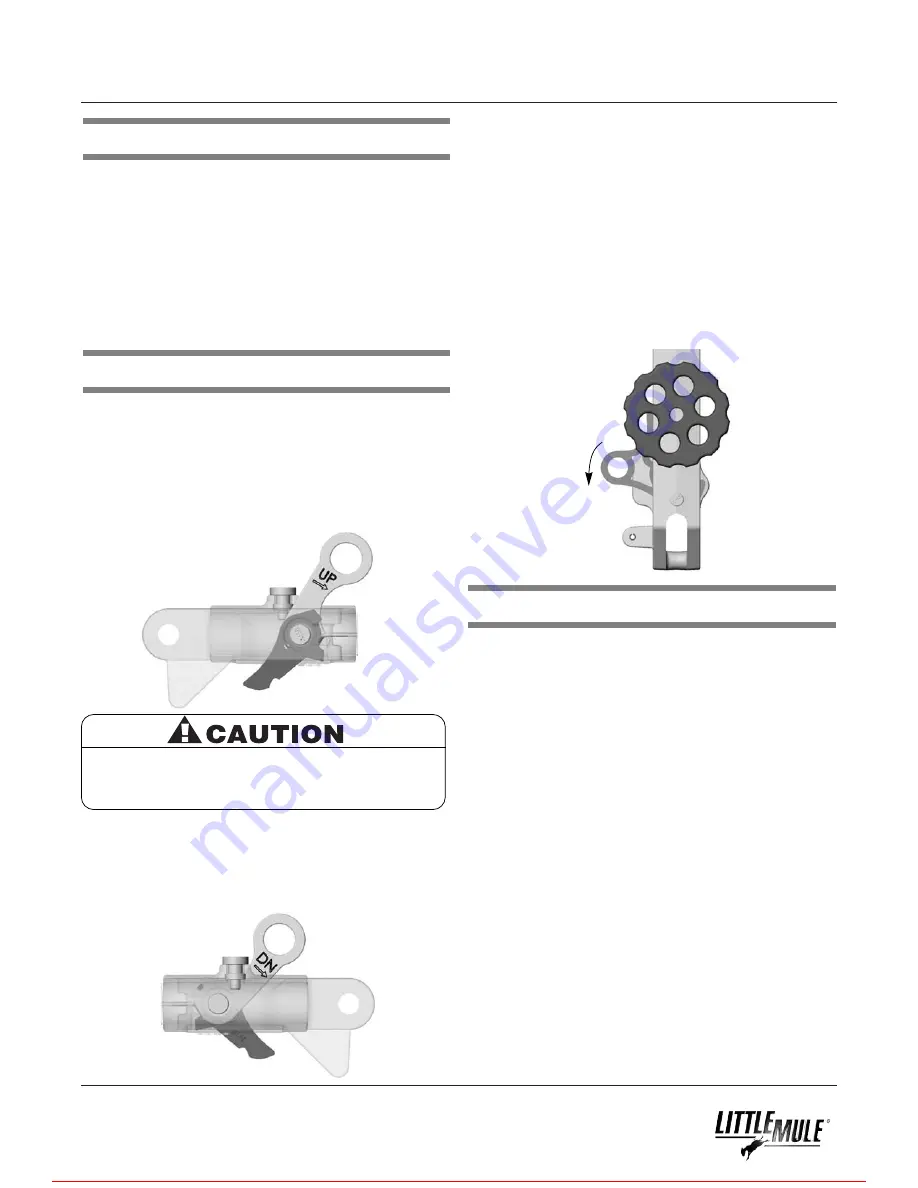
Place the reversing lever in the up position, engaging the
loading pawl against the ratchet teeth. Work the handle as
required to achieve desired lift or tension. The handle may be
inserted into either end of the U-frame socket enabling user to
work in restricted areas. Never use a “cheater” bar or handle
other than those approved by the manufacturer.

LOWERING 

Place the reversing lever in the down position and operate the
handle to its extreme down position until the load is removed
from the holding pawl. As the handle is slowly released, the

load will be lowered by one notch. To continue lowering repeat
this operation. The lowering of heavy loads is easier if quick
(sharp) downward handle motion is used.

FREE-WHEELING

Before attempting to free-wheel make certain the hoist is not
loaded. To release the cable for free-wheeling, the reversing
lever must first be in the down position. Press the free-wheel
lever. The cable may now be stripped from the drum to facilitate
more rapid positioning while attaching to the object to be pulled
or lifted. The hoist will not free-wheel if it has a minimum of 40
pounds of load/tension. Similarly, excess slack may be quickly
and easily rewound on the drum using the winding wheel.

MAINTENANCE

Maintenance of the hoist is normally limited to cleaning and
lubrication. The hoist should always be lubricated following
each cleaning operation to replace any lubricants that were
washed away.

CLEANING

Occasional cleaning of the cable hoist will increase operating
efficiency and decrease wear on friction parts. Clean with an
approved solvent or kerosene, applying liberally with a brush or
cloth. Lubricate the cable hoist after cleaning.

LUBRICATION

Lubricate the following areas weekly with a light grease:

a. ratchet teeth of drum.
b. contact points between U-frame and free-wheel lever.
c. contact points between pawl and pin (H5230-31).

Lubricate the following areas weekly with SAE 20-30 gear oil:

a. rotating points of shafts, with the exception of the drum 

shaft.

b. hook shanks

Only small amounts of lubricants need to be applied.
DO NOT saturate areas with grease/oil.
DO NOT allow lubricants to contact cable.

FREQUENT INSPECTIONS

Figure 1 

Figure 2 

Figure 3 

Free-

Wheel

Rig hoist properly so that the hoist is free to align
with the direction of pull. Avoid side loading. Hoist
frame should not bear against anything and should 
be free to align with hooks.

For more information contact: Sievert Crane and Hoist, (708) 771-1600, parts@sievertelectric.com, www.sievertcrane.com

Summary of Contents for Little Mule 105SB

Page 1: ... reference and use Forward this manual to the hoist operator Failure to operate the equipment as directed in the manual may cause injury Should you have any questions regarding this product please call Little Mule at 800 477 5003 Before using the hoist fill in the information below Model No Serial No Purchase Date Follow all instructions and warnings for inspecting maintaining and operating this h...

Page 2: ... secure taking up slack carefully 21 NOT operate a hoist unless all persons are and remain clear of the supported load 22 Report malfunctions or unusual performances of a hoist after it has been taken out of service 23 NOT operate a hoist on which the safety placards or decals are missing or illegible 24 Be familiar with operating controls procedures and warnings 1 Maintain a firm footing or be ot...

Page 3: ...hoist is not loaded To release the cable for free wheeling the reversing lever must first be in the down position Press the free wheel lever The cable may now be stripped from the drum to facilitate more rapid positioning while attaching to the object to be pulled or lifted The hoist will not free wheel if it has a minimum of 40 pounds of load tension Similarly excess slack may be quickly and easi...

Page 4: ...ll determine whether conditions found during inspection constitute a hazard and whether disassembly is required b Check fasteners for evidence of loosening c Check cable suspension frame levers yokes shafts pins rollers and locking and clamping devices for evidence of wear corrosion cracks and distortion Wire Rope Inspection Periodic inspections shall be performed by an appointed person This inspe...

Page 5: ...ed cracked or distorted parts such as suspension frame levers cable attachments yokes shafts pins and rollers Evidence of damage to hook retaining nuts and pins Evidence of worn pawls cams or ratchet corroded stretched or broken springs Warning label End connections of wire rope NORMAL SERVICE Weekly usage HEAVY SERVICE Daily usage SEVERE SERVICE Daily usage and or in severe weather conditions rai...

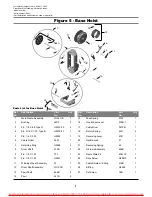
Page 6: ...51 1 11 Winding Wheel Assembly 32 1 12 Drum Shaft Assembly LG107B 1 13 Pawl Shaft 445B 2 14 Pawl 241B 2 15 Pawl Spring 23L2 1 16 Free Wheel Lever 279B 1 1 17 Cable Drum 3475B 1 18 Return Spring 23L1 2 19 Reversing Lever 47B 1 20 Handle Lock 51 1 21 Reversing Spring 42 1 22 U Frame Assembly 446B 1 23 Name Plate Kit 676L1K 1 24 Drive Screw H2861P 2 25 Cable Shield w E Ring 418B 1 26 E Ring H5595 1 2...

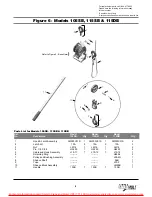
Page 7: ...C01S 2 2 Latch Kit 10A 2 10A 2 10A 3 3 Nut LM16 1 LM16 1 LM16 2 4 Pin 1 8 X 88 H5250 1 H5250 1 H5250 2 5 Cable and Hook Assembly L19 11 1 L19 12 1 L19 12 1 6 Retaining Ring H5596 2 7 Pulley and Bushing Assembly L28 2G 1 8 Sheave Shaft 96B 1 9 Yoke L30 3 1 10 Sheave Block Assembly LM99B 1 11 Handle 150B 1 150B 1 150B 1 Refer to Figure 5 Base Hoist 6 Ref Model Model Model No Description 105SB Qty 11...

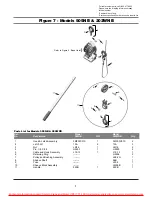
Page 8: ...y 3M003C01S 1 3M003C01S 2 2 Latch Kit 10A 2 10A 3 3 Nut LM16 1 LM16 2 4 Pin 1 8 X 88 H5250 1 H5250 2 5 Cable and Hook Assembly L19 13 1 L19 13 1 6 Retaining Ring H5596 2 7 Pulley and Bushing Assembly L28 2G 1 8 Sheave Shaft 96B 1 9 Yoke L30 3 1 10 Sheave Block Assembly LM99B 1 11 Handle 250B 1 250B 1 Ref Model Model No Description 505NB QTY 202WNB Qty Refer to Figure 5 Base Hoist For more informat...

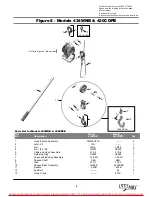
Page 9: ...ut LM16 LM16 2 4 Pin 1 8 X 88 H5250 H5250 2 5 Cable and Hook Assembly L19 5 L19 6 1 6 Retaining Ring H5596 H5596 2 7 Pulley and Bushing Assembly L28 2G L28 2G 1 8 Sheave Shaft 96B 96B 1 9 Yoke L30 3 L30 3 1 10 Sheave Block Assembly LM99B 499CDPB 1 11 Handle 250B 250B 1 12 Eye Bolt 25 2 13 Hook Clevis 474C 1 Ref Model Model No Description 434WNB 430CDPB Qty Refer to Figure 5 Base Hoist 12 13 13 CDP...

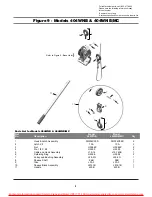
Page 10: ...250 H5250 2 5 Cable and Hook Assembly L19 14 L19 14SS 1 6 Retaining Ring H5596 H5596 2 7 Pulley and Bushing Assembly L28 2G L28 2G 1 8 Sheave Shaft 96B 96B 1 9 Yoke L30 3 L30 3 1 10 Sheave Block Assembly L914 1B L914 1B 1 11 Handle 450B 450B 1 Ref Model Model No Description 404WNB 404WNB MC Qty Parts List for Models 404WNB 404WNB MC 2 1 3 4 5 7 9 8 4 3 2 6 1 10 11 6 2 Refer to Figure 5 Base Hoist ...

Page 11: ...Please have the following information ready Model number Serial number if any Part description and number as shown in parts list NOTES For more information contact Sievert Crane and Hoist 708 771 1600 parts sievertelectric com www sievertcrane com ...

Page 12: ...nted in USA 08 03 WARRANTY Every hoist is thoroughly inspected and performance tested prior to shipment from the factory If any properly installed maintained and operated hoist as outlined in the applicable accompanying Little Mule manual develops a performance problem due to defective materials or workmanship as verified by Coffing Hoists Little Mule repair or replacement of the hoist will be mad...

Reviews: