.
Fin And Rudder
77.
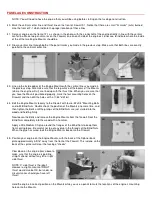
Tape the Fin plan to the building board, and cover with wax paper. Pin down over
the plan and glue in place all of the 5/16" balsa laser-cut fin parts. Cut two 5/16"
sq. balsa ribs and glue them in place with THIN CA.
78.
Once the glue is cured, remove the Fin Frame from the plan and re-glue all the
joints with Medium CA. Use just enough glue to completely fill the joint, plus leave
small fillet of glue between the parts. Take your time and don’t miss any joints!
Each and every one of them contributes to the finished strength of the Fin.
79.
Lay the Fin flat on the building board and lightly block sand both sides to smooth
out all the glue joints.
CAUTION: Do not sand so much that you thin down the Fin more than 1/32"
under its original 5/16" thickness.
80.
Mark a center-line on the front of the Fin Leading Edge. Using the center-line as
a guide, carve and sand the Leading Edge round.
NOTE: Leave the trailing edge, top end, and bottom of the Fin flat and square.
81.
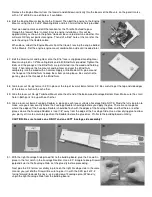
Locate the pre-shaped balsa Rudder. Compare the overall height of the Rudder to the overall length of the Fin’s trailing
edge. Notice on the plan that the Rudder should be 3/8" shorter in height than the Fin’s trailing edge. This is to provide a
gap between the bottom of the Rudder and the top of the Stabilizer after the model is assembled. Sand the end of the
Rudder slightly if necessary to achieve an adequate gap. Sand the sides of the Rudder smooth with 220 grit sandpaper.
Set aside until ready for covering.


