.
Notes On Loops
A true wing will perform perfect loops. A twisted wing will loop obliquely. One wing half being heavier than the other
may also affect loop tracking. Side mounted motor may make one side of the model heavier than the other. Put weight
in opposite wing tip until balanced. Should your model snap roll out of the top of a loop, it may snap in the direction of
any twist in the wing, but the real reason for it snapping is because of a stall. This is probably due to one or more of
the following:
Airspeed too low.
C.G. too far back.
Pilot pulls too much elevator, a mistake aggravated by excessive elevator travel which makes the elevator more
sensitive. Reduce travel of elevator and use more care in transmitter stick movement.
Not enough power, too high a wing loading for the available power or both.
26.
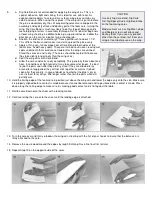
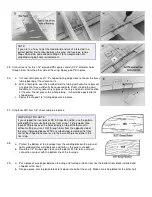
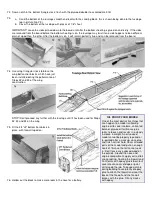
Cut out the wing tip blocks, using the pattern, at the end of these instructions, for the top view and the end of the sheeted
wing for the side view. Glue the tip block on with Sig Bond, holding it in place with masking tape and/or pins. Carve and
sand to shape. (If you wish to save weight by hollowing the tip, only tack glue it in place so that it can be removed for
hollowing after it has been shaped. Use an X-acto "Y" router blade for hollowing.
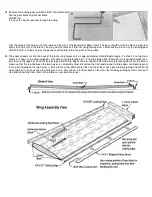
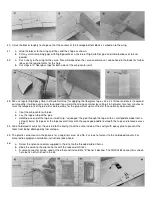
27. Cut out the inset holes in the wing sheeting for the plywood tabs called PW.
28.
Epoxy the PW tabs in place, using a ruler to line them up with the wing top surface.
29.
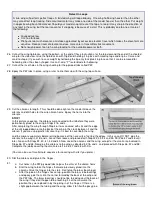
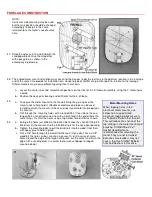
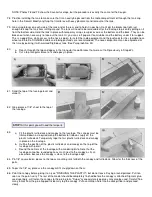
Cut the ailerons to length. This should be done right on the model. Groove the
ailerons and drill holes for the wire aileron horns. Epoxy the horns into the
ailerons.
STOP!
In this picture sequence, the ailerons were covered with silk before they were
permanently glued to the wing in Steps 31b. and c.
After completing the wing through Step 46, it was covered with silk and the edge
of the silk lapped down onto the back of the wing in the crack between it and the
aileron. If you are using plastic film covering, it is best to cover both the wing
and the ailerons separately before joining because of the necessity of ironing the edges. In this case, DO NOT glue the
ailerons to the wing in 31b. and c. Leave them loose and proceed with Steps 32, 33, 34 and 35. SKIP 36,37 and 38 until
later. Go on with Steps 39, 40, 41, 42 and 43. Now cover the ailerons and the wing, except for the small area involved in
Steps 36, 37 and 38. Now glue the ailerons to the wing as directed in 31b. and c. and proceed with Steps 36, 37 and 38.
Complete the job by covering the small area left in 36, 37 and 38 with film.
(You can also use this alternate sequence for covering with silk if you prefer.)
30.
Slot the ailerons and glue in the hinges.
31.
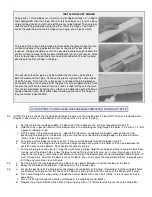
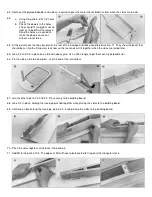
a. Cut holes in the PW plywood tabs to pass the arms of the aileron horns.
b. Slot the wing to take the hinges that were previously glued into the
ailerons. Glue the hinges into the slots. Don't glue the brass bearing yet.
c. After the glue on the hinges has set up, position the brass tube bearings
and epoxy glue them into the corner formed by the back of the wing and
the PW tabs. The brass bearings should not be forced against the back of
the wing if they don't happen to be touching it. Let them assume the
position they were placed in by the gluing in of the hinges. If there is a
slight gap between the tubing and the wing, allow it to fill with epoxy glue.


