CP6000/CP4000
Current Probe Instructions 23
Basic Operation
Before using the probe, the batteries or specified power adaptor must be installed.
WARNING!
Do not clamp the probe onto circuits with voltages greater than 600 VAC. Personal
Injury or damage to the probe may result. Always connect the CP4000 current probe
output to the instrument before clamping onto the circuit under test.
1.
First connect the current probe BNC connector to BP-250(double BNC
connection cable) ,then connect to oscilloscope input. Start by setting the
oscilloscope voltage input channel to DC coupling, and the voltage scale to
100m V/div.
2.
Move the OFF/Range switch to the 10mV/A or 100mV/A position to turn on
the probe.
※
The CP4070A has a green LED power/battery indicator. If the LED does
not light, replace the battery or use specified power adaptor.
3.
Use the ZERO adjustment to zero or offset the probe output detection of
residual magnetic DC charges.
4.
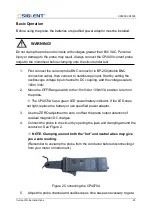
Connect the probe to the circuit by opening the jaws and clamping around the
conductor. See Figure 2.
※
NOTE. Clamping around both the “hot” and neutral wires may give
you a zero reading.
(Remember to unclamp the probe from the conductor before disconnecting it
from your meter or instrument.)
Figure 2 Connecting the CP4070A
5.
Adjust the probe channel
and oscilloscope’s time base as necessary to get a
Summary of Contents for CP4000 Series
Page 1: ...Current Probe Instructions ...
Page 2: ......


