background image

Page 43

VII.  Troubleshooting

For 3 type of general fault and shown as below:

z


System down

z


One of station fault

z


One of CO line fault

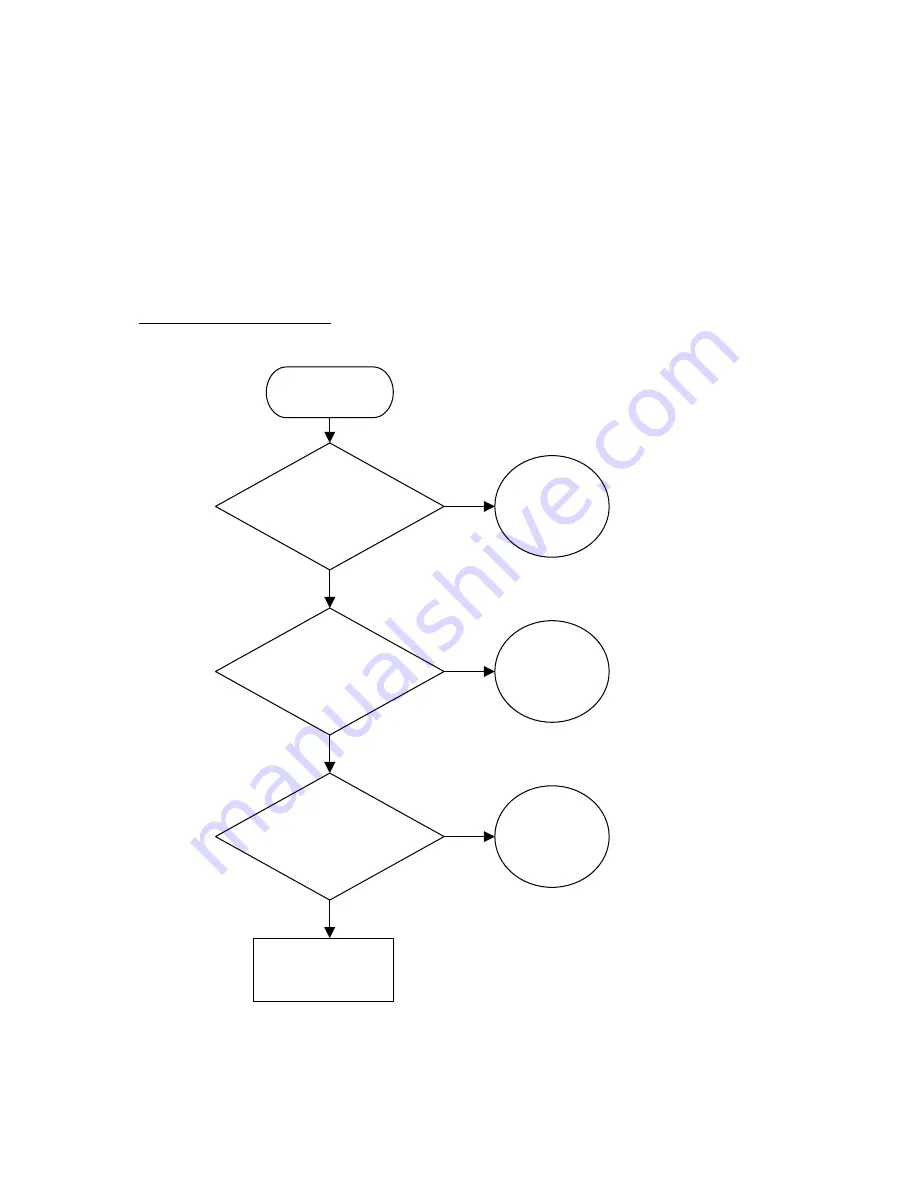
Fault Isolation Flowcharts

START

Is the system

completely non-

operational?

Call your

technical support

Is it a station no

dial tone?

Is it a CO line

no dial tone?

Go to 1.1

Go to 1.2

Go to 1.3

Summary of Contents for KT848

Page 1: ...Sigma V KT848 Business Telephone System Installation Guide Release 1 1 ...

Page 2: ... 7 i System Capacity 7 ii Power Specifications 7 iii Environmental Limits 7 iv Cable Requirements 7 v Physical Dimensions and Weights 7 vi Peripheral 8 III Installation 9 i Main unit installation 9 ii Power Supply installation 10 iii Co line connection 11 iv Station connection 11 v CO line expansion board installation 11 vi Extension expansion board installation 12 vii Caller ID board 12 viii Exte...

Page 3: ...ram 12 Incoming call setting Night mode 24 Program 13 Setting of delay ringing DISA setting 24 Program 14 Class of Service 25 Program 15 Restriction code A 25 Program 16 Restriction code B 26 Program 17 Unrest code C 26 Program 18 Public restriction code D 26 Program 19 PBX access code 27 Program 20 Account code setting 27 Program 21 DISA Trunk to trunk transfer access code setting 28 Program 22 E...

Page 4: ...ssword of extension lock 33 Program 35 Review system charge counting 33 Program 36 Presetting call charges 34 V Sample for special feature 35 VI Station Operation 40 VII Troubleshooting 43 1 1 System down 44 1 2 Station Dial Tone Faults 44 1 3 CO Line Dial Tone Faults 44 ...

Page 5: ...th feature phones and single line phones Extension ports 1 to 4 are assigned for either feature phone or single line phones The extension ports can be connected with single line phones as well as faxes recording machines and cordless phones etc Sigma V KT848 system has three kinds of expansion boards y 4 ports CO line expansion board 1 pc expandable at max y 8 ports Extension expansion board 4 pcs...

Page 6: ...Page 2 iii Hardware Diagram 1 Main Unit 2 Power Supply ...

Page 7: ...al 017 024 4 8 ports Extension expansion board terminal 025 032 5 8 ports Extension expansion board terminal 033 040 6 8 ports Extension expansion board terminal 041 048 7 Jumper for internal external music selection 8 External music input for MOH 9 External paging output 10 Parallel interface Printer 11 Serial interface PC 4 4 ports CO line board CO 1 4 ...

Page 8: ...Page 4 5 4 ports CO line expansion board CO 5 8 6 Caller ID board 7 8 ports Extension expansion board ...

Page 9: ...ton 1 8 Co line Button 9 32 One touch key for station or outside telephone number Button 33 FNC Button 34 CLEAR Button 35 DND Button 36 SCROLL 4 Dial pad 5 Panel display light switch 6 Fixed buttons Volume up down 7 Handset socket 8 Telephone set socket 9 DSS1 terminal 10 Not use 11 Microphone 12 Speaker ...

Page 10: ...Page 6 9 DSS Console 1 DSS button Button 1 48 extension port 001 048 Button 49 64 not use 2 DSS terminal ...

Page 11: ...Maximum power consumption 80 W Cross talk attenuation 70 dB Transmission loss 0 37 dB Battery backup supply 24VDC Batteries rating not less than 7Ah but not more than 40Ah iii Environmental Limits Operating temperatures 0 C to 45 C 32 F to 113 F Operating humidity 10 to 95 without condensation iv Cable Requirements Feature phone Maximum 100m 2 pairs twisted wire 0 5 Single line phone Maximum 1 000...

Page 12: ...ications 1 200 baud rate 8 N 1 Source of music Input impedance 600 ohms Input audio level generally 250MV virtual value 1V at the most Sound amplification output Input impedance 600 ohms Input audio level generally 250MV maximum 400MV ...

Page 13: ... Remark Make sure that have enough space to open the cover of Main Unit switch on off power and make a connection with parallel interface Measure the length between two holes for wall mount and then drill and put it on the wall Put the ground terminal connect to earth through ground wire ...

Page 14: ...Blue wires 14 VAC 3 Black wires 26 VAC 3 AC input of Linear power panel terminal 4 DC output of Linear power panel plug in to main board z Pin 1 2 70 VAC z Pin 1 3 5 VDC z Pin 1 4 12 VDC z Pin 1 5 30 VDC 5 Power LED terminal Type2 Specify for backup battery 1 Same as 1 of Type1 2 AC output of Transformer which plug in to 3 z Black wires 30 VAC 3 Same as 3 of Type1 4 Same as 4 of Type1 5 Same as 5 ...

Page 15: ...v Station connection Feature phone Remark max 100m length between extension port and telephone set socket Single line phone Remark max 1000m length between extension port and telephone set socket v CO line expansion board installation ...

Page 16: ...Page 12 vi Extension expansion board installation vii Caller ID board ...

Page 17: ...Page 13 viii External Music On Hold installation ix External Speaker installation ...

Page 18: ...Page 14 x SMDR installation Pin assignment of 2 KSU PC 2 3 3 2 7 5 xi Power Failure Transfer installation ...

Page 19: ...ission If you need to add more crystal heads for joints please refer to the diagram if the operating distance of the feature phone connecting line is less than 100m while compressing the crystal heads for joints you must disconnect the connecting line from the host 5 Be sure that the power plug of the KTU is properly plugged into the power socket Do not share the power socket with other equipment ...

Page 20: ...t mode 1 3 Setting of delay ringing DISA setting 1 4 Class of Service 1 5 Restriction code A 1 6 Restriction code B 1 7 Unrest code C 1 8 Public restriction code 1 9 PBX access code 2 0 Account code setting 2 1 DISA Trunk to trunk transfer access code setting 2 2 Extension setting 1 2 3 Extension setting 2 2 4 Pickup group assignment 2 5 Executive Boss Secretary function 2 6 System password 2 7 Sp...

Page 21: ...2 9 Caller ID 01 02 22 10 CO line access 01 11 Day Night mode ringing assignment 11 12 12 DISA 01 13 14 21 27 13 DND setting 23 14 DSS Console 06 15 Extension number assignment 29 16 Flash timing 02 17 Hold timing 05 18 Line Preference 05 23 19 Outgoing access 09 10 14 23 20 Outgoing call restriction 01 09 10 14 15 16 17 18 21 Paging alert signal 04 22 PBX line 02 19 23 Pick up group assignment 24...

Page 22: ...re program setting is completed press the CLEAR key twice to quit the program mode so as to restore the time display status iv Ways of using the single line phone to access system programming Use a DTMF phone lift handset and then enter 7 8 7 XXXXXXX SYSTEM PASSWORD in the off hook state If the code is correct dialing tone is heard again which means it is valid to access the system program If not ...

Page 23: ...o return to the main menu Finally hang up the phone to quit the program mode Program 01 CO setting 1 The upper row display LINE SETTING 1 The lower row display L ABCDE Default All CO line port number 10030 L 1 8 CO line port number or for all CO lines A 0 2 CO line access 0 disable 1 enable 2 COID B 0 1 Dial mode 0 DTMF 1 pulse C 0 1 Auto Attendant mode 0 disable 1 enable D 0 3 Auto Attendant 0 un...

Page 24: ...e values of FGHIJ Then press to next CO line port number or press to return to the main menu Program 03 System speed dialing The upper row display ABBREVIATE CODE The lower row display XX YY XX 00 49 Speed dialing code YY Telephone number maximum 14 digits Remarks When input external call 9 must be added before the dialing number Press the TRF key for switching to next data input Programming for s...

Page 25: ...fer is set to automatic mode it will be subject to the settings of program 08 2 The setting for ringing times is related to settings in program 08 3 The time to start reckoning in this program is related to the call accounting program Program 05 System setting 2 The upper row display SYSTEM SETTING 2 The lower row display FGHIJ Default 01100 F 0 1 Transfer to operator after Auto Attendant announce...

Page 26: ...e at station port 001 only 0 no 1 yes Programming for single line phone Enter the values of KLMNO and then press to return to the main menu Notes The setting of three minutes alert tone in this item is related to program 22 Program 07 System setting 4 The upper row display SYSTEM SETTING 4 The lower row display PQRST Default 00010 P 0 1 Mode of call charges display on feature phone 0 non removable...

Page 27: ... per CO line 0 Not allow 1 Allow Programming for single line phone Enter extension port number and then press key enter the values of XXXXXXXX Then press key to enter next extension port number or press the key to return to the main menu Program 10 Outgoing call setting Night mode The upper row display NGT LINE OUT SET The lower row display TELXXX XXXXXXXX Default All extension 11111111 TELXXX 001...

Page 28: ...ension port number represent all extensions XXXXXXXX 0 1 Ringing assignment of incoming call 0 Disable 1 Enable Programming for single line phone Enter extension port number and then press key enter the values of XXXXXXXX Then press key to enter next extension port number or press the key to return to the main menu Program 13 Setting of delay ringing DISA setting The upper row display LINE RING DE...

Page 29: ...program 16 code B Open the telephone number set in program 17 code C 4 Class 4 Restrict the telephone number set in program 15 code A program 16 code B and program 17 code C 5 Class 5 Restrict the telephone number set in program 15 code A program 16 code B and program 17 code C Open the telephone number set in program 18 code D 6 Class 6 Only for internal call Programming for single line phone Ent...

Page 30: ...ODE C The lower row display XX YYYYYYYY XX 01 12 Group number YYYYYYYY Unrest CODE max 8 digits Programming for single line phone Enter group number and then press key enter unrest code Then press key to next group number or press key to return to the main menu Program 18 Public restriction code D The upper row displays COM UNRES CODE D The lower row display XX YYYY Default 01 110 02 112 03 199 XX...

Page 31: ...am 20 Account code setting The upper row display PERSONAL PASSWORD The lower row display AAA BBBBBB C D AAA 001 255 Account code number BBBBBB Password of account code C 1 6 Class of service refer to program 14 D 1 4 Class of CO line access refer to program 13 Programming for single line phone Set Enter Access code number and then press key enter DISA password and then press key enter Class of ser...

Page 32: ...ress to return to the main menu Program 22 Extension setting 1 The upper row display EXT SETTING 1 The lower row display TELXXX ABCDE Default All extensions 30000 TELXXX 001 048 Extension port number represent all extensions A 0 3 Call waiting alert 0 Internal call OFF and external call OFF 1 Internal call ON and external call OFF 2 Internal call OFF and external call ON 3 internal call ON and ext...

Page 33: ...of ABCDE Then press key to enter next extension port number or press to return to the main menu dial tone will be heard again Program 24 Pickup group assignment The upper row display PICKUP GROUP The lower row display A TELXXX B Default All extensions is group 1 A 1 4 Pickup group number TELXXX 001 048 Extension port number represent all extensions B Set and Cancel 1 Set 0 Cancel There are totally...

Page 34: ...nd then transfer the calls to executor by secretary Programming for single line phone Enter the group number and then press key enter extension port number for boss and then press key enter extension port number of secretary Finally press the key to return to the main menu dial tone will be heard again Remark To enable this feature Boss s must enable DND feature Program 26 System password The uppe...

Page 35: ...een two lines The present extension must select between extension ports 001 008 and the selected should be leisure port Programming for single line phone Enter DISA port number and then press the key Note Single line phone is not allow to set operator in this program Program 28 Initialize the system The upper row display SYSTEM RESET The lower row display X X 1 for initialize warning all data will...

Page 36: ...rs by simple step to enter under this program and then press TRF key 2 times Programming for single line phone Enter extension port number press the key and new extension number 2 to 4 digits Finally to press key to restore new data then return to the main menu Program 30 Unit price setting of international distance call For feature phone only Advance setting please refer supplementary document in...

Page 37: ...me Enter XXX and then press HOLD key to display the charges of specify time and then press TRF key Program 34 Review password of extension lock For feature phone only The upper row display password The lower row display XXX XXX Extension port number password is behind Enter station port number 001 048 and then press TRF key to shows the password at upper row Program 35 Review system charge countin...

Page 38: ...inputting methods 1 Extension port number 001 048 2 Account code number 001 255 3 DISA Trunk to Trunk access code 1 8 Set Enter XXX press TRF key or HOLD key and then enter charges of call from 0000 00 to 9999 99 and then press HOLD key to store Cancel Enter XXX press TRF key or HOLD key and then press CLEAR key and then press HOLD key to store ...

Page 39: ...e g 11100 F 0 1 Transfer to operator after Auto Attendant announcement 0 No 1 Yes Program 27 DID Console 1 001 1st operator extension Console 2 002 2nd operation extension Console 3 no 3rd operation extension Operation Recording the announcement of AA for TEL001 only Feature phone Single line phone Normal mode Lift handset 7851 Recording prompt Play lift handset 7861 Lift handset 7851 Recording pr...

Page 40: ...m 22 TELXXX ABCDE e g 31000 B Display the Caller ID function 0 disable 1 enable Remark After programming shut down the system once Operation Review Caller ID Max storage 50 tel no Don t lift handset press After display the Caller ID press for down press for up press show the date time of call Depends on single phone operation Remark System support FSK DTMF station support DTMF only iii How to assi...

Page 41: ... staff no allow country long distance call TEL007 for engineer allow dial to Shenzhen factory only TEL008 016 for general staff dial local call only Programming Program 14 001 66 002 14 005 34 006 24 007 54 008 016 44 Program 15 01 00 country long distance code Program 16 01 0 area long distance code Program 17 010 Beijing area code 021 Shanghai area code Program 18 0755 Shenzhen area code iv How ...

Page 42: ...m connected 8 CO line DISA setting EXT 125 128 125 Class1 126 Class 2 127 Class 3 128 Class 4 refer program 21 XXXXXXXX CO line access 0 Not allow 1 Allow Remark This feature must work with AA feature Operation When hearing the announcement of AA press and then key in the password of DISA If the password is valid press 9 Tel number After successfully make a conversation system will have alert sign...

Page 43: ... for Printer connection P 0 1 Mode of call charges display on feature phone 0 non removable 1 removable Q 0 1 Printer line feed control 0 Enable 1 Disable R 0 1 Print out port selection 0 Parallel port 1 Serial port RS232 S 0 1 Timer of SMDR printing 0 Automatic 1 Manual and over capacity T 0 1 SMDR print out selection 0 Long distance and domestic distance calls 1 All calls Sample SMDR format User...

Page 44: ... Ext no 1 Busy Press 71 Ext no 2 Lift handset 71 Ext no 2 No Answer Press 71 Ext no 3 Lift handset 71 Ext no 3 Call Forwarding Internal only Busy and No Answer Press 71 Ext no 4 Lift handset 71 Ext no 4 Call Forwarding Reset Press 79 Lift handset 79 Call Pick up Press 40 Lift handset 40 Clock Setting Press 771 HHMM 24 hour Lift handset 771 HHMM Call Conference When making conversation with 1st par...

Page 45: ...ne no Lift handset 53 Ext no Normal Lift handset 7851 Recording prompt Play lift handset 7861 Lift handset 7851 Recording prompt Hang up Play lift handset 7861 Busy Lift handset 7852 Recording prompt Play lift handset 7862 Lift handset 7852 Recording prompt Hang up Play lift handset 7862 Record announcement at Auto Attendant Operation at TEL 001 only No Answer Lift handset 7853 Recording prompt Pl...

Page 46: ... access code 00 49 Lift handset access code 00 49 System Paging External speaker Press Lift handset 63 Transfer Call Press Ext no Hang up Press Ext no Hang up Trunk Queuing Press 6 when hearing the busy sound of Co line Same as feature phone ...

Page 47: ...hown as below z System down z One of station fault z One of CO line fault Fault Isolation Flowcharts START Is the system completely non operational Call your technical support Is it a station no dial tone Is it a CO line no dial tone Go to 1 1 Go to 1 2 Go to 1 3 ...

Page 48: ...e set fault Step 2 Check the wiring between telephone to station terminal Step 3 Check the wiring between station terminal to station port terminal Step 4 Check the station port Step 5 Check the telephone set Step 6 Check the handset Step 7 Call your technical support Feature phone is using 4 wires connection standard phone is using 2 wires connection 1 3 CO Line Dial Tone Faults Step 1 Check CO l...

Reviews: