background image

Signamax Connectivity System                                                                     065-9013


www.signamax-us.com


www.signamax-eu.com


14


Line1                2-1-1-2 
Proxy    Port                             


xxxx  


Select                                    Back


Proxy  Port 
xxxx 
 
OK      123    4/6    Clear

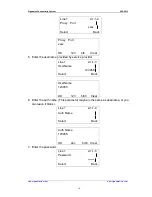
5.   Enter the username provided by service provider. 

Line1                2-1-1-3 
UserName                                 

                   123456 

Select                                    Back


UserName 
123456         
                       
OK      123    6/40   Clear

6.   Enter the auth name ( This parameter maybe is the same as username, or you 

can leave it blank ). 

Line1                2-1-1-4 
Auth Name                               


Select                                    Back


Auth Name 
123456       
                                     
OK            abc          6/40    Clear

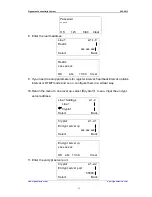
7.   Enter the password.   

Line1                2-1-1-5 
Password                                   

                     ****** 

Select                                    Back


Summary of Contents for 065-9013

Page 1: ...Signamax Connectivity System 065 9013 www signamax us com www signamax eu com 1 Signamax Connectivity Systems VoIP IP Phone Model 065 9013 User s Manual ...

Page 2: ...SCRIPTION 7 3 PHONE CONFIGURATION 10 3 1 NETWORK CONFIGURATION 10 3 1 1 Select IP Addressing Mode 10 3 1 2 Configure Network Parameters 11 3 1 3 Review Network Parameters 12 3 2 USER ACCOUNT CONFIGURATION 13 3 3 CHANGE PASSWORDS OF USER AND ROOT 17 3 4 CONFIGURE THE PARAMETERS OF UPGRADE AND UPGRADE 18 3 5 FACTORY SETTINGS 21 3 6 CONFIGURE BY WEB BROWSER 21 4 PHONE FUNCTIONS OPERATION 28 4 1 CALL ...

Page 3: ... 31 4 1 12 Do Not Disturb DND 31 4 1 13 Mute 31 4 2 TIME SETTING 32 4 3 RING VOLUME AND SIDETONE 33 4 4 SPEVOLUME OF CALL ADJUSTING 35 4 5 PHONEBOOK 35 4 6 CALL LOG 36 4 7 MESSAGE AND RECORD 37 4 7 1 Message 37 4 7 2 Recording Function 38 4 7 3 Recording Message Specifications 38 4 8 NETWORK CHECKING 38 4 9 PHONE LOGO 38 4 10 PHONE LOCK 38 4 11 HARDWARE EXAMINATION 39 4 12 PROVISION 39 ...

Page 4: ...wer adaptor User s manual 1 1 2 Optional RJ 45 Ethernet cable Headset CD 1 2 Support Protocol SIP RFC3261 DTMF inband RFC2833 SIP Info RTP RFC1889 RTCP RFC3605 RFC3611 DNS RFC1035 FTP RFC959 TFTP RFC1350 HTTP RFC1945 RFC2616 SNTP RFC1361 RFC2030 SNMP RFC1157 STUN RFC3489 DHCP RFC2131 RFC2132 PPPoE RFC2516 NAT RFC1631 RFC2663 1 3 Support Codec G 711a G 711µ G 722 G 723 1 5 3 6 3 G 729AB ...

Page 5: ...3 10 100 Base T Power Adaptor Input 110 250V Output 5V DC 1A Keypad 36keys LCD 4x20 char based white backlight LED 2 Leds 1 4 2 Optional Data Memory 16MB 32MB SDRAM Software Memory 4MB 8MB Flash memory PoE 802 3af LCD 128x64 Pixel base with blue white backlight Headset Port RJ 7 or 3 5mm plug set 1 5 Environment Operating Temperature 0 to 50 32 to 122 Storage Temperature 10 to 60 14 to 140 Relativ...

Page 6: ......

Page 7: ...ing text shown on the bottom left of the screen Cancel Back Exit or NO Quit the menu Cancel the changes made Delete input digit character W Move the pointer to the option above When editing move the cursor to the left 3 X Move the pointer to the option below When editing move the cursor to the right MIC 4 VOL When pick up the handset adjust the handset volume When press hands free adjust the speak...

Page 8: ...ck the phone s IP in idle mode 8 TRANSFER Transfer the call during a call 9 FORWARD Enter call forward setting menu 10 DND Enable Do Not Disturb function LINE1 LINE2 11 LINE3 Receive the new call during the call Make a new call during the call Switch between different conversations 12 CONF Diagnose network status when in idle mode Establish platform supported conference call 13 PHONEBOOK Add searc...

Page 9: ...g 1 a b c A B C 2 d e f D E F 3 g h I G H I 4 j k l J K L 5 m n o M N O 6 p q r s P Q R S 7 t u v T U V 8 w x y z W X Y Z 9 blank 0 19 CCITT keys while entering words press number key successively until the desired character appears Press after telephone number entered to ensure to dial out the number LINK LED Turn on if service is not available 20 MESSAGE LED Turn on when there is new voice mail ...

Page 10: ...our phone a static IP or the DHCP function has been disabled generally enterprise users having LAN network use this mode please refer to Static Mode If the network administrator has enabled the DHCP function and the phone get IP address by DHCP please refer to DHCP Mode If you connect to the Internet directly by ADSL most home users and company users without LAN use this mode please refer to PPPoE...

Page 11: ...r the network parameters by the telephone keypad 1 Enter the IP address It is default separated into 4 parts each part consists of 3 digits For example 192 168 1 58 can be entered as in sequence as 1921681 RIGHT 58 or 1921681 58 Ext ip address 192 168 1 58 OK Back 2 Enter the gateway address Ext gw address 192 168 1 4 OK Back 3 Enter the subnet mask address Ext subnet mask 255 255 255 0 OK Back 4 ...

Page 12: ...lect Back 2 Enter the PPPoE user ID provided by the service provider The username for example below is user PPPoE user ID User OK abc 4 40 Back 3 Enter the password Password OK abc 6 40 Clear 4 Return and reboot the phone The LCD will be displaying PPPoE connecting until registration succeeds If not the phone will prompt to reconnect again PPPoE connecting If fail please check your configuration o...

Page 13: ...he main menu and select Root menu And enter the root password Settings 2 User Root Select Back Password OK 123 6 20 Back 2 Enter Line1 Settings menu select Line1 menu Root 2 1 Line1 Settings Select Back Line1 Settings 2 1 1 Line1 Crypto1 Select Back 3 Enter the proxy server edit mode then input the proxy server address Line1 2 1 1 1 Proxy Server xxx xxx xxx Select Back Proxy Server xxx xxx xxx OK ...

Page 14: ...Clear 5 Enter the username provided by service provider Line1 2 1 1 3 UserName 123456 Select Back UserName 123456 OK 123 6 40 Clear 6 Enter the auth name This parameter maybe is the same as username or you can leave it blank Line1 2 1 1 4 Auth Name Select Back Auth Name 123456 OK abc 6 40 Clear 7 Enter the password Line1 2 1 1 5 Password Select Back ...

Page 15: ...ters for register interval heartbeat interval options interval or DTMF mode and so on configure them in a similar way 10 Return the menu to one level up select Crypto1 menu input the encrypt server address Line1 Settings 2 1 2 Line1 Crypto1 Select Back Crypto1 2 1 2 1 Encrypt server ip xxx xxx xxx Select Back Encrypt server ip xxx xxx xxx OK abc 11 49 Clear 11 Enter the encrypt server port Crypto1...

Page 16: ...t Back Sip Encrypt depth 256 OK 123 3 10 Clear 13 Select the Cryptographic algorithm Crypto1 2 1 2 4 SIP crypt None Select Back SIP crypt 2 1 2 4 2 None AES Select Back 14 Return the menu to one level up select Forward1 menu to configure forward parameters Line1 Settings 2 1 3 Crypto1 Forward1 Select Back Forward1 2 1 3 1 Forward Type None Select Back 15 Select a forward type from None All Busy No...

Page 17: ...igure Line2 and Line3 in similar way Please set the switch of Line2 and or Line3 to on if you want to enable Line2 and or Line3 If not please set them to off Line2 Settings 2 2 1 Sip Switch2 On Select Back 18 Return to reboot the telephone If the registration is successful the U on the upper left corner of LCD will be disappeared the link led will be turned off the telephone is ready for making ca...

Page 18: ......

Page 19: ... config 1 1 Use default Yes Select Back If you want to set the route by yourself or set it to another address please change Use default to No Use dafault 1 1 1 No Yes Select Back Enter the update server address Update config 1 2 FTP Serveraddr xxx xxx xxx Select Back FTP Serveraddr xxx xxx xxx OK abc 11 30 Clear Enter the update server port Update config 1 3 FTP Port 21 Select Back FTP Port 21 OK ...

Page 20: ...onfig 1 5 FTP User user Select Back FTP User user OK abc 4 30 Clear Enter the password of server Update config 1 6 FTP Password password Select Back FTP Password password OK abc 8 30 Clear 4 Make sure that the parameters are correct then back to select Update and press OK the phone will connect the update FTP server to check version of program and upgrade Update 1 Update config Update Select Back ...

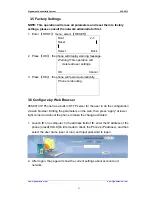
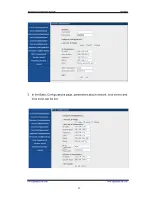
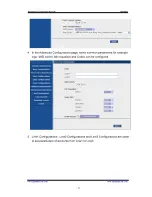
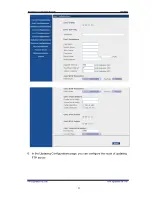
Page 21: ...ess OK the phone will restart automatically Phone is rebooting 3 6 Configure by Web Browser 065 9013 IP Phone has a built in HTTP server for the user to do the configuration via web browser Editing the parameters on the web then press apply at lower right corner and reboot the phone to make the change activated 1 Launch IE on a computer In the address field of IE enter the IP address of the phone ...

Page 22: ......

Page 23: ......

Page 24: ......

Page 25: ......

Page 26: ......

Page 27: ......

Page 28: ...mber will be limited by the dial plan Pick up the handset 1 Dialing 00 00 00 2 Idle 3 Idle During calling 1 Calling 00 00 00 1234567 2 Idle 3 Idle Dialed number connected 1 Connected 00 00 04 1234567 2 Idle 3 Idle Called party hangs up 1 Closed 00 00 00 1234567 2 Idle 3 Idle Call failed 1 Fail 00 00 00 1234567 2 Idle 3 Idle 2 Make a call from phonebook also refer section 4 5 for editing phonebook ...

Page 29: ...r dialed 4 1 3 Speed Dial In idle mode press SPEED DIAL to enter speed dial menu Select an empty item which shows None and at the bottom of this item Speed Dial Num 0 means its speed dial number is 0 Press OK and input telephone number then return There are total 10 speed dial memory locations from 0 to 9 1 None Speed Dial Num 0 Select Back Reset Speed Dial 123457 OK 123 6 20 Clear 1 123457 Speed ...

Page 30: ...e 4 1 5 Call Hold During a call press HOLD to put the call on hold Press HOLD again to resume the call 1 Holding 00 00 00 1234567 2 Idle 3 Idle 4 1 6 Call Transfer During a call press TRANSFER and enter the phone number to which you want the call to be transferred then press to transfer the call NOTE The usages of TRANSFER may be different according to different VoIP service providers Please consu...

Page 31: ...e line as LCD indicated The original call is put on hold press the corresponding LINE to Switch between different conversations 4 1 10 3 way Conference If the user want to make a conference for three persons first establish call with A press another LINE and dial to B then press OK to establish the conference call 4 1 11 Conference Function This function needs platform support First establish call...

Page 32: ...ate by entering year month and day User 1 3 Clock Select Back Clock 1 3 1 Date Fri 2006 08 04 Select Back ٛ ٛ ٛ ٛ ٛ ٛ ٛ ٛ ٛ ٛ ٛ ٛ ٛ ٛ ٛ ٛ ٛ ٛ ٛ ٛ ٛ ٛ ٛ ٛ ٛ ٛ ٛ ٛ ٛ ٛ ٛ ٛ ٛ ٛ ٛ ٛ ٛ ٛ ٛ ٛ ٛ ٛ ٛ Current date 2006 08 04 OK Back 2 Select Time Set the time by entering hour minute and second Clock 1 3 2 Time 15 36 18 Select Back Current time 15 36 18 OK Back 3 Select GMT offset The default is 08 00 meani...

Page 33: ...1 3 4 SNTP Server time nw nist gov Select Back SNTP Server 1 3 4 8 time nw nist gov Select Back 5 Select Synchronization The phone will start synchronizing with the network time server Clock 1 3 5 Synchronization Select Back Time synchronizing 4 3 Ring Volume and Sidetone 1 In idle mode enter the User menu and select Tones Press OK again to enter Ringing tone menu Select the ringer type type 1 to ...

Page 34: ...Select Back 2 Select Ringing volume User can select the volume level from level 1 to level 5 Tones 1 2 2 Ringing volume Level 2 Select Back 1 2 2 1 Level1 Level2 Select Back 3 Incoming call alert Tones 1 2 3 Incoming call alert Ringing Select Back 1 2 3 1 Ringing Off Select Back 4 Adjust sidetone level 1 10 and off Tones 1 2 4 Sidetone Volume Off Select Back ...

Page 35: ...ebook In idle mode press PHONEBOOK to enter phonebook menu 1 Select ADD to add new entry to the phonebook You are prompted to input name If no name is entered it will be saved as Noname Then edit telephone number and mobile number At least input one number or the item will not be saved Name 2 Search Add Select Back Name _ OK abc 0 19 Back Tel _ OK 123 0 20 Back Mobile _ OK 123 0 20 Back 2 Select S...

Page 36: ... one All Select Back 4 6 Call Log 1 In idle mode press CALL LOG to enter the call log menu Select missed calls received calls or dialed call list Call 1 Missed 1 60 Received 29 60 Select Back Missed 1 123456 08 04 2006 17 04 52 Select Back 2 While an entry is selected press OK to enter the edit mode The edit mode has 4 options SAVE EDIT ERASE and EMPTY LOG No 123457 1 save edit Select Back No 1234...

Page 37: ...t will prompt you to confirm if you want to empty the all entries of the selected call log NOTE The operation will delete all entries of selected log and cannot be recovered Empty log Yes No 4 7 Message and Record 4 7 1 Message 1 This function requires platform support In idle mode press MESSAGE will call directly to the mailbox of the platform and the user can hear messages recorded in his her ma...

Page 38: ...igh quality compressed digital stream Messages storage Flash memory messages will not be erased in case of power failure NOTE When rebooting the phone all recorded messages will be deleted 4 8 Network Checking In idle mode press CONF to diagnose network status The LCD will indicate the speed connecting to the server 4 9 Phone Logo Through the web browser it can configure the phone logo to be displ...

Page 39: ...ch is under Root menu If user enter the menu by mistake he she can power off the unit to exit Then power on the unit will reboot the phone back to idle mode Root 2 9 HD_TEST Select Back 4 12 Provision Provisioning is a convenient way for the service providers to configure some of the settings to specific values for all its customers The detail operation of this feature is provided in a separate ma...

Reviews: