Page 10
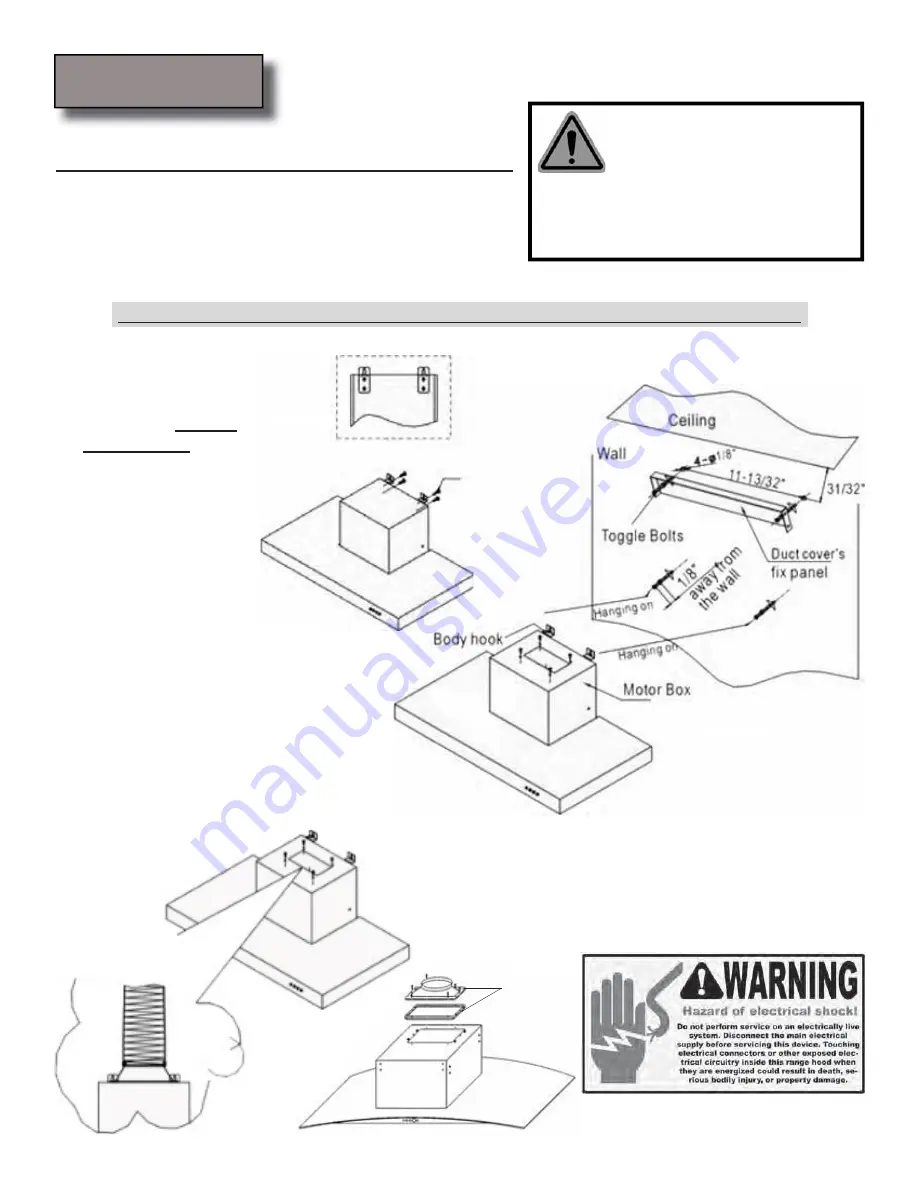
Install the Duct Set using six 4mm x 16mm Tapping
Screws, then install Aluminum Duct Tube as shown in
Figure 3A and 3B. Proceed to step 6 on Page 12.
3.
Figure 2
Installations
(refer to Page 4 for parts)
:
Due to excessive weight, two or more person is recommended for this step.
Locate an optimal location to place the range hood. Mark the
leveling points for two Body Hooks (Figure 1) on the wall and
drill two holes with diameter not exceeding 5/8”. Insert two
toggle bolts then fasten two 4mm x 16mm Tapping Screws,
reserve approximately 1/8” for the body hooks. Be sure to use appropriate anchors for your wall.
)LQGDQRSWLPDOORFD
tion for the Chimney
Mounting Bracket.
The chimney mount
ing bracket
must be
placed directly
above
DQG DOLJQ ZLWK WKH
two body hooks, see
Figure 2. Drill two
PRUH KROHV ZLWK GL
ameter not exceeding
5/8” and insert two
toggle bolts. Secure
the chimney mount
ing bracket with two
4mm x 16mm Tapping Screws as shown
in Figure 2. Be sure to use appropriate an
chors for your wall. Use four sets of 5mm
x 16mm Screw with Washer to install the
body hooks onto the hood. Then hang the
KRRGRQWKHZDOODQGWLJKWHQWKHVFUHZV
CAUTION: MAKE SURE the range hood
is secure before releasing!
1.
2.
Figure 3A
Figure 1
Duct Set
Install the Duct Set
DQG$OXPLQXPGXFW
on the body of hood.
Figure 3B
I
ll i
( f
P
4 f
Installation
If Recirculating (Non-Vented) Kit is purchased, please skip this step and proceed to Page 11.
WARNING
Excessive Weight
Require three or more person to move and
install this range hood. Spinal or other bodi-
ly injuries could occur if it is not followed.


