background image

8

W I N I F R E D

RESIN FREESTANDING TUB

SKU: 918954, 946438, 944333

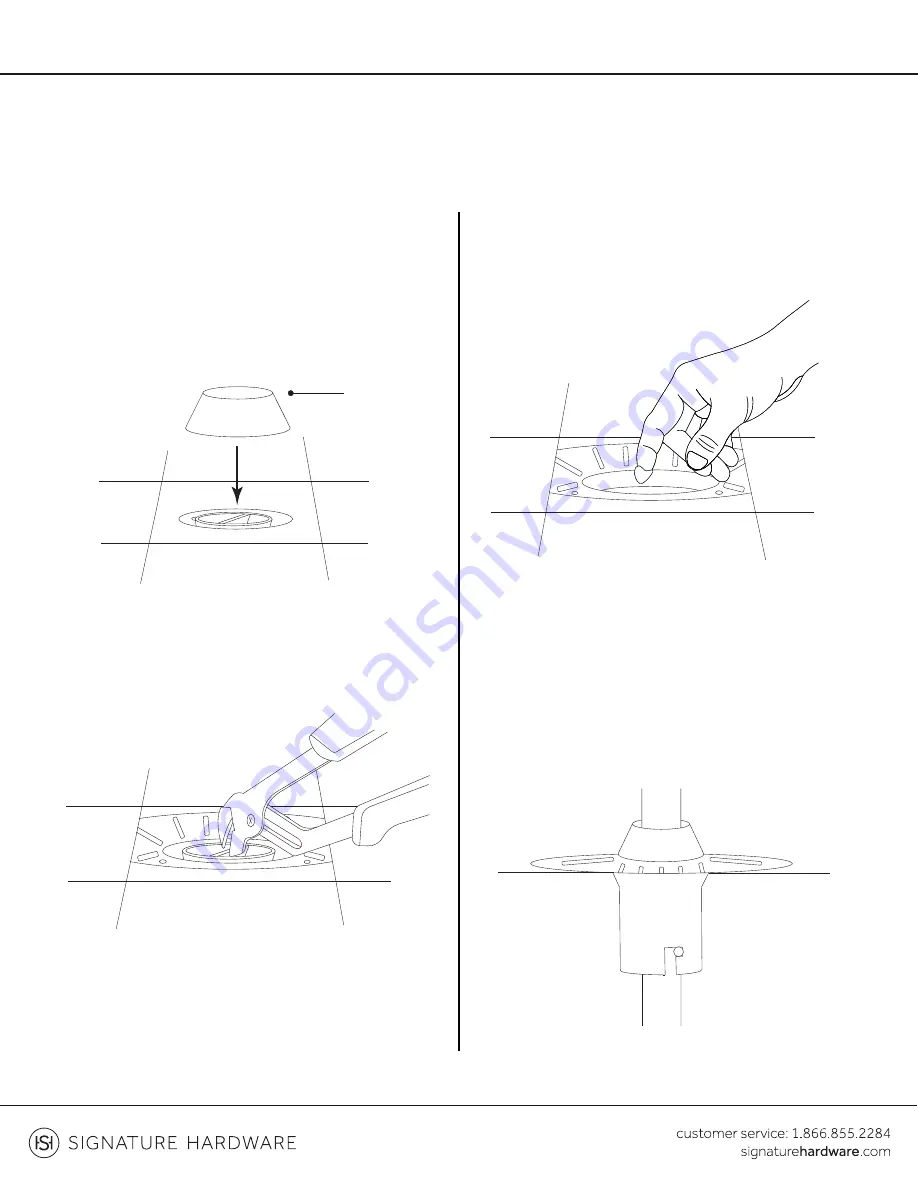
9. Install the �ooring surface, such as tile, leaving an 

opening around the drain as shown. 

Note:

 If you are installing a decorative tail piece and 

�oor �ange, install the tile and leave an opening that is 

2 1/4” diameter wide directly above the drain plug to 

ensure the �oor �ange covers the hole. 

10. Remove the drain plug with a pair of long nose 

pliers.

 Floor �ange

11. Once ready for tub installation, apply the provided 

lubricant to the rubber portion of the inside of the 

drain. 

12. A�x the appropriate tail piece to the waste and 

over�ow. Ensure the measurement between the 

base of the drain and the p-trap will accommodate 

the tail piece. 

Do not cut the brass tail piece that is 

included with the drop-in drain kit.

Note:

 If installing a freestanding tub with an exposed 

drain and over�ow, use the tail piece provided with 

the tub’s drain rather than those provided with the 

drop-in drain.


Summary of Contents for 306468

Page 1: ...all of the required materials that are needed for the installation Ensure that your bathroom oor is adequately supported and the nished oor is level Keep the plumbing connections around the tub easil...

Page 2: ...be heavy and may require assistance to rotate 1 Set the tub in the desired location and mark the drain hole location on the oor Then move the tub away from the desired installation location so that th...

Page 3: ...to check for any leaks from the connections Verify that the drain is working properly 5 Attach the anged PVC hub adapter to the exposed threads on the bottom of the tub Use a small amount of silicone...

Page 4: ...SLAB FLOOR INSTALLATION Moving blanket TOP BOTTOM 3 Place a level across the bottom of the tub to represent oor level Raise adjustable leveling supports to touch level Then raise the support an addit...

Page 5: ...of silicone on the threads to act as sealant Allow the silicone to dry fully 7 Turn the tub to upright position Then apply PVC primer and cement to the female end of hub adapter and to male PVC pipe r...

Page 6: ...r installation by running a bead of neutral cure silicone sealant around the base of the tub where it meets the oor Wipe away any excess sealant with a damp cloth INSTALLATION WITH QUICK CONNECT DRAIN...

Page 7: ...e of the p trap per manufac turer instructions Insert the pipe rmly into the p trap until cement is bonded 2 3 4 5 6 7 5 Apply PVC primer and cement to the outside of the PVC pipe and to the inside of...

Page 8: ...in plug with a pair of long nose pliers Floor ange 11 Once ready for tub installation apply the provided lubricant to the rubber portion of the inside of the drain 12 A x the appropriate tail piece to...

Page 9: ...o length by measuring from tub drain connec tion Make sure the measurement extends 2 past the bottom of the drop in drain tting 13 Apply the provided lubricant to the entire tail piece being used Posi...

Page 10: ...rub over the surface of the scratch to smooth and blend 4 Dry with a towel 5 Polish the surface with a cloth and a polishing compound Any automobile polishing compound will su ce For gloss resin surfa...

Reviews: