3.5 Power On
• Keep fingers away from the platen when the cutting
plotter is in operation.
• Keep loose clothing, hair, and any other items away from the grid
drum when the cutting plotter is in operation.
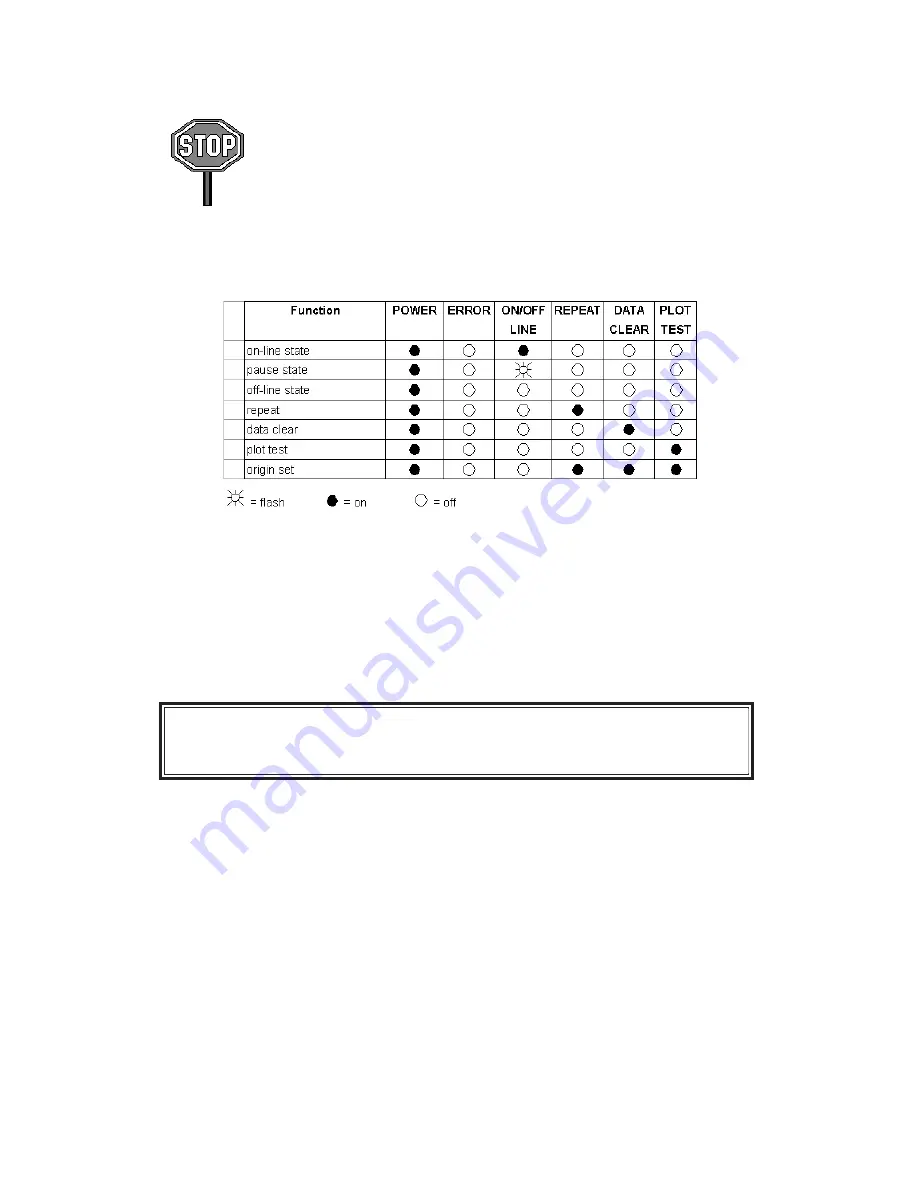
Turn on the power on the left side of the cutting plotter and the POWER LED will light up.
Notice: It will take about 10 sec. to initialize the machine; then the cutting plotter will be
ready to receive data from a computer. Refer to the following chart to understand what
represented by each light on the control panel.
3-8
3.6 ON/OFF LINE Key
**On line
When the machine is under the “
ON LINE
” condition, the ON/OFF LINE LED lights up.
The cutting plotter is ready to receive data from the host computer. At this moment, only
“PAUSE” and “ON/OFF LINE” keys are valid.
**Change the setting value
1. Press the
PAUSE key.
Then switch the DIP to
change the value settings.
2. Press the
ON/OFF LINE key
to valid the new settings and to
continue cutting.
**Terminate the cutting & clear the data in the buffer
1. Press the
ON/OFF LINE
or
PAUSE
key
2. Then press the
DATA CLEAR
key
**Off - line
When the machine is in
“OFF LINE” mode
, the
ON/OFF LED
doesn’t light up. At this
moment, you can switch the DIP settings, make a plot test to adjust the cutting pressure
and set a new origin. Pressing the button again will let the cutting plotter switch back to
“ON LINE” condition, and resume the suspended operation. However, there might be
some data loss during this interruption.
3.7 PAUSE Key
The purpose of the “
PAUSE
” key is to temporarily terminate the motion of the cutting
plotter after it starts cutting. At this moment, the
ON/OFF LINE LED
is flashing; you can
change the DIP Switches settings and the cutting force. It will resume cutting after the
ON/OFF LINE
key is pressed, to return the machine back to on-line status.
Note :
The parameters of the DIP Switch can not be changed while cutting unless you press
the “
PAUSE
” key. After pressing the “
PAUSE
” key, you can change the settings
.


