76
77
Maintenance
Maintenance
Routine maintenance
A Media installation
1
CHECK MEDIA
FOR WRINKLES
Check that the media is not wrinkled.
If it is wrinkled, either set the media again or feed it up to an
area without wrinkles.
* Printing on wrinkled media may damage the nozzle
surfaces.
B Start maintenance (capping unit cleaning, normal cleaning)
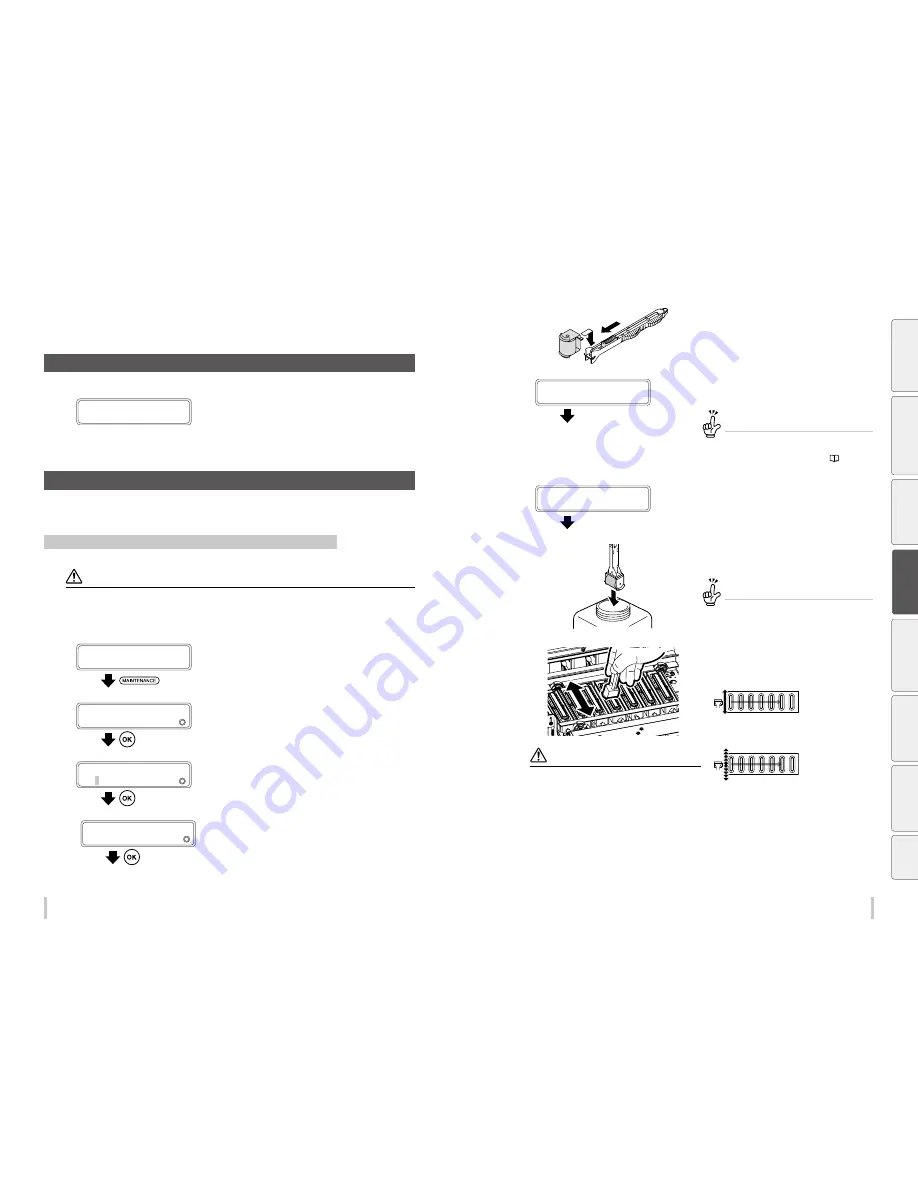
Select START MAINTENANCE on the panel and follow the instructions to perform both capping unit cleaning and
normal cleaning at the same time. You may also perform normal cleaning only in this manner.
Performing capping unit cleaning and normal cleaning at the same time
CAUTION
To prevent the ink from drying inside the print head’s nozzles:
- Do not leave the printer with the carriage detached from the capping unit.
- Complete the capping unit cleaning operation and cap the print heads within 5 minutes.
1
PRINTER READY
01: PAPER / 1626mm
Press the
MAINTENANCE
key.
2
MAINTENANCE
2
START MAINTENANCE
Press the
OK
key.
3
>START MAINTENANCE
2
OK?
Press the
OK
key.
4
>START CAP MAINT?
OK/CANCEL
Press the
OK
key to start the operation.
To cancel the operation, press the
CANCEL
key.
5
(1)
(2)
Attach the cleaning roller to the cleaning
stick.
6
1ST WIPING OPERATION
PLEASE WAIT
1:00
Carriage stops moving.
After the wiping of the print heads finishes, the carriage
moves to the maintenance area.
The printer issues a warning beep.
When the carriage moves, the printer issues a
warning beep.
To disable the warning beep, see the
page
149
.
7
OPEN COVERS
AND CLEAN CAPS
After the carriage has moved to the
maintenance area, open the front cover, and
then the capping cover.
8
Soak the cleaning roller in the cap cleaning
liquid.
TIP
To keep the cap cleaning liquid clean, do not soak
the cleaning roller in the cap cleaning liquid bottle
again after you have cleaned the caps with it.
9
CAUTION
Be careful so that the cap cleaning liquid does not
adhere to any part other than the caps.
The cleaning roller is intended for a single use only. Use
a new cleaning roller for each cleaning.
If the caps are not completely clean after one cleaning
operation, use a new roller and clean the caps again.
With the 6 color specification printer, the rightmost cap
does not need do be cleaned.
Clean the top surface of the caps by rolling
the cleaning roller.
(1) Roll the roller back and forth on each cap.
(2) Then roll the roller back and forth 10 times on each
cap.
Be
fo
re
p
rin
tin
g
Lo
adi
ng
the
m
edi
a
A
dj
us
tm
ent
M
ai
nt
enan
ce
A
dv
an
ce
d
op
er
ati
on
s
Trou
ble
sh
oo
tin
g
M
enu
tr
ee
Ap
pe
nd
ix
Summary of Contents for IP-6620
Page 112: ...222 ...


