background image

36

11

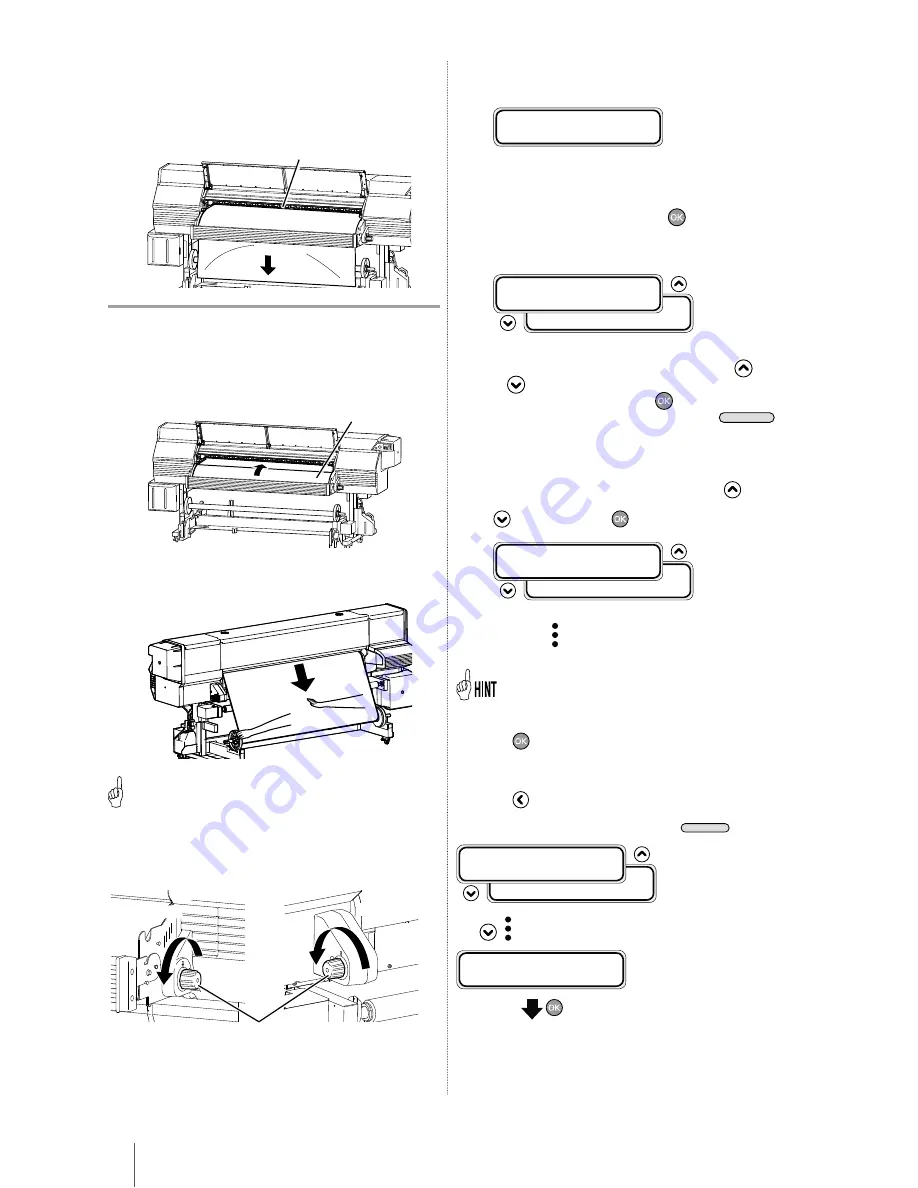
Feed the media until the media end almost 
reaches the floor.

In this state, smooth out the media toward the both 
sides on the platen to make the media center tense.

Platen

Note


-

If the media is set with a distortion or wrinkles, this may cause a 
media jam or skew.

12

Feed back the media to the top of the front 
paper guide.

Front paper guide

Feed back the media while pressing the center of 
the media gently at the supply side.

NOTICE


-

Step 12 is important to set the media properly.

13

Takeup side

Supply side

or

Pressure control knobs

Rotate the pressure control knob in the arrow 
direction to lower the pressure roller.

14

Set the media edge guards and close the front 
cover.

C H E C K   E D G E   G U A R D
* O K ?

Check that the media edge guards are not under the 
media or thick media is not caught by inserting it 
forcibly. After confirming visually that the media edge 
guards are properly set, press the 

 key.

15

Select roll media or cut-sheet media.

R O L L / S H E E T : S H E E T

S E L E C T   M E D I A
R O L L / S H E E T : R O L L

Either [roll] or [sheet] can be selected with the 

 key 

or 

 key.

Here, select [roll] and press the 

 key.

(To return to the media selection, press the 

CANCEL


key.)

16

Select the type of media.

Select the registered type of media with the 

 and 

 keys and press the 

 key. 

M E D I A : T Y P E 0 2

S E L E C T   M E D I A
M E D I A : T Y P E 0 2


To register new media

[NEW MEDIA ENTRY] is displayed at the end of the registered 
media.
Press the 

 key to enter MEDIA REG MENU.

The media registration procedure is the same as the registration 
from the registration menu.

Press the 

 key to return from the media registration menu to 

the media type selection menu.
To return to the value before input, press the 

CANCEL

 key.

M E D I A : T Y P E 0 2

S E L E C T   M E D I A
M E D I A : T Y P E 0 2


      (The registered media is displayed.)

S E L E C T   M E D I A
N E W   M E D I A   E N T R Y


 (Enter the media registration menu.)

Summary of Contents for IP-7700-20

Page 1: ...Operation panel 32 Media installation and removal 34 Roll media installation procedure 34 Procedure to install general roll media to the take up reel unit 38 Procedure to remove media from the printer 40 Ink pack installation and replacement 42 Ink pack installation replacement procedure 42 Waste ink bottle installation and replacement 43 Procedure when the waste ink bottle becomes full 43 Procedu...

Page 2: ... apply tension to the media 4 Caster Unlocked to move the printer and locked to immobilize it 5 Pressure control knob A knob to switch the media press force 6 Front cover Must be closed during printing 7 Waste ink bottle unit A unit to contain a waste ink bottle 8 Cap cover Opened when cleaning the capping unit or replacing the wiper blade 9 Wipe cover Opened when maintaining the print head replac...

Page 3: ... Printer power switch Heater power inlet Heater power switch USB connector Connected to the printer server Subcartridge An auxiliary ink for printing even during replacement of ink Take up reel switch Media feed switch P 37 Pressure control knob Scroller flange P 34 q Peel roller P 37 ...

Page 4: ...eaters for ink fusing and image quality stabilization Media Head 1 Supply side rear Takeup side front 1 LEDs Indicate printer status with ON OFF and blinking Keys Used for menu operation and other purposes of the printer 5 Buzzer 1 Preheater rear Preheats media 2 Print heater front Penetrates ink into media to fuse the ink 3 Afterheater finishing Dries ink to stabilize print quality These three he...

Page 5: ...NLINE LED Green Indicates online or offline state of the printer ON Online Blink Online pause mode OFF Offline 2 Key ONLINE key Used to select online or offline of the printer MENU key Used for auxiliary parameter input switching menu layer display CANCEL key Used to cancel entered parameters OK key Used to fix the selected menu and parameters HEATER key Used to enter heater control menu key Used ...

Page 6: ...scroller flange into each edge of the paper tube Scroller flange Roll media installation procedure The installation method of the scroller flange varies with the type weight and take up direction of the media See the tables below to install the scroller flange correctly General media Vinyl chloride media Flange spacer Required Not required 2 Insert the flange spacer between the scroller flange and...

Page 7: ...on bar and open the front cover Front cover Protection bar 8 Move the media edge guards to each side so that they are not under the media Media edge guards 9 Rotate the pressure control knob in the arrow direction to raise the pressure roller Takeup side Supply side or Pressure control knobs 10 Insert the media end into the paper feeder while smoothing out the media by hand to prevent wrinkles Pri...

Page 8: ...visually that the media edge guards are properly set press the key 15 Select roll media or cut sheet media R O L L S H E E T S H E E T S E L E C T M E D I A R O L L S H E E T R O L L Either roll or sheet can be selected with the key or key Here select roll and press the key To return to the media selection press the CANCEL key 16 Select the type of media Select the registered type of media with th...

Page 9: ...es of tension bar combinations Size used Tension bar length L 48 inches 123 cm L S 64 inches 164 cm L S S 80 inches 204 cm General media in TENSION winding mode Put a tension bar suitable for the media width Usually put a tension bar suitable for the media width with a few exceptions General media without take up reel unit Put a tension bar which is half the width of the media Vinyl chloride media...

Page 10: ...B 3 Push the scroller flange until it stops and turn the handle clockwise until the flange is fixed to the paper tube Scroller flange Handle 4 Remove the flange spacers 2 Set the take up direction switch to OFF Note If the printer processing proceeds to the next step with the take up direction switch set to ON your hand may be caught as the scroller is not secured Take up direction switch u Outer ...

Page 11: ...Then set the take up direction switch to OFF Note If the tension bar is attached without winding the media by one turn the tape will peel off 8 Advance the media with the FORM FEED MENU on the operation panel to an extent where a slack can be created Be sure to create a sufficient slack so that the tension bar is placed at the bottom of the tension bar guide 9 Open the tension bar guide s cover 10...

Page 12: ...ng up the floor Procedure to remove media from the printer 5 Set the printer to the offline state by pressing the O N L I N E key Ç I N K M E D I A R E G È Å M E D I A M A D V Æ 6 Press the key The TUR s take up switch is activated by selecting media and setting the take up direction switch to ON 7 Rotate the scroller the wind switch at the supply side to take up the media Take up reel switch T T ...

Page 13: ...p switch is activated by selecting media 3 Lift the slackened part and remove the tension bar at the supply side Peel roller Scroller Media in general Tension bar Vinyl chloride media Printer rear supply side Peel roller Tension bar S size tension bar n n bar Switch Caution Do not ratate the peel roller or the printer may be damaged 4 Rotate the pressure control knob in the arrow direction to rais...

Page 14: ...k the two holes at the end of the ink pack 1 on the ink tray s two protrusion Then insert the plate into the ink tray until a click is heard 2 2 1 New ink pack Plate Protrusion Ink tray 5 Insert the ink tray into the slot of the printer Note Insert the ink tray as far as it will go The location of ink tray is determined by color Be sure to insert each ink tray into the specified slot Ink tray 6 Cl...

Page 15: ...ttle Note Do not hit the external cover s upper part or the waste ink may spill 7 The message to select the waste ink counter reset clear is displayed B O T T L E E M P T Y N O B O T T L E E M P T Y Y E S 8 Select BOTTLE EMPTY YES and press the key Procedure when the waste ink bottle becomes full Procedure when no waste ink bottle is installed 1 Confirm that the printer recognizes no waste ink bot...

Page 16: ...cover 2 Nip the bottom edge of the wiper blade with tweezers and release the hook of the plastic projection 3 Remove the wiper blade upward 4 Nip the rubber of the new wiper blade with the tweezers and insert it straight downward and install it by hooking the hole in the rubber to the plastic projection Note When handling the wiper blade do not touch its upper part by hand or nip it with tweezers ...

Page 17: ...O R M A L 5 Select the option for cleaning with the and keys S T R O N G P H R E C O V E R Y N O R M A L 6 Press the key P H R E C O V E R Y B O T T L E O K 7 Select head numbers with the key or the key and reverse display or non display the selected head numbers with the key or the key S E L E C T 8 7 6 5 4 3 2 1 F B B O T T L E O K Note The indicated head numbers denote the heads to be cleaned 8...

Page 18: ...rough the cleaning liquid port at the lower right of the top face of the wipe unit Liquid level Cleaning liquid port If the liquid lever is below the top of the mark that can be seen inside the cleaning liquid port replenish wiper cleaning liquid to a level below the top of the mark Wiper cleaning liquid 3 Close the wipe cover and the front cover Cleaning the capping unit 1 Attach the cleaning rol...

Page 19: ... occur even after the above cleaning is performed remove foreign matters and ink stains on the cap with a cleaning swab dampened with cap cleaning liquid while checking visually Be careful so that the cap cleaning liquid does not adhere to any part other than the cap Replenishing spittoon absorber liquid 1 Open the front cover and then open the cap cover 2 Check the spittoon absorber liquid level ...

Page 20: ...moves the warning beeps 4 Open the front cover and then open the cap cover O P E N C O V E R C L E A N C A P 5 Remove the knob screw of the spittoon unit and remove the spittoon unit Spittoon unit Knob screw Note The spittoon unit contains cleaning liquid Be careful not to spill it 6 Soak the cleaning stick in the cap cleaning liquid Note Do not soak the cleaning stick that you used for cleaning i...

Page 21: ...aning swab in the cap cleaning liquid Checking visually scrub stains on the media edge guard 3 Clean the stains with a soft and clean cloth 4 Close the front cover Performing normal cleaning Select PH REC MENU from the operation panel and select NORMAL ALL for cleaning Performing nozzle print Select ADJUST MENU from the operation panel and select TEST PRINTS to perform the nozzle print Check for m...

Page 22: ... Y Y M M D D R O L L P A P E R X X X m m S E L E C T M E D I A 0 1 T Y P E 0 1 S I N G A D V E X E C U T E R E W I N D I N G M E D I A P H R E C O V E R Y N O R M A L F E E D I N G M E D I A C A P C L E A N I N G C O N F I G P R I N T N O Z Z L E P R I N T E X E C U T E L A N G U A G E J A P A N E S E H E A T E R S T A N D B Y T I M E 3 0 m i n P R I N T E R R E A D Y R O L L 1 6 2 5 P A P E R INK...

Page 23: ... BACK FWD Select a media advance mode SUCTION FAN LEVEL XX HIGH Select the force air volume of fan to suck the media to the platen AFTERHEATER T XX 30 C Set the afterheater temperature However when is set the postheater does not work PRINTHEATER T XX 40ºC Set the printheater temperature However when is set the print heater does not work PREHEATER T XX 40 C Set the preheater temperature However whe...

Page 24: ...er media Designate the copy destination in PASTE MEDIA PASTE MEDIA 01Æ02 Select the media number of copy destination M ADV MENU Menu Outline of functions SING ADV EXECUTE To determine the media advance value print the media advance correction pattern with the current value Then set the adjustment value AUTO BIDIR ADJUST EXECUTE Print a bidirectional print position adjustment pattern and enter the ...

Page 25: ... for LCD TIME ZONE GMT YY MM DD HH MM ZZZ Select a time zone LENGTH UNITS MILLIMETER Select a length unit TEMPERATURE UNITS CENTIGRADE Select a temperature unit BEEP UNCAP CARRI ON Set whether to emit a warning beep in the state below The print head is dislocated from the cap in the daily maintenance or head height adjustment The print head cannot be capped due to a media jam error during printing...

Page 26: ...el Room temperature Raise the room temperature Recommended temperature 20 to 25ºC Affect of air flow If the air from the air conditioner or fan is blowing against the paper guide avoid the air flow by changing air flow direction orientation of the printer or the location of the printer The transmitted data is not printed ONLINE LED blinking Check the host computer communication conditions Blank sh...

Page 27: ...A R T R I D G E C H E C K K I N D X X X S U B C A R T R I D G E C L O S E S U B C A R T C O V E R Waste ink bottle errors B O T T L E O U T I N S T A L L B O T T L E B O T T L E F U L L R E P L A C E B O T T L E Media jam errors W A R N I N G 0 C L E A R M E D I A J A M W A R N I N G 1 C L E A R M E D I A J A M W A R N I N G 2 C L E A R M E D I A J A M Media errors N O M E D I A L O A D E D L O A ...

Page 28: ...ng The life of the cap SUS belt and supply tube pump assembly is coming close Action Ask the service depot to replace them L O A D I N K P A C K C H A R G E I N K Meaning Ink filling from the ink tray is not yet completed Action Prepare an ink pack and perform cleaning menu When you select cleaning the ink supply menu is displayed automatically P E R F O R M P H R E C O V E R Y N O W Meaning Autom...

Reviews: