background image

17

2

3


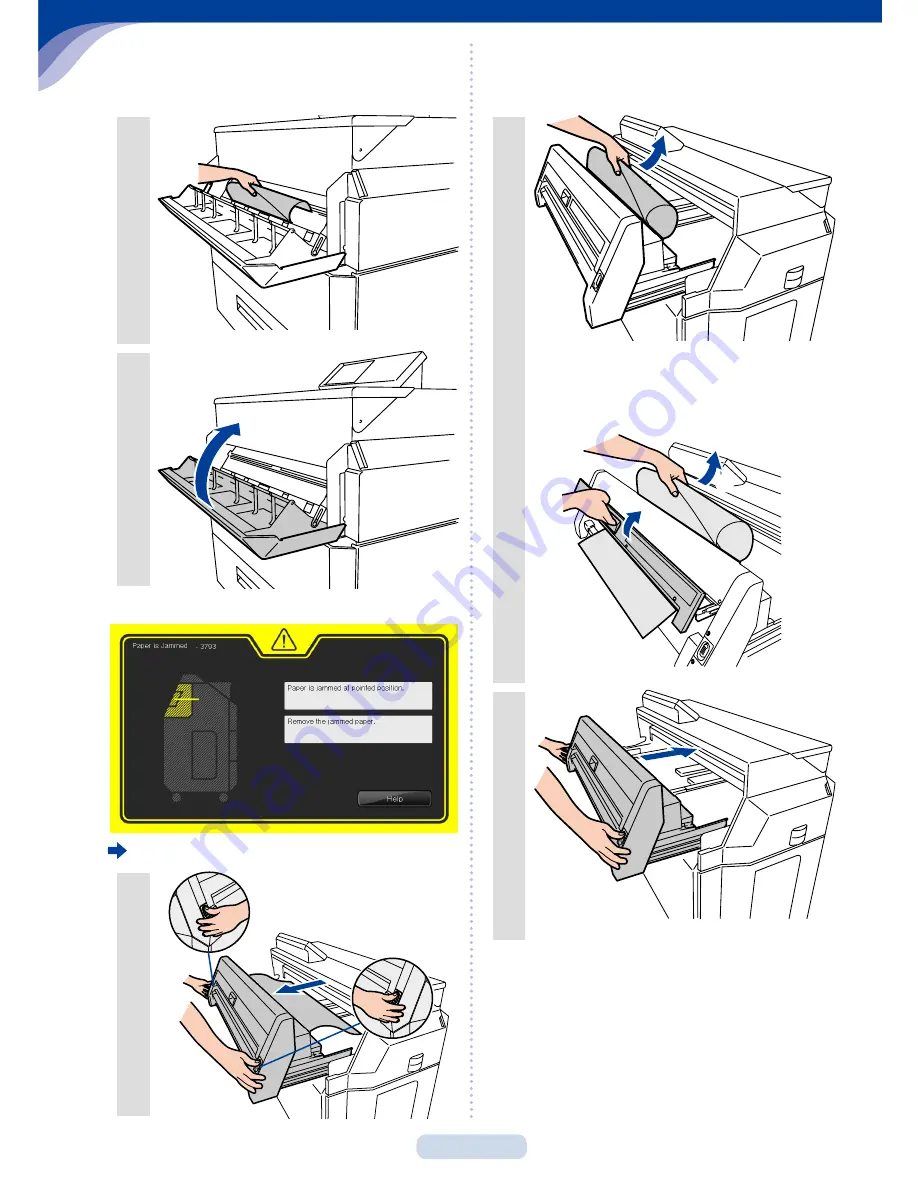
Paper jam in the Fuser unit

1

2

When you cannot pull out the paper 
easily:


3


T

Paper Jams

Summary of Contents for LP-1030

Page 1: ...eries LP 2050 Multifunction Model Printer Model LP 2050 MF To operate your Printer correctly read this manual carefullybeforeuse After reading the manual keep it in a place where you canaccessitwhenrequired Quick Reference Guide U00121382802 ...

Page 2: ...rger Unit 10 Replacing the Process Cartridge 12 Part Names 14 Paper Jams 16 Copying MF 20 Importing Images Documents to a Computer MF 21 Operating the Printer from a Computer MF 23 Troubleshooting 24 When an Error Message Appears 24 Smears on a Printout 24 Changing the Time Until Power Save Mode 24 Automatic Paper Cutting After a Certain Time 24 Automatic Paper Cutting After Opening and Closing a ...

Page 3: ...anges to submission mode and the lamp at the button s left lights up For more details see the separate User s Manual for Multifunction Printer Operation z z SCAN button MF Changes to scan mode and the lamp at the button s left lights up For more details see the separate User s Manual for Multifunction Printer Operation z z PRINT button Changes to print mode and enables printing z z MENU button Cha...

Page 4: ...4 Replacing the Paper 1 2 3 4 5 6 Ok No 7 ...

Page 5: ...5 T T Replacing the Paper 8 60 cm 23 63 inches 9 10 Approximately 90 Approximately 90 11 ...

Page 6: ...6 Replacing the Toner Cartridge 1 2 3 4 x10 x10 5 6 ...

Page 7: ...ing of Empty Toner Cartridges Put the used toner cartridge into the bag provided in the box of the new toner cartridge and dispose of it according to the local regulations T T Replacing the Toner Cartridge 7 8 ...

Page 8: ...8 Replacing the Waste Toner Bottle 1 2 x10 3 4 ...

Page 9: ...9 Disposing of Used Toner Bottles Dispose of the waste toner bottle according to the local regulations T T Replacing the Waste Toner Bottle 5 6 7 ...

Page 10: ...10 Replacing the Charger Unit 1 Press down for 1 sec or longer 2 3 4 5 6 7 ...

Page 11: ...placing the Charger Unit 8 9 10 11 TIP The charger unit can be installed in either direction If lines or other defects appear on the printout inverting the charger unit right and left sides may solve the problem ...

Page 12: ...12 Replacing the Process Cartridge 1 Press down for 1 sec or longer 2 3 4 5 6 7 8 9 ...

Page 13: ...13 T T Replacing the Process Cartridge 10 x5 x5 11 12 13 14 15 16 ...

Page 14: ...14 Part Names Front door Drawer for rolls 1 and 2 Drawer for rolls 3 and 4 Printer Model Multifunction Model Document table Toner door Scanner cover Front Side ...

Page 15: ...15 Process cartridge drawer Fuser unit drawer Filter cover Waste toner door Paper outlet slot Latch button Paper outlet cover Rear Side T T Part Names ...

Page 16: ... action is displayed in accordance with the paper jam location Open the specified door and take the appropriate action to remove the paper jam Paper jam in a Roll paper drawer 1 2 3 Paper jam in the front door 1 Paper Jams ...

Page 17: ...17 2 3 Paper jam in the Fuser unit 1 2 When you cannot pull out the paper easily 3 T T Paper Jams ...

Page 18: ...18 Paper jam in a roll paper drawer or front door 1 2 3 4 5 6 T T Paper Jams ...

Page 19: ...19 7 8 Original jam MF 1 2 3 4 5 T T Paper Jams ...

Page 20: ... Press COPY Set the original Position the original facing down Set it in the Printer aligned with the original width guide The inserted original is automatically pulled into the Printer and set Copying MF ...

Page 21: ...21 Importing Images Documents to a Computer MF 1 Double click TerioStation 2 Click the Scan tab 3 Click Save Folder 4 Select the destination folder to save the scanned data Click OK 5 Click Scan ...

Page 22: ...s and then click Scan 9 Load the original Important If Scanner is operating in another mode is displayed press SCAN on the operation panel If Color processing is not supported because the scanner being used is a dedicated monochrome device is displayed you cannot scan in color mode T T Importing Images Documents to a Computer MF ...

Page 23: ...Printer from a Computer MF 1 Start the web browser and enter http IP address set on the Printer in the address field Press Enter 2 Click English 3 Click an item from the left menu to check the settings or Printer status ...

Page 24: ...e Power Save in the Printer Engine menu Menu Printer Engine Time Before Power Save 15 minutes or 30 minutes or 60 minutes or 90 minutes or 235 minutes Automatic Paper Cutting After a Certain Time Set Top Cut Timer in the Printer Engine menu Menu Printer Engine Roll 1 Top Cut Timer or Roll 2 Top Cut Timer or Roll 3 Top Cut Timer or Roll 4 Top Cut Timer Off or 30 minutes or 1 hour or 2 hours or 4 ho...

Page 25: ...nu Menu Printer Engine Print Density Low or Slightly Low or Normal or Slightly High or High Wrinkles on Tracing Paper Set Humidity for Tracing Paper to High Humidity in the Printer Engine menu Menu Printer Engine Humidity for Tracing Paper High Humidity Selecting Paper to Match the Print Data Select Optimal at Paper Supply Mode Menu PDL settings Select the port and format Paper Parameters Paper Su...

Page 26: ...ces and Printers 2 Right click the SII LP 2050 icon and then click Printing Preferences 3 Click the Options tab 4 Click Change in the operation mode of the driver 5 Change the output process selection from Process with Printer to Process with Computer Click OK 6 Click Apply T T Troubleshooting ...

Page 27: ...e symptom persists perform the following setting operation If the problem persists 1 Perform steps 1 to 4 and open Driver Operation Mode 2 Set the resolution of the printer driver to 200dpi or 100dpi Click OK T T Troubleshooting ...

Page 28: ...28 3 Click Apply 4 Click OK 5 Print The User s Manuals and driver are on the supplied CD ROM T T Troubleshooting ...

Page 29: ...you get the most from your Teriostar LP 2050 Series Printer For details contact your dealer or nearest service representative http www seiko i com Disposal Method Dispose of the used toner cartridges and waste toner bottles according to the local regulations ...

Page 30: ...anual may cause harmful interference to radio communications Operation of this equipment in a residential area is likely to cause harmful interference in which case the user will be required to correct the interference at his own expense The CE mark that shows that the products sold in the EU are conformed to the requirements of EC directive is statutorily obliged to be affixed to the products In ...

Reviews: