background image


7


SOFTWARE PROCEDURE 

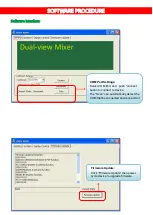
Software Interface: 


COM Port Settings: 

Select COM Port and    push 

“connect” 

button to connect to device. 

The 

“Scan” can automatically detect the 

COM that be connected and connect to it. 


Firmware Update: 

Click 

“Firmware Update” then power 

cycle device to upgrade firmware.. 


Summary of Contents for AV-GM01U3-S1

Page 1: ...Universal Video Format to HDMI Converter P N AV GM01U3 S1 ...

Page 2: ...o not attempt to service this unit yourself except where explained in this manual Provide proper ventilation and air circulation and do not use near water Keep objects that might damage the device and assure that the placement of this unit is on a stable surface Use only the power adapter and power cords and connection cables designed for this unit Do not use liquid or aerosol cleaners to clean th...

Page 3: ... and the handy audio support can make the input video and audio become HDMI ready With versatile IR remote control and push buttons AV GM01U3 S1 offers a very easy way to convert switch adjust videos at your convenience With PIP and PAP support users can display two video inputs at the same time FEATURES HDMI 1 3 HDCP 1 1 and DVI 1 0 compliant Display Port 1 1 support Scales up and down VESA compl...

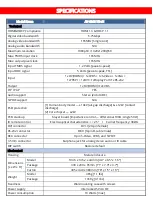
Page 4: ...y model 19kV air gap discharge 12kV contact discharge 2 Core chipset 2kV PCB stack up 6 layer board impedance control differential 100 single 50 IR remote control Electro optical characteristics 25 Carrier frequency 38kHz DVI connector DVI I 29 pin female RS 232 connector DE 9 9 pin D sub female RCA connector 9 pin S Video CVBS and S PDIF 3 5mm connector Earphone jack for analog stereo audio or IR...

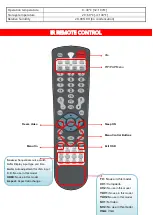
Page 5: ...dle PIP PAP Menu Sleep ON Freeze Video Source Sequential source switch Info Display input type and time Auto Auto adjustment for VGA input C C No use in this model HDMI No use in this model Aspect Aspect ratio change TV No use in this model CV1 Composite CV2 No use in this model YUV1 No use in this model YUV2 No use in this model SV1 S Video SV2 No use in this model VGA VGA ...

Page 6: ...4 The buttons not listed above are not in use for this model ...

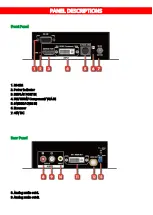
Page 7: ...5 PANEL DESCRIPTIONS Front Panel 1 RS 232 2 Power Indicator 3 DISPLAY PORT IN 4 DVI HDMI Component VGA IN 5 S VIDEO CVBS IN 6 IR sensor 7 5V DC Rear Panel 8 Analog audio out L 9 Analog audio out R ...

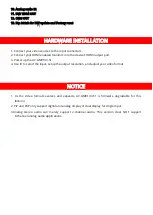
Page 8: ...put port 3 Power up the AV GM01U3 S1 4 Use IR to select the input setup the output resolution and adjust your video format NOTICE 1 As the video formats evolves and expands AV GM01U3 S1 is firmware upgradable for this fashion 2 PIP and PAP only support digital and analog display or dual display for single input 3 Analog stereo audio can merely support 2 channel audio This version does NOT support ...

Page 9: ...e COM Port Settings Select COM Port and push connect button to connect to device The Scan can automatically detect the COM that be connected and connect to it Firmware Update Click Firmware Update then power cycle device to upgrade firmware ...

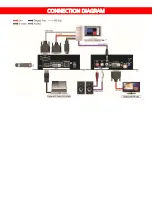
Page 10: ...8 CONNECTION DIAGRAM ...

Page 11: ...f loss or damage in transit Under no circumstances will a unit be accepted without a return authorization number The warranty is in lieu of all other warranties expressed or implied including without limitations any other implied warranty or fitness or merchantability for any particular purpose all of which are expressly disclaimed Proof of sale may be required in order to claim warranty Customers...

Page 12: ...10 April 2018 ...

Reviews: