background image

6

Hardware Installation

1.

Power off the displays, AV device and the extenders.

2.

Setup Transmitter: Connect your HDMI source to

the 

HDMI In

 using the included HDMI cable and

connect your HDMI display

*

 to the 

HDMI Out

using an HDMI cable (cable not included).

*Note

: Connecting this HDMI display is optional.

This HDMI display is needed only if you require

local monitor support.

3.

Connect the 

IR Blaster Cable

 to the transmitter's IR

blaster connector.  Skip this step if IR transmission

is not needed.

4.

Setup Receiver: Connect your HDMI display to the

HDMI Out

 using the included HDMI cable.

5.

Plug the included 

5V/2A

 power adapter into the

transmitter's 

Power Jack

; plug the 

5V/1A

 power

adapter into the receiver's 

Power Jack

; plug both

power adapters into reliable power sources.

6.

Press the power button of both transmitter and

receiver and power on all connected devices.

7.

Make sure your HDMI displays are tuned to the

correct HDMI input.

8.

Press and hold down the receiver's 

Pairing Button

,

when the 

Wireless LED

 flashes release the button.

9.

Press the transmitter's 

Pairing Button

 to establish

connection.  The 

HDMI Wireless Extender

 is ready to

use.

Summary of Contents for CE-H21U11-S1

Page 1: ...h channel hopping channel automatically changes when an interference is detected with other RF sources IR extender to control HDMI source device from the remote HDMI display end Complete kit with a Tr...

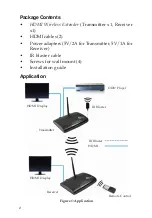
Page 2: ...x1 HDMI cables 2 Power adapters 5V 2A for Transmitter 5V 1A for Receiver IR blaster cable Screws for wall mount 4 Installation guide Application Figure 1 Application HDMI Display HDMI ODD Player HDMI...

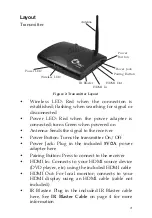
Page 3: ...power adapter here Pairing Button Press to connect to the receiver HDMI In Connects to your HDMI source device DVD player etc using the included HDMI cable HDMI Out For local monitor connects to your...

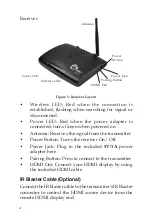
Page 4: ...r On Off Power Jack Plug in the included 5V 1A power adapter here Pairing Button Press to connect to the transmitter HDMI Out Connect your HDMI display by using the included HDMI cable IR Blaster Cabl...

Page 5: ...shield for negative voltage OD ID L DCPowerJack Refer to the table below for the specifications of the power adapter Table 1 Power Adapter Specifications 1 IR Signal 2 Ground Figure 4 1 2 Note IR cab...

Page 6: ...sion is not needed 4 Setup Receiver Connect your HDMI display to the HDMI Out using the included HDMI cable 5 Plug the included 5V 2A power adapter into the transmitter s Power Jack plug the 5V 1A pow...

Page 7: ...lide it down into position FAQ Q1 The Power LED doesn t light up A1 Makesurethepoweradaptersareproperlyinserted to the correct device 5V 2A for transmitter 5V 1A for receiver and plugged to reliable p...

Page 8: ...s extenders are powered on Make sure you are using the included HDMI cables to connect your HDMI source device to the transmitter s HDMI In and your HDMI display to the receiver s HDMI Out Q3 No audio...

Page 9: ...9 Blank Page...

Page 10: ...10 Blank Page...

Page 11: ...the store s return policy period please return the product to the store where you purchased it B If your purchase has passed the store s return policy period please follow these steps to have the prod...

Page 12: ...lifetime warranty SIIG products can be found in many computer retail stores mail order catalogs and e commerce sites in the Americas as well as through major distributors system integrators and VARs...

Reviews: