background image

8

Hardware Installation

Note: 

To achieve


optimal performance, a CAT6 cable is

recommended.

1. Power off all devices including your HDMI source
      and display.
2. Connect your HDMI source to the Transmitter's 

HDMI

IN 

connector with an HDMI cable (not included).

3. Optional: Connect the IR Blaster extension cable to

the Transmitter's 

IR Out

. Face the eye towards your

HDMI device's IR window.

4. Connect your HDMI display to the Receiver's 

HDMI

OUT

 connector with an HDMI cable (not included).

5. Optional: Connect the IR Receiver extension cable to

the Receiver's 

IR In

.

6. Connect and link the Transmitter and Receiver by a

CAT5e/6 cable.

7. Plug the included power adapters into the

Transmitter's and Receiver's

 Power Jacks

, then plug

the power adapters into reliable power outlets.

8. Power on your HDMI device and HDMI display.
9. The HDMI Extender is ready for use.

Summary of Contents for CE-H22N15-S1

Page 1: ...l clear picture quality up to 30m at 4Kx2K 60Hz up to 60m at 4Kx2K 30Hz Plug n play IR remote control feature allows to remotely control the HDMI source device from the remotedisplayside Uniqueandlowp...

Page 2: ...pecifications Version Compatible with HDMI 2 0 and HDCP 2 2 Resolution 2160p 1080p 1080i 720p 480p Audio 2 ch PCM stereo audio Connectors TX 1x 19 pin HDMI Type A Female 1x 8 pin RJ45 1x 3 5mm IR Blas...

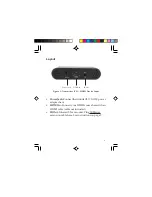
Page 3: ...n IR Out Power Jack Layout PowerJack Connecttheincluded5V 1ADCpower adapter here HDMI In Connect your HDMI source here with an HDMI cable cable not included IR Out Infrared 3 5mm socket Plug IR Blaste...

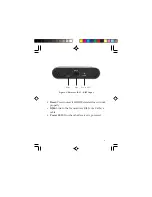
Page 4: ...er LED Figure 2 Transmitter TX RJ45 Output Reset RJ45 Reset PresstoresetifHDMIExtenderdoesn twork properly RJ45 Link to the Receiver s RJ45 via a Cat5e 6 cable Power LED On when the Transmitter is pow...

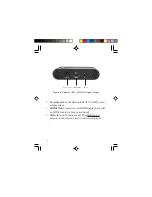
Page 5: ...eset PresstoresetifHDMIExtenderdoesn twork properly RJ45 Link to the Transmitter s RJ45 via a Cat5e 6 cable Power LED On when the Receiver is powered Figure 3 Receiver RX RJ45 Input Power LED Reset RJ...

Page 6: ...dapter here HDMIOut ConnecttoyourHDMIdisplayhere with an HDMI cable cable not included IRIn Infrared 3 5mm socket PlugIRReceiver extension cable here See instructions on page 7 Figure 4 Receiver RX HD...

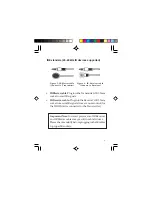
Page 7: ...rIRsockets IRBlastercable PlugintotheTransmitter sIR3 5mm socket to emit IR signals IRReceivercable PlugintotheReceiver sIR3 5mm sockettoreceiveIRsignalsfromaremotecontrol for theHDMIdeviceconnectedto...

Page 8: ...smitter s IROut Facetheeyetowardsyour HDMIdevice sIRwindow 4 ConnectyourHDMIdisplaytotheReceiver sHDMI OUT connectorwithanHDMIcable notincluded 5 Optional ConnecttheIRReceiverextensioncableto theRecei...

Page 9: ...mputers up to 197ft 60m and supports high resolutions up to 4Kx2K Figure 7 Application DVD IR OUT IR IN Receiver Transmitter TV When using the remote control please make sure its distance to the IR Re...

Page 10: ...Kresolution 3 MakesuretheNetworkcable CAT5e 6 isfirmly connected between TX and RX 4 Press the Reset button on the TX or RX Q There is black screen on the TV A 1 Check the length of the Network cable...

Page 11: ...is within the store s return policy period please return the product to the store where you purchased from B If your purchase has passed the store s return policy period please follow the steps below...

Page 12: ...I O adapters that bridge the connection between Desktop Notebooksystemsandexternalperipherals SIIGcontinuestogrowbyadding A V and Digital Signage connectivity solutions to our extensive portfolio SIIG...

Reviews: