background image

8

Step 3: Attaching the TV to the Wall Plate

Warning

: Some TVs may require two people to lift and position it onto the wall plate.  SIIG, Inc. is

NOT RESPONSIBLE for any damage or injury caused by incorrect installation, assembly or use.

1.

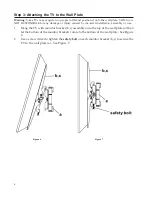
Hang the TV with monitor bracket (b,c) assembly onto the top of the wall plate (a) then

let the bottom of the monitor brackets rotate to the bottom of the wall plate.  See Figure

6.

2.

Use a screw driver to tighten the 

safety bolt

 on each monitor bracket (b, c) to secure the

TV to the wall plate (a).  See Figure 7.

Figure 6

Figure 7

Summary of Contents for Large Full-Motion TV Wall Mount

Page 1: ...lowing or understanding these installation instructions please consult a qualified installation specialist Articulating Full Motion Universal Flat Panel TV Wall Mount TV size 42 to 80 Tilt angle 10 de...

Page 2: ...increase the risk of fire Make sure no water or natural gas lines are present where the mount is to be installed Cutting or drilling into water or natural gas lines could cause personal injury or prop...

Page 3: ...crete anchor k i j x4 M6 M8 washer x6 Lag bolt o l x4 M6 M8 spacer n p m x4 M4x30 bolt x4 M4x12 bolt x1 Wall plate x1 Right monitor bracket x1 Left monitor bracket x4 M5 lock washer x4 M4 lock washer...

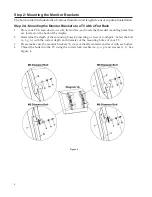
Page 4: ...ll horizontal slots that are in alignment with the wood studs See Figure 2 4 You should mark four positions total Take down the wall plate 5 Next pre drill a 5 32 hole to a depth of 3 in the wood stud...

Page 5: ...an electric drill and 3 8 masonry drill bit to a depth of 3 at the positions you marked 4 Insert a concrete anchor x into each hole 5 If necessary a hammer can be used to lightly tap each concrete an...

Page 6: ...e the threaded mounting holes that are located on the back of the display 2 Determine the depth of the mounting holes by inserting a straw or toothpick Select the bolt e f g h with the correct depth a...

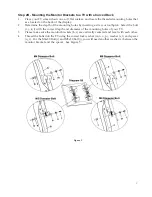
Page 7: ...inserting a straw or toothpick Select the bolt i j k l with the correct depth and diameter of the mounting holes of your TV 3 Please make sure the monitor brackets b c are vertically centered and lev...

Page 8: ...njury caused by incorrect installation assembly or use 1 Hang the TV with monitor bracket b c assembly onto the top of the wall plate a then let the bottom of the monitor brackets rotate to the bottom...

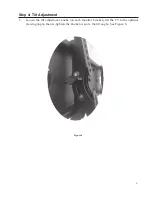
Page 9: ...9 Step 4 Tilt Adjustment 1 Loosen the tilt adjustment knobs on each monitor bracket tilt the TV to the optimal viewing angle then re tighten the knobs to secure the tilt angle See Figure 8 Figure 8...

Page 10: ...mounted to the wall mount by rotating the front plate that the TV mounts onto To make this adjustment first unmount the TV from the front plate then loosen the six bolts located on the front of the f...

Page 11: ...11 Blank Page...

Page 12: ...opofthereturnedpackage SIIGwillrefusetoacceptanyshipping package andwillnotberesponsibleforaproductreturnedwithoutanRMAnumberpostedontheoutside of the shipping carton You are responsible for the cost...

Reviews: