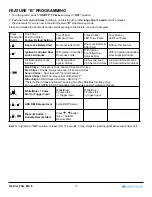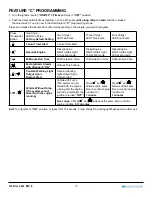
IM_FULL_55SL_REV_B
16
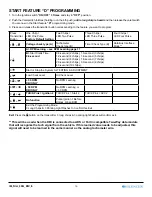
START FEATURE “D” PROGRAMMING
1. Turn the Ignition switch
“ON/OFF” 3 Times
and stay in
“OFF”
position.
2. Push the Valet switch
6
times (holding in on the 6th push)
until a long chirp is heard
and then release the valet switch.
You are now in the Start feature
“D”
programming mode.
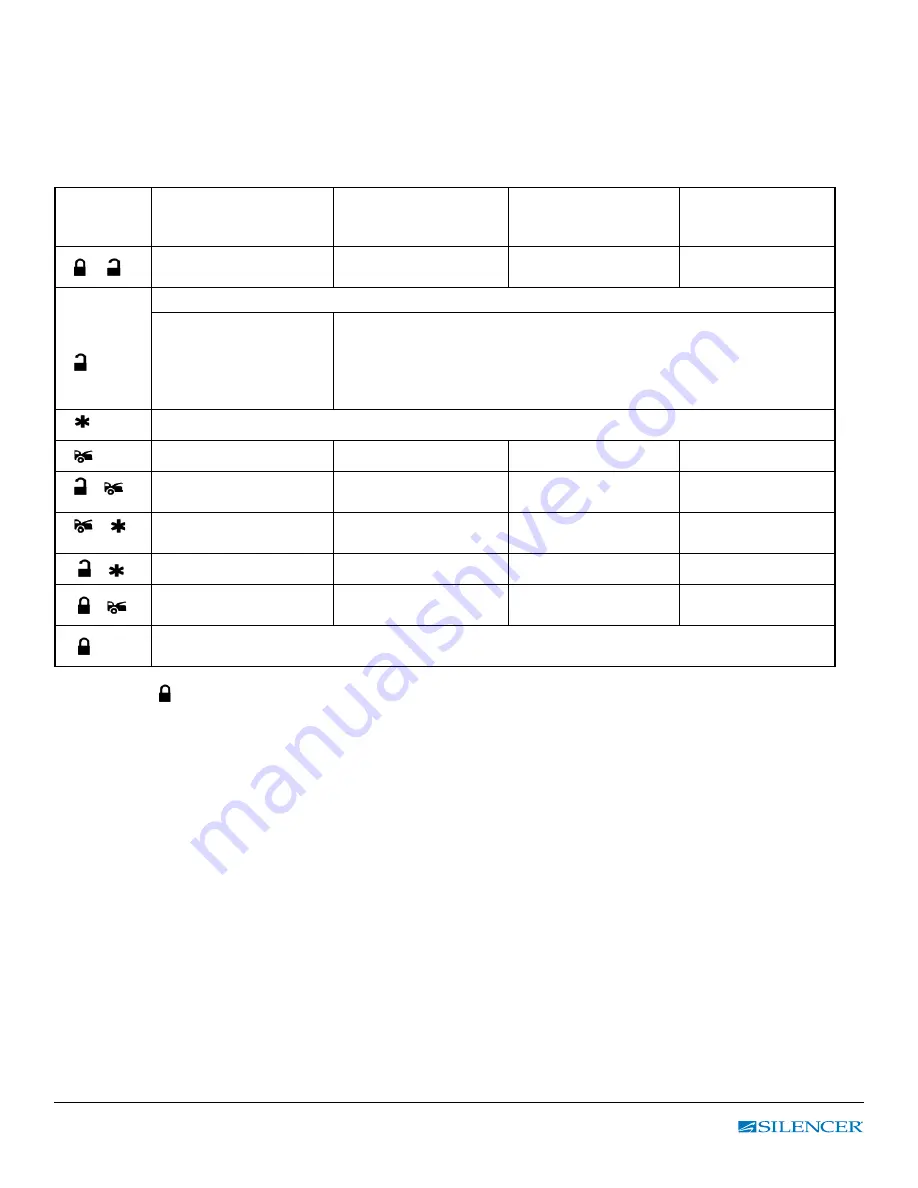
3. Press and release the transmitter button corresponding to the feature you want to program.
Press
Transmitter
Button
One Chirp /
LED One Pulse
Factory Default Setting
Two Chirps /
LED Two Pulse
Three Chirps /
LED Three Pulse
Four Chirps /
LED Four Pulse
1 +
Voltage check type (A)
Tachometer
Check type (B)
Timer Check Type (B)
Data Bus Interface
Mode**
2
A> RPM learning – see RPM Learning page 17
B>
Start Crank Time:
0.6-second
0.8-second (2 chirps), 1.0-second (3 chirps),
1.2-second (4 chirps), 1.4-second (5 chirps),
1.6-second (6 chirps), 1.8-second (7 chirps),
2.0-second (8 chirps), 3.0-second (9 chirps),
4.0-second (10 chirps),
3
Start or Stop the System for TESTING & ADJUSTMENT
4
Low Check Level
Hi Check Level
5 +
+ 50 RPM
DBI ONLY
No RPM Learning
6 +
- 50 RPM
DBI ONLY
No RPM Learning or
< 50 RPM
7. +
THICK Pink = Ignition 2
THICK Pink = Start 2
THICK Pink = ACC 2
8. +
No function
Pulse Ignition 1 Before
Unlock. Wake BCM
9.
Exit the Programming Mode.
3 Long Chirps & 3 Parking Light Flashes to Confirm this Exit.
Exit:
Press the button on the transmitter. 3 long chirps & 3 parking light flashes will confirm exit.
** This will be used when the DBI is connected to a ADS or Fortin compatible Two-Way data module
that will recognize the tach signal from the vehicle. If this learned value needs to be adjusted, this
signal will need to be learned in the same manner as the analog tachometer wire.

