background image

UM_FULL_56SL_REV_A

4

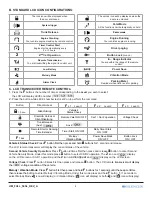
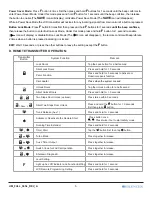
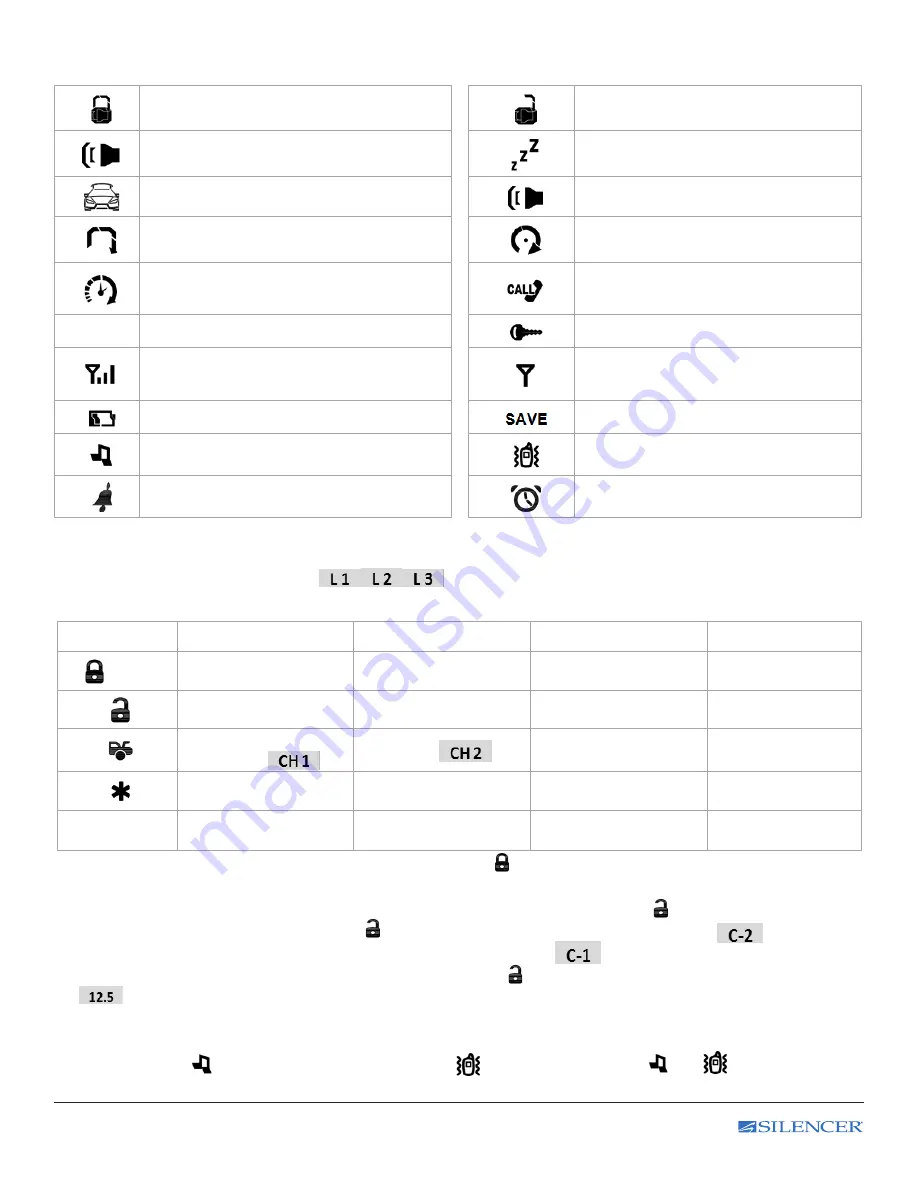
B. STANDARD LCD ICON CONFIGURATIONS

:

The lock icon will be displayed when  

the door are locked.

The unlock icon will be displayed when the 

door are unlocked.

System trigger

Valet Mode

All the function shall be temporally on hold

.

Trunk Release

Panic mode 

Engine Cranking

Your vehicle engine cranking by remote control.

Engine Running

Your vehicle’s engine is running 

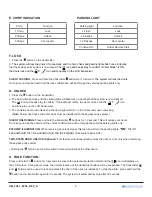
Timer Control Start

  Engine starts automatically every

2 or 3 hours


Driver paging

2

2

nd


Car Operation 

Button Lock

 (Icon on)


Remote Transmission

You are transmitting the signal to control unit.

In – Range Indicator

You are within the range of the remote 

control

.

Low Battery

Power Save

Melody Mode 

Vibration Mode 

Alarm Clock 

Parking Meter

Reminder when time is up for parking 

C. 

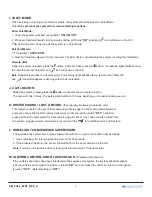
LCD TRANSCEIVER REMOTE CONTROL:

1. 

Press the 

F

 buttons the number of times corresponding to the 

Level

 you wish to select;  

the LCD will display LEVEL number (

)

2. 

Press the button while LEVEL number text is still on to perform the command.

Button

Direct Access

F

 x 1    Level 1

F

 x 2     Level 2

F


x 3     Level 3


1.0 sec.

Silent Arming

Vehicle’s

Status Check

Disarm & Unlock or 

Silent Disarming

Remote Valet ON / OFF

Car 1 / Car 2 operation

Voltage Check

Trunk Release 

(Aux 1) 

Aux 2 

Remote Start or Running 

Time Extender

Timer Start ON / OFF

Daily Timer Start 

ON / OFF

1 sec

Melody /

Vibration Mode

Power Save Mode

ON / OFF

Button Lock

ON / OFF

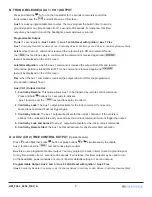
Vehicle’s Status Check:

 Press 

F

 button


first then press and hold   buttons for

 1 second and release.  

The LCD remote transceiver will display the current status of the vehicle.                                                                                  

Second Vehicle Security Operation:

 Press 

F

 button 

times first then press and release   button to enter Second  

Vehicle Security Mode, Under this mode press   button to select CAR 2 operation, The 

2

 icon and 

 display  

on the LCD screen or CAR 1 operation and the 

2

 icon will

 disappear

 and 

 display on the LCD screen.

Voltage Check: 

Press 

F

 button 

3

 times first then press and release


 button. The LCD rem

ote transceiver will display 

the 

 voltage condition of the vehicle.

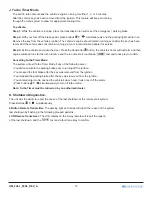
Melody / Vibration Mode: 

Press 

F

 button first then press and hold 

F

 buttons for 1 seconds until the beep confirms,  

then release the button to 

enter Melody / Vibrating Mode, Under this mode press and hold 

F


button for 1 seconds to  

select Melody Mode 

 icon will display) or Vibration Mode  

 icon will display) or both 

 and 

 icon will display).  

Summary of Contents for 56SL

Page 1: ......

Page 2: ...ION 7 IGNITION CONTROL DOOR LOCK UNLOCK 7 TRUNK RELEASE AUX 1 OUTPUT 8 AUX 2 TIMER CONTROL OUTPUT 8 SECOND CAR OPERATION 9 CLEAR THE FLASHING TAMPER WARNING MESSAGE ICONS 9 STOP THE MELODY SOUND 9 ILLUMINATE LCD DISPLAY 9 OUT OF REMOTE COTROL RANGE 9 REMOTE START OPERATION TO REMOTE START THE VEHICLE 10 PROGRAMMABLE SAFETY START 10 RUNNING TIME EXTENDER 11 OPERATE THE VEHICLE WHILE RUNNING FROM TH...

Page 3: ...akens A icon shall be displayed on the LCD screen When the old battery is replaced there will be beep sounds to indicate the power is back up on the transmitter BATTERY REPLACEMENT SLRF751 The One way remote is powered by one CR2032 Battery To replace battery use a coin or small flat blade screwdriver to carefully pry apart case Small Flat Blade Screwdriver or Coin ...

Page 4: ...lent Arming Vehicle s Status Check Disarm Unlock or Silent Disarming Remote Valet ON OFF Car 1 Car 2 operation Voltage Check Trunk Release Aux 1 Aux 2 Remote Start or Running Time Extender Timer Start ON OFF Daily Timer Start ON OFF F 1 sec Melody Vibration Mode Power Save Mode ON OFF Button Lock ON OFF Vehicle s Status Check Press F button first then press and hold buttons for 1 second and releas...

Page 5: ...the F button D REMOTE TRANSMITTER OPERATION Transmitter Button System Function Remark Lock Doors Tap the Lock button for a half second Silent Lock Doors Press and hold for 1 0 seconds Panic Function Press and hold for 3 seconds to Activate or Deactivate panic function Car Locator Press when the system Locked Unlock Doors Tap the Unlock button for a half second Silent Unlock Doors Press and hold fo...

Page 6: ...3 The vehicle s doors will unlock and the dome light will turn on for 30 seconds upon unlocking Note Power door locks and dome light must be installed with the keyless entry system SILENT UNLOCKING Press and hold the transmitter buttons for 1 0 second This will unlock your doors No chirp sound will be heard and the unlock confirmation will be through the vehicles parking lights only PATHWAY ILLUMI...

Page 7: ... will chirp 6 times The parking light will flash 12 times assisting you in easily locating your car K DRIVER PAGING LOST FOUND For two way transceiver operation only This feature is useful in the event that someone wants to page the driver of a parked vehicle or someone cannot find his LCD remote transceiver Under the ignition switch OFF condition press and hold the valet switch for 2 seconds to p...

Page 8: ... 1 Output Control 1 Control by Remote This option allows Aux 1 to be triggered by remote control command Press and hold buttons for 3 seconds to activate Aux 1 function and the text and tones play to confirm 2 Control by Lock The Aux 1 output will activate for the lock command If you send a second lock command it will not trigger Again 3 Control by Unlock The Aux 1 output will activate for the unl...

Page 9: ...ease the buttons Under Car 2 mode the 2 icon will flash For Car 1 When 2 icon disappears and the text show on the LCD display then release the buttons Q CLEAR THE FLASHING TAMPER WARNING MESSAGE ICONS The flashing warning message icons in the LCD display will clear and reset when the transmitter is used to lock the vehicle Also Locking then Unlocking the system will clear the flashing icons R STOP...

Page 10: ...ansmitter 2 The parking light will activate to indicate the remote start has received the signal 3 The engine will start in approximately 5 seconds and the icon will blink to indicate that the engine is starting the icon will show on the LCD screen the parking lights will turn on While the vehicle is running the icon the run time start countdown text and tones play to confirm The countdown timer b...

Page 11: ...rake pedal is pressed before the key is in the ON position the engine will shut down E Temporary Stop Mode This mode allows the vehicle to remain running after the key has been removed from the ignition This feature is useful for occasions when you wish to exit and lock the vehicle for short periods of time but would like to leave the motor running and the climate control on 1 While the vehicle is...

Page 12: ... Open the hood trunk doors or manually starts or remote starts the vehicle will cancel the timer start 3 System needs to be locked or timer start will not start the engine 4 2 chirps from siren indicate fail to setting and the text and tone play on the LCD transceiver IMPORTANT Timer Start and Daily Timer Start should be used only in open areas never start and run the vehicle in on enclosed space ...

Page 13: ... runs for the turbo runtime and the run time start countdown text and tones play to confirm Cancelling Turbo Timer Mode The system will exit Turbo Timer Mode if any of the following occur You did not activate the parking brake prior to turning off the ignition You pressed the foot brake after the key was removed from the ignition You released the parking brake after the key was removed from the ig...

Page 14: ... Foot Brake on Check 14 pin White Violet wire connection Release Foot Brake 4 System is in Valet Mode Exit the Valet mode 5 Hi Voltage Voltage Checking Type Set the Feature 3 02 to Low Level Low or No RPM Tachometer Checking Type Check 14 pin White Red wire connection Set the Feature 3 02 to Hi Level Re learning the RPM 6 The engine has run successfully but is still starting Tachometer Checking Ty...

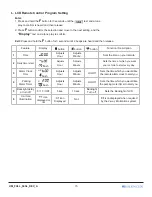
Page 15: ...Hour Adjusts Minute Sets the time on your remote 2 Daily timer start flash Adjusts Hour Adjusts Minute Sets the time at which you want your vehicle to start every day 3 Alarm Clock Time flash Adjusts Hour Adjusts Minute On Off Sets the time which you would like the remote alarm clock to alert you 4 Parking Meter Timer flash Adjusts Hour Adjusts Minute On Off Sets the time which you would like the ...

Page 16: ...s shall not be liable to anyone for consequential or incidental damages or claims that may arise due to failure of product to operate properly except those accorded by law Magnadyne s or its authorized agents liability to the repair replacement of the product as stated above if all conditions of the warranty are met No expressed warranty or implied warranty is given except those set forth herein M...

Page 17: ...Magnadyne Corporation 1111 W Victoria Street Compton CA 90220 310 735 2000 Please visit our website at www magnadyne com Made in Taiwan All Rights Reserved ...

Reviews: