Model # 559061000/559061010
Part # SAP-PL-R24-MV-BK/SAP-PL-R24-MV-WH
USe And CARe GUide
PLASMA AiR diSinfeCtion RoUnd 24” PURifieR
note
:
Keep your receipt and these instructions for proof of purchase.
note
:
Dispose used products according to local regulation.
WARninG
:
Shut off the power at the circuit breaker or fuse panel before removing the old fixture, ballast, or fluorescent tubes.
The installation height must be above 10ft. Make sure the ceiling can withstand the weight of this product at 35LBS.
If you are unfamiliar with electrical installations, we recommend you contact a qualified electrician to do the installation.
INSTALLATION
Select a suitable location that can support the weight of the fixture. Determine the method of mounting before drilling.
WARninG:
RISK OF ELECTRIC SHOCK. Ensure the electricity to the wires you are working on is shut off. Either remove the fuse or turn off the circuit breaker before removing the
existing light fixture or installing the new one. With power disconnected to your electrical box, remove the existing fixture. Make a sketch of how the current fixture is wired (by wire color) or
mark the wires with masking tape and a pencil so you will know how to properly reconnect the wires to the new LED light fixture.
RISK OF ELECTRIC SHOCK - These servicing instructions are for use by qualified personnel only. To reduce the risk of electric shock, do not perform any servicing other than that contained
in the operating instructions unless you are qualified to do so.
This product complies with the maximum allowable concentration of ozone of 0.050 parts per million by volume (ppmv) in a 24-h period.
TM
PAckAge cONTeNTS
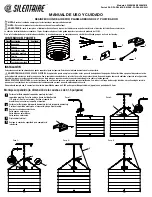
Part Description
Quantity
A
Fixture
1
B
Chain
1
C
Wire Connector
3
D
Mounting Bracket
1
E
Screw
8
F
Side cover
2
G
Safety Rope
1
A
1
2
4
3
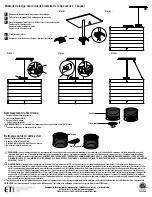
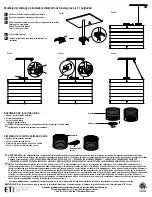
Punch out the knock out hole of the mounting bracket. Install the
mounting bracket. Pass the wires through the flexible pipe (1/2in
or 3/4in, not included). Slide the mounting bracket into the
fixture, and then fix the mounting.
Install three chains.
Make the electrical connections:
Black color to black color.
White color to white color.
Green color to green color.
Fix the side cover.
5
Hang the safety rope, to complete the installation.
Suspend Mounting (dimension of the chain is 31.5inch)
STEP 1:
STEP 2:
STEP 3:
STEP 4:
STEP 5:
D
C
B
E
F
G
B
C
D
D
F
B
D
C
D
D
B
G


