background image

P.R. CELL 

2G

Instruction Manual 

15

Start Up Procedure | 10

10.

Start-Up Procedures

Z

Turn the power switch on  at the back of the unit; the three sculpting keys will blink. Select

gentle suction using “Circulation/Drainage” key

Z

Select treatment duration using the “minutes” key. The timer will count down to zero with

an alarm alerting you at the end of treatment without interrupting suction.

Z

When the “Control” valve is turned clockwise, suction is stronger; to reduce suction, turn to

the left (counter-clockwise).

Z

The “Rhythm” key* displays suction duration at 0.5 Second intervals and can be increased

if desired 

Z

Push Start key O/I to begin treatment. The unit will produce 3 suction sounds, indicating

that the unit is now ready to use.

Sculpting Keys

3 levels of suction depth

The P.R. Cell offers a choice of 3 suction levels (Light, medium, strong) to accommodate different client
needs.The choice of a suction level will be made according to two criteria:

Z

Client sensitivity

Z

Desired massage depth

Minute Key

The  P.R.  Cell  timer  counts  down  to  zero  in  a  True  Time  fashion.    Setting  of  the  timer  is  through  the
“Minutes” key.  

Z

Use 

UP / DOWN

arrows to adjust desired treatment time.

Z

Up arrow increases time by 5 minute increments

Z

Down arrow decreases time by 1 minute increments

Note: Timer countdown begins when activating the “Start” key

Suction “rhythm”

Suction rhythm is the time suction is active.
This rhythm is measured in seconds and is adjustable from 1 to 10 seconds.

Z

increasing rhythm duration will influence massage depth. A longer “rhythm “produces a

deeper suction.

Summary of Contents for P.R. CELL 2G

Page 1: ......

Page 2: ...ATMENT FOR ABDOMEN AND MIDRIFT SECTION 24 13 TREATMENT FOR HEAVY LEGS 28 14 FOR BEST RESULTS 31 15 P R CELL 2G TREATMENT PROTOCOL AFTER LIPOSUCTION 34 16 CLIENT CONSENT FORM 36 17 P R CELL 2G TROUBLE...

Page 3: ...n risk of electric shock If repair or replacement of the cord or plug is necessary do not connect the grounding wire to either flat blade terminal The wire with insulation having an outer surface that...

Page 4: ...th appearance The P R Cell 2G is ideal for Z Spas offering body contouring and cellulite treatments Z Massage therapist to perform deep subdermal massage Z Physiotherapists offering sport massage and...

Page 5: ...inflammation Z Clients with gastric or duodenal ulcers should not be massaged on the stomach or thorax area Z Inflammatory conditions tendinites bursites etc Never use the PR Cell on breasts Avoid ar...

Page 6: ...reating an improved contour and shape Though the rollers massage and suction is strong enough to reach the top layer of body fat it is not strong enough to cause damage to the skin bones or muscles Th...

Page 7: ...s that results using the P R Cell were seen after seven treatments when using the deep sub dermal sculpting massage Ideal results were achieved after 14 treatments Treatment duration P R Cell 2G treat...

Page 8: ...ell can also prevent cellulite from evolving into complicated and unhealthy stages Along with regular exercise and healthy eating habits PR Cell 2G is an effective way to prolong and maintain a youthf...

Page 9: ...tissue Congested connective tissue Cellulite stage 1 At this stage the skin appears normal cellulite is visible only when the skin is pinched reveal ing the orange peel sign the first symptom of cellu...

Page 10: ...its P R Cell 2G Treatment program Treatments are usually twice weekly painless and very relaxing Some people see results in just several weeks depending on the body area being treated and if complimen...

Page 11: ...ge oil Z When doing a complete body treatment you should always end with a manual back massage Z Treatments can be tailored to your client s needs They can be short 15 to 20 minutes when targeting a s...

Page 12: ...rming the procedure They are designed to slide smoothly over the body contour eliminating the need for expensive body stockings Z Large pneumatic treatment head For deeper problems and larger areas Z...

Page 13: ...the roller insert component Note To disassemble the treatment head use the accessory holder located on the side of the unit Casing Maintenance Periodically wipe surface of your P R Cell using a damp c...

Page 14: ...Connective tissue access key 3 Deep sub dermal access key 4 Minutes key to select treatment time 5 Rhythm Key regulates suction duration 6 Pressure Control Valve 7 Start and stop key 8 Pedal Key P R C...

Page 15: ...Back of unit 1 ON OFF switch 2 Power cord outlet 3 Parker Filter 4 Accessory holder also used to dismantle treatment head for maintenance P R CELL 2G Instruction Manual 12 Control panel 08 1 2 4 3...

Page 16: ...connective tissue breaks down water pockets tones and energises 3 Deep Subdermal Program Subcutaneous Tissue and Fatty Layers Deep tissue mobilisation localised fat deposits releases fibrous and myofa...

Page 17: ...ersal For toning and revascularization Crosswise Increases circulation and oxygenation releases muscular tension and fibrous adhesions softens fibrous connective tissue and decongests localized fatty...

Page 18: ...ds indicating that the unit is now ready to use Sculpting Keys 3 levels of suction depth The P R Cell offers a choice of 3 suction levels Light medium strong to accommodate different client needs The...

Page 19: ...mode Important Z When using Pd mode suction can only be interrupted manually Z To avoid pain when releasing suction use the release button located at the top of the treat ment head The pedal is optio...

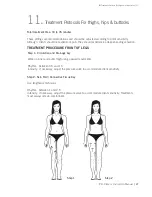
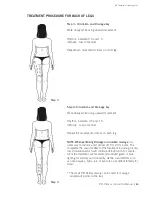
Page 20: ...should experience a deep kneading sensation TREATMENT PROCEDURE FRONT OF LEGS Step 1 Circulation and Drainage key Work on inner and outer thigh using upward movements Rhythm between 0 5 and 1 5 Inten...

Page 21: ...uction Should treatment be painful decrease suction by using the pressure control valve Rhythm between 1 and 2 5 Intensity If necessary adjust the pressure control valve to insure client s comfort Ste...

Page 22: ...tep 5 Deep subdermal access Key This program is designed to work on deeper cellulite advanced stages 3 or more and for body sculpting Rhythm between 1 and 2 5 Intensity If necessary adjust the pressur...

Page 23: ...high using upward movement Rhythm between 0 5 and 1 5 Intensity If necessary adjust the pressure control valve to insure client s comfort Step 2 Skin Fold Connective Tissue Key Use lengthwise techniqu...

Page 24: ...rous adhesion and eliminate dimples Rhythm between 1 and 2 5 Intensity If necessary adjust the pressure control valve to insure client s comfort Step 4 Skin Fold Connective Tissue Key Use crosswise te...

Page 25: ...saddle bags using length wise technique Rhythm between 1 and 2 5 Intensity If necessary adjust the pressure control valve to insure client s comfort Step 6 Deep subdermal access Key With client lying...

Page 26: ...Manual 23 Treatment Protocols For thighs hips buttocks 11 Step 7 Deep subdermal access Key Use sculpting upward movement on buttocks hip and saddle bags Rhythm between 1 and 2 5 Repeat all movements...

Page 27: ...nce a deep kneading sensation TREATMENT PROCEDURE ABDOMEN Step 1 Circulation and Drainage key Work slowly with descending movements Rhythm between 0 5 and 1 5 Intensity Low Repeat each movement 4 time...

Page 28: ...belly area she can contract her muscles similar to per forming sit ups and you can then proceed with the transversal technique She can repeat con tracting and releasing 3 to 5 times Step 4 Skin Fold C...

Page 29: ...atment Variation Step 1 Z Work on the abdomen using a very low intensity and a clockwise rotation Z Repeat 3 times passing above and below the navel Step 2 Z Using Lengthwise technique work the side o...

Page 30: ...ythm between 1 and 2 Intensity If necessary adjust the pressure control valve to insure client s comfort Step 2 Skin Fold Connective Tissue Key Using crosswise technique work the waist hips and midrif...

Page 31: ...movement Rhythm between 0 5 and 1 5 Intensity Low to medium Adjust the pressure control valve to insure client s comfort Repeat the movements 4 times on each leg Step 2 Circulation and Drainage key Us...

Page 32: ...l 29 Treatment for heavy legs 13 Step 3 Circulation and Drainage key Using the medium treatment head work slowly with upward movement Rhythm between 0 5 and 1 5 Intensity Low to medium Repeat all step...

Page 33: ...to medium Repeat the movements 4 times on each leg NOTE When performing Drainage or circulation massage it is necessary to include a rest period of 15 to 20 minutes This completes the vascular effect...

Page 34: ...luids Water is the most indispensable of all nutrients necessary for survival A minimum of 8 glasses each day is required to cleanse the body and keep bodily functions operating at maximum efficiency...

Page 35: ...fingers and feet Drink Plenty of Water Water is essential in treating cellulite and maintaining hydration Drink 8 to 12 glasses of water each day This will help the body eliminate toxins and waste Em...

Page 36: ...e Exercise stimulates the metabolism Beta receptors are also stimulated into transforming fat stored in the adipocyte cells into energy The exercise need not be strenuous in order to be beneficial A b...

Page 37: ...than the thighs or buttocks Z Bruising swelling and draining are normal after liposuction Z The time for recovery depends on the number of treated areas Z Patients are given a tight compression garmen...

Page 38: ...following liposuction clients should follow 1 to 2 maintenance treat ments per month Intensity settings Warning Never use constant suction Z The first six 6 treatments consist of drainage massage The...

Page 39: ...to proceed is based solely on my expressed desire to do so I understand that it is my personal responsibility to inform the practitioner of the clinic named above of any changes to my medical history...

Page 40: ...the limitations of the treatment I agree to follow the recommendations given to me by my therapist or aesthetician in order to achieve the best possible results Results are not guaranteed and a main t...

Page 41: ...ll on Maximum Drain Level indicator At the back of the unit is a filter that prevents any oil that may have been sucked into the tube from entering the motor Failure to maintain the filter may result...

Page 42: ...l line Z The filters must be drained once the oil has reached the Max Drain Level line as shown Step 1 a There are 2 ways of emptying the filters Z Depress the button and align the 2 markers Pull down...

Page 43: ...Parker Filter 17b Direction of the arrow View of the backside of the P R Cell 2G Parker filter During installation of the filter make sure the arrow on top of the filter points from right to left as s...

Page 44: ...ouet Tone is not responsible for damage or accidents due to incorrect use of the unit 19 Warranty Z This unit is warranted to be free from defects in material or workmanship 1 year from date of purcha...

Page 45: ...nics Microprocessor controlled SILHOUET TONE RESERVES THE RIGHT TO CHANGE THE SPECIFICATIONS OF THE UNIT WITHOUT NOTICE All rights reserved No part of this work covered by the copyright hereon may be...

Page 46: ...TONE U S A INC 1623 NW 84th Avenue Miami Florida 33126 U S A Tel 1 800 552 0418 stusa silhouettone com SILHOUET TONE EUROPE S A 9 route Suisse CH 1295 Mies Suisse Tel 41 22 775 15 60 Fax 41 22 775 15...

Reviews: