


10
CAUTION
: the light bulbs and glass cover become extremely
hot when running. Shut off the lights and allow them to cool
prior to changing the bulb. Failing to do so could result in
serious burns. Turn off power to the unit before replacing bulb.
Be careful around sharp edges.
LAMP REPLACEMENT
The mesh fi lters are intended to trap residue and grease
produced during cooking process. To ensure optimal perfor-
mance, appearance, and a sanitary cooking environment,
clean the fi lters, fan and grease laden surfaces regularly. Use
only a clean cloth and mild detergent solution on stainless
steel and painted surfaces. Do not use corrosive or abrasive
cleaning agents or steel wool or scouring pads as these will
scratch the surface. Do not use cleaning products that use
chlorine bleach or orange cleaners.
The grease fi lters, bottom panel surrounding the grease fi lters,
and the blower should be cleaned frequently. When washing
by hand use warm soapy (mild detergent) water. The grease
fi lter and blower wheels are dishwasher safe.
The motor is permanently lubricated and never needs oiling. If
the motor bearings make unusual or excessive noise, call for
service at 1-800-263-2629.
Hood Cleaning
Stainless steel is one of the easiest materials to keep
clean. Occasional care will help preserve its fi ne appearance.
CLEANING & MAINTENANCE
Cleaning tips:
Hot water with soap or detergent is all that is usually needed.
Follow all cleaning with rinsing with clear water. Wipe dry with
a clean, soft cloth to avoid water marks.
For discolorations or deposits that persist, use a non-
scratching household cleanser or stainless steel polishing
powder with a little water and a soft cloth.
For stubborn messes, use a plastic scouring pad or soft bristle
brush together with cleaning solution and water. Rub lightly
in direction of polishing lines or “grain” of the stainless fi nish.
Avoid using too much pressure which may alter the surface.
DO NOT
allow deposits to remain for long periods of time.
DO NOT
use ordinary steel wool or steel brushes. Small bits
of steel may adhere to the surface causing rust.
DO NOT
allow salt solutions, disinfectants, bleaches, or
cleaning compounds to remain in contact with stainless steel
for extended periods.
Many of these compounds contain chemicals which may be
harmful.
Rinse with water after exposure and wipe dry with a clean
cloth.
Painted surfaces should be cleaned with warm water and mild
detergent only.
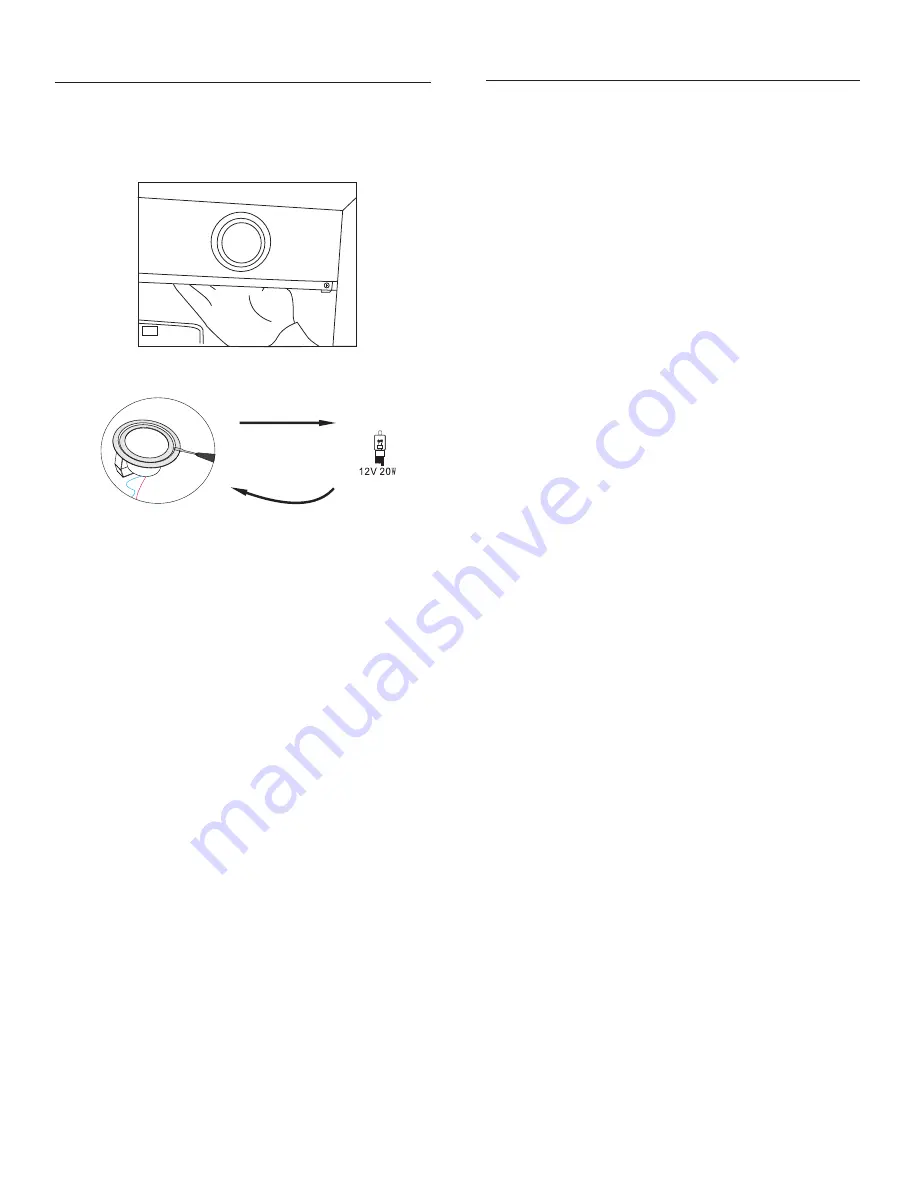
FIG. 15
1. Remove the grease fi lters.
2. Reach within the unit and push out the lamp housing
towards you. See Fig. 15.
3. Using a small, fl at-head screw driver pop off the glass plate.
See Fig. 16 above.
4. Remove the burnt out 2-pronged 20 watt Halogen bulb.
Replace with a new 20 watt Halogen bulb. Wipe the new bulb
with a clean cloth before replacing the cover.
5. Caution: the lights are designed for 20 watt Halogen bulbs
only. Replacing with high wattage bulbs can result in
damage to the range hood or fi re and not recommended
6. Replace lamp cover and press lamp housing back into
place.
FIG. 16


