Copyright Donald W Thomas, K5ZRQ
16
Disassembly:
Carefully drill off the braded end of the two rivets holding the switch together using a
small drill bit. Then push the rivets out of the switch while holding the switch front and back. Once the
rivets are removed, the internal spring will be pushing the switch apart. Lift the top cover off while
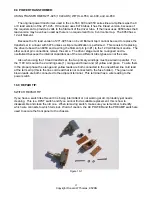
watching where all the pieces are located. The picture above shows a switch before repairing and one
disassembled showing all the parts and the two bolts to put it back together with. Remove the three
piece part (cap, spring, and guide) and lay to the side. Remove the brass roller that looks like a mini
dumbbell and clean it to remove any oxidation. Next using a Q-tip and alcohol, clean the contacts
inside the switch housing. It’s possible the bottom contacts have worn down some over time. If so,
the raised track running down the middle of the housing may now be holding the brass roller up
preventing it from making firm connection with the bottom contacts. Using a small knife point, carefully
scrape both sides of the track a small amount by the contacts. You can also scrape down the top a
very small amount. Do not remove much material, just scrape a little off. The track also acts as a wall
between the contacts. This should allow the roller better contact if the track was holding it up.
Reassembly:
Put brass roller back into the housing and push it to the end with the side contacts. Put
the three piece part back in with the grooved guide end riding on the middle of the brass roller. Place
the two insulators back on the sides of the housing. Move toggle on top cover to the side labeled “ON”.
While holding the housing and insulators together, slide the top cover down over the housing. The
bottom of the toggle lever fits into the top plastic cup of the three piece part as it goes together. If you
have it backwards, the “ON” position will be “OFF”. Just turn the top around if needed to put it right.
Two small nails that will fit thru the holes will hold it together while finishing up. You can check the
“ON and “OFF” with an ohmmeter at this point easily. The two bolts and nuts needed to replace the
rivets are size 2-56. The bolt is 2-56 x 3/4in. The bolts will fit the holes in the top cover, but will have
to be threaded thru the housing. Remove one of the nails and insert a bolt. Screw it in all the way
down and watch the housing bottom as you tighten it. You only want to tighten enough to barely
compress the housing. Place a nut on the end and tighten only enough to barely compress the
housing from that side. If tightened too much, you may distort the housing where the brass roller may
bind and not move freely. Now put in the other bolt and nut. Tighten the same way. You only need
them snug to hold the switch together properly. Verify the switch is working properly. You can use a
drop of nail polish to secure the nuts if needed.


