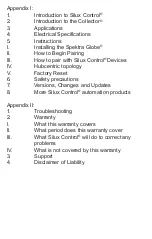
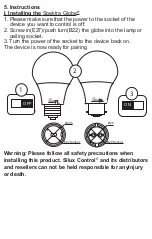
background image

5. Instructions

I. Installing the 

Spektra Globe

®

1. Please make sure that the power to the socket of the 

    device you want to control is off.

2. Screw in(E27)/push turn(B22) the globe into the lamp or 

    ceiling socket.

3. Turn the power of the socket to the device back on.

The device is now ready for pairing

Warning: Please follow all safety precautions when 

installing this product. Silux Control

®

 and its distributors 

and resellers can not be held responsible for anyinjury 

or death.

II. How to pair with your smart device:

Please remember that the IntelliHub

®

 needs to be installed to 

be able to control the Spektra Globe

®

 from your smart 

device. Please refer to the user manual of the IntelliHub

®

 for 

pairing the Spektra Globe

®

 to your Android or iOS device. 

III.How to pair with Silux Control

®

 Devices:

1. Install and power on your Spektra Globe

®

2. Open the Silux Control

®

 app and navigate to “Add 

    device”.

3. This will begin the discovery process where your 

    IntelliHub

®

 will search for the Spektra Globe

®

. Depending 

    on the environment it could take a few minutes before 

    your device is discoverable. Once you see your Spektra 

    Globe

® 

in the list, tap on it to add it.

4. You will be required to scan or type in the QR code to  

    confirm that the device can be joined to your network. 

IV. How to pair with the Touch Lamina

®

:

1. Open you Silux Control

®

 app and navigate to “Edit 

devices” menu.

2. Select the Spektra Globe

®

 you wish to pair and tap the 

“Pair” botton. The Spektra Globe

®

 will now be in teach mode.

3. Ensure the Touch Lamina

®

 has power. Press the Teach 

button on the Touch Lamina

®

. The green light on the Touch 

Lamina

®

 will start flashing.

4. Tap the button on the Touch Lamina

®

 corresponding to the 

Spektra Globe

®

 you wish to pair with this device. The green 

light will switch off after successfully paired.

If the green light stays on, the pairing was unsuccessful and 

you should wait for 30 seconds for the green light to 

go off before trying again.

Please refer to the Touch Lamina

®

 and Seeker

®

 manuals 

regarding controlling your Spektra Globe

®


from network 

paired devices. 

Summary of Contents for SC-SPG01

Page 1: ...OPERATION MANUAL SC SPG01 Spektra Globe ...

Page 2: ...air with Silux Control Devices IV Hubcentric topology V Factory Reset 6 Safety precautions 7 Versions Changes and Updates 8 More Silux Control automation products Appendix II 1 Troubleshooting 2 Warranty I What this warranty covers II What period does this warranty cover III What Silux Control will do to correct any problems IV What is not covered by this warranty 3 Support 4 Disclaimer of Liabili...

Page 3: ... convenience of your living room or anywhere across the world using any smart device running Android or iOS At Silux Control we tried to keep our products as affordable as possible without compromising quality Our devices are specially designed to make it as easy as possible to install with easy usability and a wide range of applications With encrypted data control you are also protected from the ...

Page 4: ...e was designed to control and set the mood of your home office The Spektra Globe can be installed in a lamp or ceiling socket 4 Electrical Specifications The Spektra Globe Fittings E27 B22 Operating Voltages 110V AC 230V AC Frequency Range 50Hz 60Hz Maximum Switching Power 10W Lumens 800lm Approx Lighting Angle 120º Operating Temperatures 5 C 60 C Layout IntelliHub Smart Device Running Silux Contr...

Page 5: ...urn B22 the globe into the lamp or ceiling socket 3 Turn the power of the socket to the device back on The device is now ready for pairing Warning Please follow all safety precautions when installing this product Silux Control and its distributors and resellers can not be held responsible for anyinjury or death Ø33 5 E27 Socket Ø28 B22 Socket OFF 1 2 ON 3 ...

Page 6: ... be required to scan or type in the QR code to confirm that the device can be joined to your network IV How to pair with the Touch Lamina 1 Open you Silux Control app and navigate to Edit devices menu 2 Select the Spektra Globe you wish to pair and tap the Pair botton The Spektra Globe will now be in teach mode 3 Ensure the Touch Lamina has power Press the Teach button on the Touch Lamina The gree...

Page 7: ... the environment The IntelliHub has been developed to achieve a distance of 20m however thick walls large electrical appliances and long distances are 3 factors that can limit communication with Silux Control devices Use the diagnostics section of your Silux Control app to diagnose any issues you might be experiencing with communication on your Silux Control Network V Factory Reset This function w...

Page 8: ...iquids away from this device Do research about wire insulating colour codes for your country Please consult a qualified electrician Warning Please follow all safety precautions when installing this product It is always recommended to use a qualified electrician Silux Control and its distributors and resellers cannot be held responsible for any injury or death 7 Versions changes and updates Current...

Page 9: ...Range Extender Silux RPT PIR Sensor Seeker Touch Plate EU SA Touch Lamina Altus Touch Plate USA Touch Lamina Artatus Plug Electrifier Smoke Gas Detector Halitus Water Heater Geyser Thermo Stabilizer High Power Appliances Tolleno Irrigation Saturizer Garage Tilt Tylten Pro Smart Switch Smart Module RGB Globe Spektra Globe RGB Downlight Spektra Downlight Please note Not all the products on this list...

Page 10: ...sing it 2 Warranty I What this warranty covers Silux Control warrants to the original purchaser of this Silux Control product that the product shall be free from defects in design assembly material or workmanship under normal use and operation Silux Control s sole and exclusive obligation under the foregoing warranty shall be to repair or replace at its option any defective product that fails duri...

Page 11: ...e water damage damage due to low voltage disturbances i e brownouts or sags non authorized program or system equipment modification or alteration 3 Support Please visit our website at www siluxcontrol com for any other support products future products and updated user manuals 4 Disclaimer of Liability Please read this user manual thoroughly before using the IntelliHub Follow all safety precautions...

Page 12: ...rranty is available on our website www siluxcontrol com Please take a moment to fill out your information Please return the warranty card with defective product and the sales receipt as proof of the date purchase Warranty cannot be carried out without it Product Model No Serial No Date of Purchase Name Surname E Mail Address Phone No Address Country D D M M Y E A R Cut Here ...

Reviews: