background image


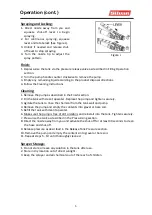
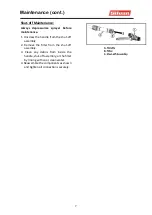
Spraying and Locking: 

1.  Direct  nozzle  away  from  you  and 

squeeze  shut-off  lever  to  begin 
spraying. 

2.  For  continuous  spraying,  squeeze 

lever and rotate lock (See Figure J). 

3.  Unlock  if  needed  and  release  shut-

off lever to stop spraying. 

4.  Turn  the  nozzle  tip  to  adjust  the 

spray pattern. 

Finish: 

1. Depressurise the tank via the pressure release valve as described in Filling Operation 

section. 

2. Turn the pump handle counter clockwise to remove the pump. 
3. Empty any remaining liquid according to the product disposal directions. 
4. Follow the Cleaning instructions. 

Cleaning: 

1. Remove the pump as described in the Finish section. 
2. Fill the tank with clean tap water. Replace the pump and tighten securely. 
3. Agitate the tank to rinse the chemical from the tank wall and pump. 
4. Remove the pump and empty the contents into gravel or bare soil. 
5. Refill the tank with clean tap water. 
6. Make sure the pump is free of dirt or debris and reinstall into the tank. Tighten securely. 
7. Pressurise the tank as described in the Pressurising section. 
8. Direct the nozzle away from you and activate the shut-off for at least 30 seconds to clean 

the hose and shut-off. 

9. Release pressure as described in the Release Tank Pressure section. 
10. Remove the pump and empty the contents into gravel or bare soil. 
11. Repeat steps 5 - 10 until thoroughly cleaned. 

Sprayer Storage: 

1. Do not store or leave any solution in the tank after use. 
2. Store in dry location out of direct sunlight. 
3. Keep the sprayer and all chemicals out of the reach of children. 


Operation (cont.) 


Figure J 

Summary of Contents for 190545

Page 1: ...Instruction Manual MAN190545 REV A 23 04 18 PRO GRADE HAND SPRAYER 5L 8L 190545 190546 190548 190549...

Page 2: ...Do not store chemicals in this tank Always release pressure when sprayer is not in use and before performing any maintenance Clean and rinse sprayer thoroughly after each use and before and maintenanc...

Page 3: ...ozzle C Adjustable Cone Nozzle D Red High Volume Fan Nozzle E Yellow Low Volume Fan Nozzle F Flat Seal G Adapter H Extension ADJUSTABLE CONE USES FOAMING NOZZLE USES Spot spraying in or around flower...

Page 4: ...oper mixture 4 Install the pump into the tank opening and turn clockwise until tightly sealed against the tank See Figure G Figure E Figure F Figure G Pressurising 1 Make sure spray gun shut off lock...

Page 5: ...pump and tighten securely 3 Agitate the tank to rinse the chemical from the tank wall and pump 4 Remove the pump and empty the contents into gravel or bare soil 5 Refill the tank with clean tap water...

Page 6: ...e 2 3 Inspect O ring If worn or damaged remove and replace Lubricate O ring with petroleum jelly See Figure 3 4 Inspect check valve in bottom of barrel If worn or damaged remove and replace by pressin...

Page 7: ...he handle from the shut off assembly 2 Remove the filter from the shut off assembly 3 Clean any debris from inside the handle shut off assembly or the filter by rinsing with cool clean water 4 Reassem...

Page 8: ...pped torn swollen damaged pump or missing valve at bottom of pump Fig 4 1 Remove and clean dirt or debris from valve Fig 4 and sealing surface on pump 2 Replace if worn or missing valve as described i...

Page 9: ...Assembly 2 183870 Pressure Relief Valve 3 183862 Nozzle Kit 4 183871 Hand Pump Repair Kit 5 183859 Trigger Assembly Shut Off Assembly 5A 183863 Trigger Assembly Wand Repair Kit 6 183860 Stainless Stee...

Reviews: