1
TECHNICAL MANUAL
SILVER KING MONARCH UPRIGHT FREEZER
MODEL SKM49F
Thank you for purchasing Silver King food service equipment. Our goal is to provide our customers with the most reliable
equipment in the industry today. Please read this manual and the accompanying warranty information before operating your new
Silver King unit. Be sure to complete and mail the warranty card within 10 days of purchase to validate your warranty.
INSPECT FOR DAMAGE AND UNCRATE
Upon delivery of your new Silver King unit, uncrate at once to examine and test for possible damage following the instructions
printed on the exterior of the container. Report any damages to the carrier responsible for transportation and promptly present a
claim for any evidence of mishandling. Save all packaging materials if a claim must be filed.
INSTALLATION
The stainless steel exterior and interior of the cabinet has been protected by a plastic covering during manufacturing and shipping.
This covering can be readily stripped before installation. After removing this covering, wash the interior and exterior surfaces using
a warm, mild soapy water solution and a sponge or soft cloth. Rinse afterward with clean water and wipe dry. Do not use
chlorinated cleaners.
Location
When locating your new Silver King unit, convenience and accessibility are important considerations, but the following installation
guidelines must be observed;
•
Always avoid locating the unit adjacent to an oven, heating element or hot air source which could adversely affect the
performance of the unit.
•
The unit must be level.
•
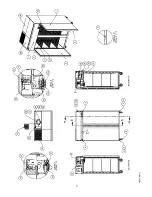
For proper ventilation, the top and back of the unit must not be obstructed. A minimum clearance of 6 inches is required on the
top and 4 inches is required in the back. The supplied angle bracket must be installed on the top of the unit to prevent
accidental obstruction caused by setting large objects on top of the unit. Installation instructions are shown on the Angle
Bracket.
Legs/Casters
The unit comes with legs or casters. To install them, tip the unit on its back and thread the legs or casters into the four plates in the
base of the unit. Make sure that they are installed tightly to prevent future thread wear. Periodically check for tightness.
Shelves
Inside the unit you will find Shelves and a plastic bag containing the Shelf Supports. The Shelf Supports mount on the Pilasters that
are already mounted inside the unit. This shelf system allows for easy adjustment to suit your needs.
Door Adjustment and Swing
Should the door ever require straightening, loosen the screws on the hinges, square the door with the cabinet and retighten the
screws.
The mounting of the door is reversible on single door units should space or convenience require that you do so. Simply remove the
screws holding the hinges, rotate the door 180 degrees, move the Self Closing Hinge Cartridge to the other end of the door (so that
it is located on the bottom of the door after it is roated), and relocate the hinges on the side opposite their original location.


