2
Electrical Connections
Be sure to check the data plate, located on the liner of the cabinet, for required voltage prior to connecting the unit to power. The
specifications on the data plate supersede any future discussion.
The standard freezer is equipped with an eight (8) foot power cord that requires a 115 Volt, 60 Cycle, 1 Phase properly grounded
electrical receptacle. The power cord comes with a 3 prong plug for grounding purposes. Any attempt to cut off the grounding
spike or to connect to an ungrounded adapter plug will void the warranty, terminate the manufacturers responsibility and could result
in serious injury.
The circuit must be protected with a 15 or 20 ampere fuse or breaker. The unit must be isolated on a circuit and not plugged into an
extension cord.
OPERATION
Initial start up
After satisfying the installation requirements, the freezer is ready to start. The freezer will start when the power cord is connected to
the required power source. If the compressor does not start when the unit is initially plugged in, check to make sure that the
Temperature Control is not in the “off” position. Allow the unit to run for two hours before loading it with product. When loading the
unit with product, take care not to block the air flow at the back of the cabinet as this would affect the units performance.
Temperature Control
The Temperature Control is located on the back wall of the cabinet liner and is factory set to maintain an average cabinet
temperature of approximately 0 Deg F. To obtain colder temperatures turn the Temperature Control stem clockwise and vice versa
with a flat blade screwdriver. Allow the unit a minimum of one hour to respond to a control setting adjustment.
Defrost
Your Silver King freezer is an automatic defrost unit and no additional plumbing is required. Automatic defrosting is accomplished
by a defrost heater and timer. Frost buildup on the Evaporator Coil is cleared at six hour intervals. Defrost water is collected in a
pan located in the compressor compartment where it is evaporated into the room air. It is important that the unit be installed level to
allow proper drainage of the condensate water.
MAINTENANCE
Preventative maintenance is minimal although these few steps are very important to continued operation and maximizing the life of
the appliance.
Cabinet Surfaces
The cabinet interior is aluminum and the exterior is stainless steel. These surfaces should be cleaned periodically with a solution of
warm water and mild soap and wiped dry with a soft cloth. Should a surface become stained or discolored, do not attempt to clean
with an abrasive cleanser or scouring pad. Use a soft cleanser and rub with the grain of the metal to avoid scratching the surface.
Condenser
Periodically, accumulated dust must be removed from the condenser screen. First, disconnect the unit from the power supply. To
clear the dust, vacuum or brush the screen at the rear of the cabinet. This will need to be done regularly to maintain the
compressor warranty!
Door Gasket
To extend the life of the door gasket, clean it regularly by wiping it with a solution of warm mild soapy water and rinse with clean
water.
MODEL
SERIAL NO.
DATE INSTALLED
Summary of Contents for SKUCF7F
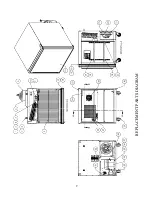
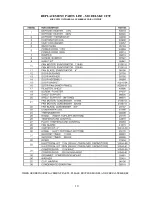
Page 10: ...9 REPLACEMENT PARTS DIAGRAM...
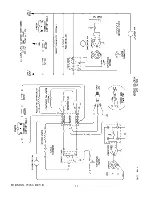
Page 12: ...11 FORM NO 25966 REV R...


