background image


Instruction Manual for Motorized, Recessed In-Ceiling Screens 


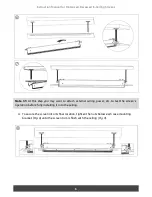
Note 3.1:

At this step you may want to attach external wiring, power, etc. to test the screen’s


operation before fully installing it into the ceiling. 


4. To secure the screen into its final location, tighten the nuts below each case mounting 

bracket (

Fig. 8

) until the screen trim is flush with the ceiling (

Fig. 9

). 


Summary of Contents for SIE-169106

Page 1: ...Instruction Manual for Motorized Recessed In Ceiling Screens Thank you for choosing Silver Ticket Products Please follow the instructions in this manual and keep it for future reference...

Page 2: ...Instruction Manual for Motorized Recessed In Ceiling Screens Product Overview Parts Included 1...

Page 3: ...e injuries or screen damage 1 Choose a proper location on the ceiling to install the projection screen Be sure that no load bearing supports will be cut or compromised during the installation 2 Measur...

Page 4: ...Ceiling Screens 4 The distance between the center of each bracket is A the measurement from Fig 1 above minus 116mm 4 5 The mounting holes for each bracket are 48mm 1 875 apart Mark the location of e...

Page 5: ...2 Slide the threaded installation rods through the holes in the each ceiling mount bracket and secure each rod on both sides with nuts until the ceiling mount brackets are secure Fig 4 Install the ce...

Page 6: ...you may want to attach external wiring power etc to test the screen s operation before fully installing it into the ceiling 4 To secure the screen into its final location tighten the nuts below each c...

Page 7: ...sides of the screen case The screen should now be fully installed and the cut out hole should not be visible since it is covered by the trim flanges Note 5 1 For adjusting the automatic stop limits o...

Page 8: ...1 When the screen is set to manual control only manual control of the screen will work For any other type of control set the screen to remote control 1 Manual Control The push button located on the l...

Page 9: ...lly lower When power is off the screen will rise back into the case 3 IR Remote The remote control will work up to 25 from the IR eye and an angle of up to 30 The remote will not work if the signal or...

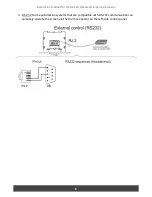
Page 10: ...nual for Motorized Recessed In Ceiling Screens 4 RS 232 Home automation systems that are compatible with RS 232 communication can remotely operate the screen via the RJ 45 connector on the left side c...

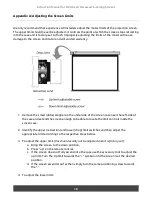
Page 11: ...near the left side of the case and extend the screen enough to be able to locate the limit controls inside the screen case 2 Identify the upper retraction and lower drop limit switches and then adjus...

Page 12: ...the remote control c If the screen does not fully drop to your desired position from the case use the accessory tool to adjust the down limit Turn the Down limit towards the symbol until the screen i...

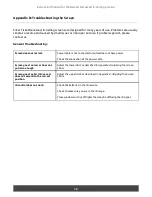
Page 13: ...wer cable is not connected or outlet does not have power Check the connection of the power cable Screen goes too low or does not go down enough Adjust the lower limit as described in Appendix A Adjust...

Page 14: ...al or contact your local dealer Incorrect connection of wires may result in leaks or fires 6 Fluorescent lights may cause interference with infrared signal 7 Be careful not to scratch or damage the sc...

Reviews: