background image

SBT 3.6 B1

■ 

56 

GB


Before epilation, treat the skin with a peeling treatment or a massage glove. This 
helps remove dead skin cells, ingrowing hairs are avoided, and fine hairs stand 
proud. This enables the appliance to grip the hairs better.


After epilation/shaving, treat the skin with a moisturising lotion or cream. Ideally, use 
a cream containing aloe vera or camomile extracts to soothe and maintain the skin.

Using the appliance

Fitting/removing the attachments

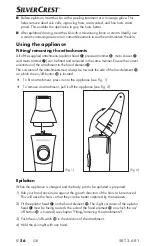
All of the supplied attachments (epilator head 

, precision trimmer 

, micro shaver 


and micro trimmer 

) can be fitted and removed in the same manner. Ensure the correct 

orientation of the attachment to the hand element 

-

:

The curvature of the attachments must always be towards the side of the hand element 

-

on which the on/off button 

3

 is located.


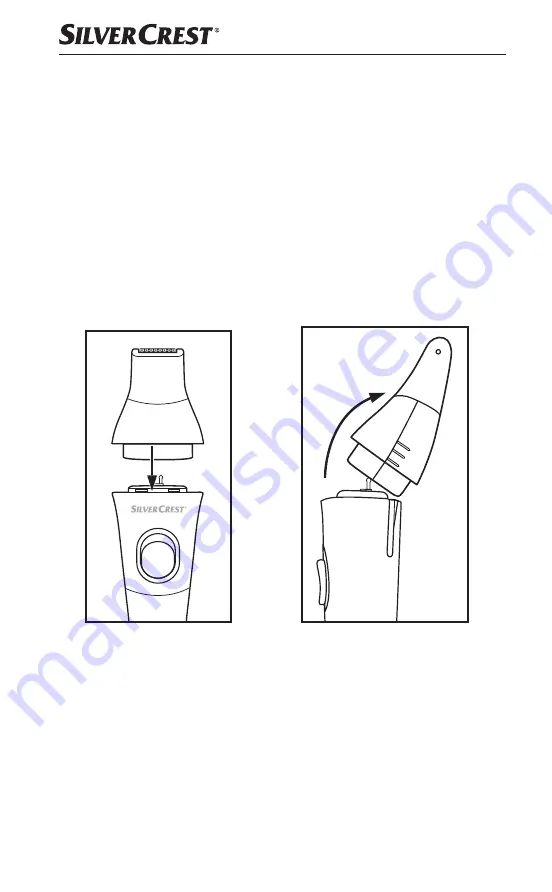
To fit an attachment, press it onto the appliance (see Fig. 1)


To remove an attachment, pull it off the appliance (see Fig. 2) 


 (Fig. 1) 

 (Fig. 2)

Epilation

When the appliance is charged and the body part to be epilated is prepared:

1)  Rub your hand once more against the growth direction of the hairs to be removed. 

This will raise the hairs so that they can be better captured by the tweezers.

2)  Fit the epilator head 

 on the hand element 

-

. The slight curvature of the epilator 

head 

 must be facing towards the side of the hand element 

-

 on which the on/

off button 

3

 is located (see chapter "Fitting/removing the attachments").

3)  Push the on/off switch 

3

 in the direction of the attachment.

4)  Hold the skin tight with one hand.

Summary of Contents for 273442

Page 1: ...IAN 273442 LADY TRIMMER SBT 3 6 B1 LADY TRIMMER Bedienungsanleitung RASOIO ELETTRICO DA DONNA Istruzioni per l uso ÉPILATEUR BIKINI Mode d emploi BIKINI TRIMMER Operating instructions ...

Page 2: ...ließend mit allen Funktionen des Gerätes vertraut Avant de lire le mode d emploi ouvrez la page contenant les illustrations et familiarisez vous ensuite avec toutes les fonctions de l appareil Prima di leggere aprire la pagina con le immagini e prendere confidenza con le diverse funzioni dell apparecchio Before reading unfold the page containing the illustrations and familiarise yourself with all f...

Page 3: ...B A C ...
Page 4: ...ufsätze aufsetzen und abnehmen 8 Epilieren 8 Bikinizone mit Präzisionstrimmer und kamm trimmen 9 Formen mit dem Präzisionstrimmer 10 Augenbrauen schneiden mit Präzisionstrimmer und Augenbrauenkamm 10 Mit Mikrotrimmer Augenbrauen formen bzw einzelne Gesichtshaare entfernen 11 Rasieren mit dem Mikrorasierer 12 Reinigen und Pflegen 13 Lagerung 13 Fehlerbehebung 14 Entsorgung des Gerätes 15 Garantie un...

Page 5: ...mungsgemäße Verwendung Dieses Gerät ist ausschließlich zum Epilieren und Schneiden von Augenbrauen und Bikinizone in privaten Haushalten bestimmt Benutzen Sie es nicht gewerblich Eine andere oder darüber hinausgehende Benutzung gilt als nicht bestimmungsgemäß Ansprüche jeglicher Art wegen Schäden aus nicht bestimmungsgemäßer Verwendung unsachgemäßen Reparaturen unerlaubt vorgenommenen Veränderunge...

Page 6: ...führung der Verpackung in den Materialkreislauf spart Rohstoffe und verringert das Abfallaufkommen Entsorgen Sie nicht mehr benötigte Verpackungsmaterialien gemäß den örtlich geltenden Vorschriften Bedienelemente Abbildung A Epilierkopf Schutzkappe für Mikrorasierer Mikrorasierer Augenbrauenkamm mit 3 Raststellungen Rasterungen für Augenbrauenkamm Präzisionstrimmer Mikrotrimmer Präzisionskamm mit 5...

Page 7: ...wenden Sicherheitstransformator kurzschlussfest SMPS Schaltnetzteil Gerät Eingangsspannung 4 5 V Stromaufnahme 1000 mA Schutzart IPX4 Sicherheitshinweise STROMSCHLAGGEFAHR Schließen Sie den Netzadapter zum Laden des einge bauten Akkus nur an eine vorschriftsmäßig installierte Netzsteckdose mit einer Netzspannung von 100 240 V 50 60 Hz an Das Kabel des Netzadapters kann nicht ersetzt werden Bei Bes...

Page 8: ...ter um Gefährdungen zu vermeiden Verwenden Sie das Gerät nicht im Freien Wickeln Sie das Kabel des Netzadapters nicht um das Gerät und schützen Sie es vor Beschädigungen Fassen Sie das Gerät den Netzadapter und dessen Kabel nie mit nassen Händen an ACHTUNG Das Gerät trocken halten Das Gerät ist spritzwassergeschützt gemäß der Schutzart IPX4 der Netzadapter nicht Verwenden Sie das Gerät mit Netzada...

Page 9: ...n sowie von Personen mit verringerten physischen sensorischen oder mentalen Fähigkeiten oder Mangel an Erfahrung und Wis sen benutzt werden wenn sie beaufsichtigt oder bezüglich des sicheren Gebrauchs des Gerätes unterwiesen wurden und die daraus resultierenden Gefahren verstehen Kinder dürfen nicht mit dem Gerät spielen Reinigung und Benutzer Wartung dürfen nicht von Kindern ohne Beaufsichtigung ...

Page 10: ...iedrige Akkuladung anzeigt Tipps und Tricks HINWEIS Benutzen Sie das Gerät nicht wenn Sie einen Sonnenbrand an den betroffenen Körperstellen haben Hautreizungen oder rötungen vorliegen Sie eine Hautkrankheit wie zum Beispiel Neurodermitis haben Sie Pickel Muttermale oder Warzen an den betroffenen Körperstellen haben Sie Wunden offene Wunden oder erhabene Narben an den betroffenen Körperstellen haben T...

Page 11: ...usrichtung von Aufsatz zu Handgerät Die Krümmung der Aufsätze muss immer zu der Seite des Handgerätes weisen auf der sich der Ein Ausschalter 3 befindet Um einen Aufsatz aufzusetzen drücken Sie ihn auf das Gerät siehe Abb 1 Um einen Aufsatz abzunehmen ziehen Sie ihn vom Gerät ab siehe Abb 2 Abb 1 Abb 2 Epilieren Wenn das Gerät aufgeladen ist und die zu epilierenden Körperstellen vorbereitet sind 1 ...

Page 12: ...ich an den Service siehe Kapitel Garantie und Service Halten Sie die IAN Nummer bereit siehe Cover der Bedienungsanleitung Bikinizone mit Präzisionstrimmer und kamm trimmen Benutzen Sie zum Trimmen der Bikinizone den Präzisionstrimmer mit Präzisionskamm 1 Nehmen Sie zunächst ggf einen Aufsatz vom Handgerät ab Setzen Sie den Präzisionstrimmer so auf das Handgerät dass die beiden Rillen im Aufsatz s...

Page 13: ...n Richtung des Aufsatzes 3 Modellieren Sie mit dem Gerät die gewünschten Kontur der Bikinizone Berühren Sie dabei das Haar leicht mit dem Präzisionstrimmer Sie können den Präzisionstrimmer direkt auf die Haut gerichtet verwenden oder mit dem äußeren Teil des Aufsatz gehäuses über die Haut streichen Lassen Sie entweder Ihrer Kreativität freien Lauf oder verwenden Sie eine der beiliegenden Trimmscha...

Page 14: ...dlung fertig sind schieben Sie den Ein Ausschalter 3 in die entgegengesetzte Richtung um das Gerät auszuschalten Mit Mikrotrimmer Augenbrauen formen bzw einzelne Gesichtshaare entfernen Mit dem Mikrotrimmer können Sie Augenbrauen formen oder einzelne Gesichtshaa re entfernen 1 Nehmen Sie zunächst ggf einen Aufsatz vom Handgerät ab Setzen Sie den Mik rotrimmer auf das Handgerät Die leichte Krümmung...

Page 15: ... führen Sie das Gerät gegen die Haarwuchsrichtung 5 Wenn Sie mit der Behandlung fertig sind schieben Sie den Ein Ausschalter 3 in die entgegengesetzte Richtung um das Gerät auszuschalten 6 Setzen Sie die Schutzkappe wieder auf HINWEIS ZUR SCHERFOLIE Wenn die Scherfolie beschädigt ist benutzen Sie diese nicht weiter Um die Scherfolie zu wechseln nehmen Sie den Mikrorasierer vom Handgerät ab Ziehen ...

Page 16: ...as dann zum Vorschein kommende Schneidewerk vorsichtig mit dem beiliegenden Reinigungspinsel 6 Dann setzen Sie die beiden Teile des Mikrorasierers wieder zusammen Bei regelmäßigem Gebrauch sollte der Präzisionstrimmer und der Mikrotrimmer gelegentlich geölt werden Benutzen Sie dazu das mitgelieferte Öl Wischen Sie das Gerät die Trimmschablonen und den Netzadapter 0 mit einem feuchten Tuch ab Bei B...

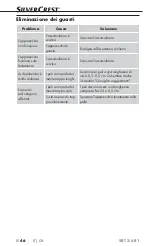
Page 17: ... langsam Der Akku ist leer Laden Sie den Akku Das Epilieren der Haare ist sehr schmerzhaft Die Haare sind eventuell zu lang Kürzen Sie die Haare auf ca 0 3 0 5 cm Beachten Sie auch das Kapitel Tipps und Tricks Es werden nicht alle Haare erfasst Es ist möglich dass die Haare zu kurz sind Die Haare sollten eine Länge von 0 3 0 5 cm haben Sie arbeiten zu schnell Bewegen Sie das Gerät langsamer über d...

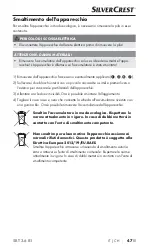
Page 18: ...e des Gerätes lösen lassen 3 Lösen Sie die beiden nun sichtbaren Schrauben Sie können dann das Gehäuse auseinander nehmen 4 Kneifen Sie das rote und das schwarze Kabel welches die Platine mit dem blau ummantelten Akku verbindet durch Sie können nun den Akku aus dem Gerät entfernen Entsorgen Sie den Akku umweltgerecht Beachten Sie die aktuell geltenden Vorschriften Setzen Sie sich im Zweifels fall ...

Page 19: ... Eingriffen die nicht von unserer autorisierten Service Niederlassung vorgenom men wurden erlischt die Garantie Ihre gesetzlichen Rechte werden durch diese Garantie nicht eingeschränkt Die Garan tiezeit wird durch die Gewährleistung nicht verlängert Dies gilt auch für ersetzte und reparierte Teile Eventuell schon beim Kauf vorhandene Schäden und Mängel müssen sofort nach dem Auspacken gemeldet werd...

Page 20: ... les embouts en place et les retirer 24 Épilation 24 Tondre la zone bikini avec la tondeuse et le peigne de précision 25 Sculpter avec la tondeuse de précision 26 Couper les sourcils avec la tondeuse de précision et le peigne à sourcils 26 Sculpter les sourcils avec la micro tondeuse ou éliminer les poils du visage 27 Raser avec le micro rasoir 28 Nettoyage et entretien 29 Entreposage 29 Dépannage...

Page 21: ...nt destiné à l épilation et à la coupe des sourcils et de la zone du bikini dans les ménages privés Ne l utilisez pas à des fins professionnelles Tout usage autre ou dépassant ce cadre est réputé non conforme Aucune réclamation ne sera prise en compte pour des dommages résultant d une utilisation du matériel non conforme à la destination de réparations effectuées incorrectement de modifications arbit...

Page 22: ... de l emballage dans le cycle des matériaux permet d économiser les matières premières et réduit la formation de déchets Veuillez éliminer les matériaux d emballage qui ne servent plus en respectant la réglementation locale Éléments de commande Figure A Tête d épilation Capuchon de protection du micro rasoir Micro rasoir Peigne pour les sourcils à 3 positions Crans du peigne pour les sourcils Tond...

Page 23: ... sécurité protégé contre les court circuits SMPS Bloc d alimentation Appareil Tension d entrée 4 5 V Courant absorbé 1000 mA Indice de protection IPX4 Consignes de sécurité RISQUE D ÉLECTROCUTION L adaptateur secteur pour la charge de l accu intégré ne doit être branché que dans une prise installée régle mentairement et alimentée par une tension secteur de 100 240 V 50 60 Hz Le câble de l adaptate...

Page 24: ...il à l extérieur N enroulez pas le câble de l adaptateur secteur autour de l appareil et protégez le contre les endommagements Ne saisissez jamais l appareil l adaptateur secteur et son fil avec les mains mouillées ATTENTION Maintenez l appareil au sec L appareil est protégé contre les projections d eau conformément à l indice de protection IPX4 l adap tateur secteur ne l est pas N utilisez jamais ...

Page 25: ...es personnes ayant des capacités physiques mentales ou sensorielles réduites ou qui n ont pas l expérience et les connaissances nécessaires s ils sont sous la surveillance d une personne responsable de leur sécurité ou s ils ont reçu des instructions concernant l utilisation de l appareil et qu ils comprennent les dan gers pouvant en résulter Ne pas laisser les enfants jouer avec l appareil Il est...

Page 26: ...a charge de l accu est trop faible Conseils et astuces REMARQUE N utilisez pas l appareil lorsque vous présentez un coup de soleil sur les zones corporelles concernées présentez des irritations ou rougeurs cutanées souffrez d une maladie de la peau comme par exemple la névrodermite avez des boutons d acné des taches de naissance ou des verrues sur les zones corporelles concernées avez des plaies pl...

Page 27: ...même manière Veillez au bon alignement de l embout avec l appareil la courbure de l embout doit toujours pointer vers le côté de l appareil sur lequel se trouve le bouton marche arrêt 3 Pour mettre en place un embout appuyez le sur l appareil voir fig 1 Pour retirer un embout tirez le de l appareil voir fig 2 fig 1 fig 2 Épilation Lorsque l appareil est chargé et que les zones corporelles à épiler son...

Page 28: ... le numéro IAN à portée de main voir la page de couverture du mode d emploi Tondre la zone bikini avec la tondeuse et le peigne de précision Pour tondre la zone de bikini utilisez la tondeuse de précision avec le peigne de précision 1 Retirez d abord éventuellement un embout de l appareil Positionnez la tondeuse de précision sur l appareil de manière à ce que les deux rainures de l embout recouvre...

Page 29: ...on de l embout 3 Modelez le contour souhaité de la zone de bikini avec l appareil Ce faisant touchez légèrement les poils avec la tondeuse de précision Vous pouvez utiliser la ton deuse de précision directement sur la peau ou glisser sur la peau avec la partie extérieure du boîtier de l embout Donnez libre cours à votre créativité ou bien utilisez l un des pochoirs de tonte ci joints pour créer un...

Page 30: ...de la racine du nez 7 Une fois le traitement terminé repoussez le bouton marche arrêt 3 dans la direction opposée pour éteindre l appareil Sculpter les sourcils avec la micro tondeuse ou éliminer les poils du visage La micro tondeuse vous permet de sculpter les sourcils ou d éliminer des poils du visage 1 Retirez d abord éventuellement un embout de l appareil Placez la micro ton deuse sur l appare...

Page 31: ... glisser l appareil à rebrousse poil 5 Une fois le traitement terminé repoussez le bouton marche arrêt 3 dans la direction opposée pour éteindre l appareil 6 Remettez le capuchon de protection en place REMARQUE CONCERNANT LA GRILLE DE COUPE Si la grille de coupe est endommagée cessez d utiliser l appareil Pour remplacer la grille de coupe retirez le micro rasoir de l appareil Retirez la partie de ...

Page 32: ...yez avec précaution l outil de coupe qui apparaît avec le pinceau de nettoyage 6 livré Assemblez ensuite à nouveau les deux parties du micro rasoir En cas d utilisation régulière la tondeuse de précision et la micro tondeuse doivent être huilées de temps en temps Utilisez l huile livrée Essuyez l appareil les pochoirs de tonte et l adaptateur secteur 0 à l aide d un chiffon humide Si nécessaire ver...

Page 33: ...a batterie est déchargée Chargez l accu L épilation est très douloureuse Les poils sont éven tuellement trop longs Raccourcissez les poils à env 0 3 0 5 cm Veuillez également tenir compte du chapitre Trucs et astuces Les poils ne sont pas tous saisis Il est possible que les poils soient trop courts Les poils devraient avoir une longueur de 0 3 0 5 cm Vous travaillez trop vite Déplacez l appareil p...

Page 34: ...rieur afin que les parties latérales de l appareil puissent être détachées 3 Desserrez les deux vis devenues visibles Vous pouvez ensuite démonter le boîtier 4 Sectionnez le fil rouge et le fil noir qui relient la carte avec la batterie à gaine bleue Vous pouvez à présent retirer la batterie de l appareil Procédez à une mise au rebut respectueuse de l environne ment de la batterie Respectez la réglem...

Page 35: ...nnel La garantie est annulée en cas de manipulation incorrecte et inappropriée d usage de la force et en cas d intervention non réalisée par notre centre de service après vente agréé Vos droits légaux ne sont pas restreints par la présente garantie L exercice de la garan tie ne prolonge pas la période de garantie Cette disposition s applique également aux pièces remplacées ou réparées Les dommages...

Page 36: ...one degli accessori 40 Depilazione 40 Rifinitura della zona bikini con rifinitore e pettine di precisione 41 Modellatura con il rifinitore di precisione 42 Taglio delle sopracciglia con il rifinitore di precisione e il pettine per sopracciglia 42 Modellatura delle sopracciglia con il microtrimmer e rimozione di singoli peli del viso 43 Rasatura con il microrasoio 44 Pulizia e manutenzione 45 Conservaz...

Page 37: ...conforme Questo apparecchio è destinato esclusivamente alla depilazione e al taglio di soprac ciglia e zona bikini in ambiente domestico privato Non utilizzarlo a fini commerciali Un uso diverso o esulante da quanto sopra è considerato non conforme Sono escluse rivendicazioni di qualsiasi tipo per danni derivanti da uso non conforme riparazioni non professionali modifiche non autorizzate o uso di pa...

Page 38: ...risparmiare materie prime e riduce la generazione di rifiuti Smaltire il materiale di imballaggio inutilizzato in conformità alle norme vigenti localmente Elementi di comando Figura A Testina depilante Cappuccio di protezione per Microrasoio Microrasoio Pettine per sopracciglie con 3 punti di arresto Punti di arresto per pettine per sopracciglie Rifinitore di precisione Microrifinitore Pettine di pre...

Page 39: ...icurezza resistente al cortocircuito SMPS alimentatore a commutazione Apparecchio Tensione di ingresso 4 5 V Assorbimento di corrente 1000 mA Grado di protezione IPX4 Indicazioni relative alla sicurezza PERICOLO DI SCOSSA ELETTRICA Per caricare l accumulatore incorporato connettere l adat tatore di rete solo a una presa di rete installata a norma con tensione di rete di 100 240 V 50 60 Hz Il cavo ...

Page 40: ...n utilizzare l apparecchio all aperto Non avvolgere il cavo dell adattatore di rete attorno all apparecchio e proteggerlo da eventuali danneggia menti Non afferrare mai l apparecchio l adattatore di rete e il suo cavo con le mani umide ATTENZIOINE Tenere l apparecchio sempre asciutto L apparecchio è protetto dagli spruzzi d acqua secon do il grado di protezione IPX4 l adattatore no Non utilizzare m...

Page 41: ...tilizzato dai bambini di almeno 8 anni di età e da persone con capacità fisiche sensoriali o mentali ridotte o insufficiente espe rienza o conoscenza solo se sorvegliati o istruiti sull uso sicuro dell apparecchio e qualora ne abbiano compreso i pericoli associati I bambini non devono giocare con l apparecchio La pulizia e la manutenzione a cura dell utente non devono essere eseguite da bambini a men...

Page 42: ...nato rosso verde Consigli e suggerimenti AVVERTENZA Non utilizzare l apparecchio se Si hanno scottature solari sulla parte del corpo dove si desidera utilizzarlo Sono presenti arrossamenti o irritazioni cutanee Si soffre di malattie cutanee come ad esempio neurodermatite Si hanno brufoli voglie o verruche sulla parte del corpo che si desidera depilare Si hanno ferite ferite aperte o cicatrici in ri...

Page 43: ...ssi allo stesso modo Badare che accessorio e impugnatura siano correttamente allineati La curvatura degli accessori deve essere sempre rivolta verso il lato dell impugnatura sul quale si trova l interruttore On Off 3 Per applicare un accessorio premere sull apparecchio vedi fig 1 Per rimuovere un accessorio sfilarlo dall apparecchio vedi fig 2 Fig 1 Fig 2 Depilazione Quando l apparecchio è caricato e ...

Page 44: ...l uso Rifinitura della zona bikini con rifinitore e pettine di precisione Per rifinire la zona bikini utilizzare il rifinitore di precisione con il pettine di preci sione 1 Dapprima rimuovere uno degli accessori eventualmente applicato sull impugnatura Mettere il rifinitore di precisione sull impugnatura in modo tale che le due scanalature presenti nell accessorio coincidano con quelle presenti sul ret...

Page 45: ...a bikini desiderato Nel far questo toccare leggermente i peli con il rifinitore di precisione Si può utilizzare il rifinitore di precisione dirigendolo direttamente sulla pelle oppure passandolo di striscio sulla pelle con la parte esterna dell involucro dell accessorio Si può dare sfogo alla propria creatività o utilizzare una delle sagome per la rifinitura fornite in dotazione per ottenere un conto...

Page 46: ...naso 7 Quando il trattamento è terminato per spegnere l apparecchio spingere l interruttore On Off 3 nella direzione opposta Modellatura delle sopracciglia con il microtrimmer e rimozione di singoli peli del viso Con il microtrimmer si possono modellare le sopracciglia o rimuovere singoli peli presenti sul viso 1 Dapprima rimuovere uno degli accessori eventualmente applicato sull impugna tura Appli...

Page 47: ...accessorio 4 Appoggiare con cautela la lama sulla pelle e muovere l apparecchio contropelo 5 Quando il trattamento è terminato per spegnere l apparecchio spingere l interrutto re On Off 3 nella direzione opposta 6 Rimettere il cappuccio di protezione AVVERTENZA SULLA LAMA Se la lama è danneggiata cessare di utilizzarla Per sostituire la lama rimuovere il microrasoio dall impugnatura Sfilare la parte...

Page 48: ...nello 6 fornito in dotazione Infine ricon giungere le due parti del microrasoio In caso di uso frequenta si consiglia di lubrificare di tanto in tanto con olio il rifini tore di precisione e il microrifinitore A tale scopo utilizzare l olio fornito in dotazione Strofinare l apparecchio le sagome per la rifinitura e l adattatore di rete 0 con un panno umido In caso di necessità è possibile utilizzare un ...

Page 49: ... L accumulatore è scarico Caricare l accumulatore La depilazione è molto dolorosa I peli sono probabil mente troppo lunghi Accorciare i peli a una lunghezza di circa 0 3 0 5 cm Consultare anche il capitolo Consigli e suggerimenti Non tutti i peli vengono afferrati I peli sono probabil mente troppo corti I peli devono avere una lunghezza compresa fra 0 3 e 0 5 cm Si sta lavorando trop po velocemente...

Page 50: ...ti laterali dell apparecchio 3 Allentare ora le due viti visibili Ora è possibile smontare l alloggiamento 4 Tagliare il cavo rosso e nero che connette la scheda all accumulatore rivestito con una guaina blu Ora è possibile rimuovere l accumulatore dall apparecchio Smaltire l accumulatore in modo ecologico Rispettare le norme attualmente in vigore In caso di dubbi mettersi in contatto con l ente d...

Page 51: ...zia decade in caso di impiego improprio o manomissione uso della forza e interventi non eseguiti dalla nostra filiale di assistenza autorizzata Questa garanzia non costituisce alcun limite ai diritti legali del consumatore Il periodo di garanzia non viene prolungato da interventi in garanzia Ciò vale anche per le parti sostituite e riparate I danni e difetti eventualmente presenti già all atto dell...

Page 52: ...ing the attachments 56 Epilation 56 Trimming the bikini line with the precision trimmer and trimming comb 57 Shaping with the precision trimmer 58 Trimming eyebrows with the precision trimmer and eyebrow comb 58 Using the micro trimmer to form the eyebrows or remove individual facial hairs 59 Shaving with the micro shaver 60 Cleaning and care 61 Storage 61 Troubleshooting 62 Disposal of the applia...

Page 53: ...tended use This appliance is intended exclusively for the epilation of human hair from the eyebrows and bikini line in domestic households It is not suitable for commercial use It is not intended for any other use or use beyond that specified Claims of any kind for damage resulting from unintended use incompetent repairs unauthorised modification or the use of unauthorised spare parts will not be ac...

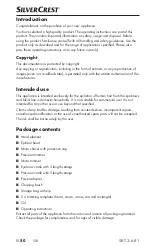
Page 54: ...o the material cycle conserves raw materials and reduces the amount of waste that is generated Dispose of packaging materials which are no longer needed in accordance with applicable local regulations Controls Figure A Epilator head Protective cap for micro shaver Micro shaver Eyebrow comb with 3 length settings Length settings for eyebrow comb Precision trimmer Micro trimmer Precision comb with 5...

Page 55: ...mer short circuit proof SMPS switched mode power supply Appliance Input voltage 4 5 V Current consumption 1000 mA Protection type IPX4 Safety guidelines RISK OF ELECTRIC SHOCK Connect the mains adapter for charging the built in bat tery only to a correctly installed mains power socket that supplies a mains voltage of 100 240 V 50 60 Hz The cable of the mains adapter cannot be replaced If the cable...

Page 56: ...o avoid personal risks Do not use the appliance outdoors Do not wrap the mains adapter cable around the appliance and protect it from being damaged Never touch the appliance mains adapter or its cable with wet hands WARNING Keep the appliance dry The appliance is splash proof in accordance with protection class IPX4 the mains adapter is not Never use the appliance with its mains adapter connected ...

Page 57: ... used by children aged 8 years and above and by persons with limited physical sensory or mental capabilities or lack of experience and knowledge provided that they are under supervision or have been told how to use the appliance safely and are aware of the potential risks Children must not use the appliance as a plaything Cleaning and user maintenance tasks may not be carried out by children unles...

Page 58: ...nce until the control lamp starts alternately flashing red and green indicating low battery charge level Tips and tricks NOTE Do not use the appliance if You have sunburn on the specific part of the body You have skin irritation or redness You have a skin disease such as neurodermatitis You have pimples moles or warts on the affected parts of the body You have wounds open sores or raised scars on the...

Page 59: ...ent to the hand element The curvature of the attachments must always be towards the side of the hand element on which the on off button 3 is located To fit an attachment press it onto the appliance see Fig 1 To remove an attachment pull it off the appliance see Fig 2 Fig 1 Fig 2 Epilation When the appliance is charged and the body part to be epilated is prepared 1 Rub your hand once more against the ...

Page 60: ...e Please have the IAN number ready see operating manual cover Trimming the bikini line with the precision trimmer and trimming comb Use the precision trimmer with the precision comb to trim your bikini line 1 Start by removing any other attachment from the hand element if required Fit the precision trimmer attachment onto the hand element so that the two grooves in the attachment match up with tho...

Page 61: ...he direction of the attachment 3 Use the appliance to contour your bikini line as required Push the precision trimmer gently against the hair You can use the precision trimmer directly on the skin or stroke the outer part of the attachment housing across the skin Let your creativity run free or use one of the enclosed trimming templates to create a contour 4 When you are finished with the treatment...

Page 62: ... with the treatment push the on off switch 3 in the opposite direction to switch off the appliance Using the micro trimmer to form the eyebrows or remove individual facial hairs You can use the micro trimmer to form the eyebrows or remove individual facial hairs 1 Start by removing any other attachment from the hand element if required Fit the micro trimmer on the hand element The slight curvature o...

Page 63: ...ving foil gently on the skin and move the appliance against the direction of hair growth 5 When you are finished with the treatment push the on off switch 3 in the opposite direction to switch off the appliance 6 Replace the protective cap NOTE ON THE SHAVING FOIL If the shaving foil is damaged do not use it any more To replace the shaving foil remove the micro shaver from the hand element Pull the c...

Page 64: ...tachment and then carefully clean the cutting blades that have now been revealed using the supplied cleaning brush 6 Then put the two parts of the micro shaver back together If used regularly the precision trimmer and the micro trimmer should be oiled occasionally Use the supplied oil Wipe the appliance the trimming templates and the power adapter 0 with a moist cloth If required use some mild det...

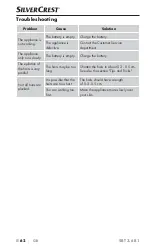
Page 65: ... appliance only runs slowly The battery is empty Charge the battery The epilation of the hairs is very painful The hairs may be too long Shorten the hairs to about 0 3 0 5 cm See also the section Tips and Tricks Not all hairs are plucked It is possible that the hairs are too short The hairs should have a length of 0 3 0 5 cm You are working too fast Move the appliance more slowly over your skin ...

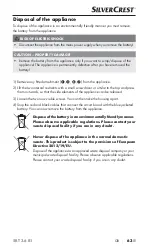
Page 66: ...utwards so that the side elements of the appliance can be released 3 Loosen the two now visible screws You can then take the housing apart 4 Snip the red and black cables that connect the circuit board with the blue jacketed battery You can now remove the battery from the appliance Dispose of the battery in an environmentally friendly manner Please observe applicable regulations Please contact you...

Page 67: ...y and is not intended for commercial use The warranty is void in the case of abusive and improper handling use of force and internal tampering not carried out by our authorised service branch Your statutory rights are not restricted in any way by this warranty The warranty period is not extended by repairs made under the warranty This applies also to replaced and repaired parts Damages and defects...

Page 68: ...SS HANDELS GMBH BURGSTRASSE 21 44867 BOCHUM DEUTSCHLAND GERMANY www kompernass com Stand der Informationen Version des informations Versione delle informazioni Last Information Update 11 2015 Ident No SBT3 6B1 102015 1 1 ...

Reviews: