background image

SGBR 1500 B3

■ 

10 

GB

CY

NOTE


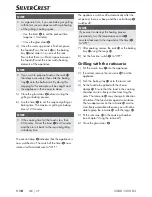
As a general rule, if you are baking or grilling 
with hot air you can dispense with a preheating 
of the grilling/cooking space. 


Use the timer 

 to set the preheat time  

(approx. 10 minutes).


Close the glass door 

.

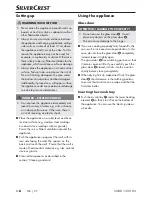
4)  Once the warm-up period is finished, place  

the foodstuffs on the rack 

!

 or the baking  

tray 

-

 and slide it in on one of the rails.  

Ensure that there is sufficient space between 
the foodstuffs and the inner walls/heating  
elements of the appliance.

NOTE


If you wish to prepare food on the rack 

!


that drips excessively, then slide the baking 
tray 

-

 onto the bottom rail. By doing this, 

dripping fat for example will be caught and 
the appliance is then easier to clean.

5)  Close the glass door 

 before starting the 

grilling or baking process.

6)  Use the timer 

 to set the required grilling or 

baking time. The maximum grilling or baking 
time is 120 minutes.

NOTE


If the cooking time for the food is less than  
20 minutes, first set the timer 

 to 40 minutes 

and then turn it back to the required grilling 
or baking time.

The control lamp 


 indicates that the appliance is 

now switched on. The switch of the timer 

 now 

rotates itself anti-clockwise to "OFF ".

The appliance switches off automatically after the 
set period, there is a beep and the control lamp 


switches off.  

NOTE

If you want to interrupt the heating process  
prematurely, turn the temperature control 


counter-clockwise to the stop and set the timer 


to "OFF ".

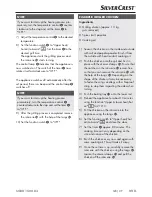
7)  After cooking, remove the rack 

!

 or the baking 

tray 

-

 using the tongs 

.

8)  Set the function switch 

 to "OFF".

Grilling with the rotisserie

1)  Put the crumb tray 

 into the appliance.

2)  If inserted, remove the rotisserie 

6

 from the 

appliance.

3)  Push the baking tray 

-

 onto the lower rail.

4)  Fix the food to be grilled with the skewer  

clamps 

0

. Ensure that the food in the cooking 

chamber can turn freely without touching the 
sides. The rotisserie 

6

may change its direction 

of rotation if the food strikes against a resistance.  
The two depressions on the rotisserie 

6

 must re-

main freely accessible, otherwise you will not be 
able to grasp the rotisserie 

6

 with the tongs 

3

.

5)  Fit the rotisserie 

6

 in the cooking chamber 

(see chapter "Using the rotisserie")

6)  Close the glass door 

.

Summary of Contents for 274498

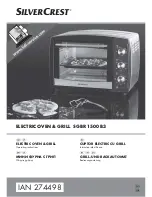
Page 1: ...RIC OVEN GRILL SGBR 1500 B3 IAN 274498 ELECTRIC OVEN GRILL Operating instructions CUPTOR ELECTRIC CU GRILL Instrucţiuni de utilizare МИНИ ФУРНА С ГРИЛ Οδηүίες χρήσης GRILL UND BACKAUTOMAT Bedienungsanleitung ...

Page 2: ...d familiarise yourself with all functions of the device Înainte de a citi instrucţiunile priviţi imaginile şi familiarizaţi vă cu toate funcţiile aparatului Πριν ξεκινήσετε την ανάγνωση ανοίξτε τη σελίδα με τις εικόνες και εξοικειωθείτε με όλες τις λειτουργίες της συσκευής Klappen Sie vor dem Lesen die Seite mit den Abbildungen aus und machen Sie sich anschließend mit allen Funktionen des Gerätes ...

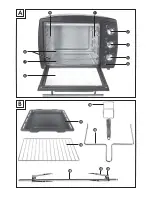
Page 3: ...B A 3 6 0 ...

Page 4: ... 6 Glass door 6 Inserting the crumb tray 6 Using the rotisserie 7 Using the baking tray rack 8 Before first use 8 Operating the appliance 9 Function switch 9 Temperature control 9 Timer 9 Grilling and baking 9 Grilling with the rotisserie 10 Cleaning and care 12 Storage 12 Troubleshooting 13 Disposal 14 Kompernass Handels GmbH warranty 14 Service 15 Importer 15 Recipes 16 ...

Page 5: ... in private homes Do not use it for commercial applications All other uses are deemed to be improper and may result in property damage or even in personal injury Package contents Electric Oven Grill 1 baking tray 1 rack 2 tongs Rotisserie with 2 clamps 1 crumb tray Operating instructions NOTE Check contents for completeness and damage immediately after unpacking Contact Customer Services if necess...

Page 6: ...ury Do not allow any liquids to penetrate the housing Do not expose the appliance to moisture and do not use it outdoors Additionally do not place fluid filled receptacles such as flower vases on the appliance This increases the risk of fire and of receiving an electric shock If liquids permeate into the housing unplug the appliance immediately and arrange for it to be repaired by a qualified technicia...

Page 7: ...nger than 8 years of age must be kept away from the appliance and the power cable Route the power cable in such a way that no one can tread on it or trip over it Never touch the glass door or the housing during use these can get very hot Use oven gloves or something similar to open the glass door to avoid being burnt Never touch the heating elements or the viewing window when the appliance is in u...

Page 8: ...heat sources such as hotplates or naked flames Only operate the appliance with the original accessories supplied Do not kink or crush the mains cable To disconnect always remove the plug itself from the mains power socket do not pull on the power cable When the appliance is in use ensure that there are no easily inflammable materials in the immediate vicinity e g dishcloths oven cloths etc Never dry...

Page 9: ...ant surface e g stainless steel worktops or natural stone worktops such as granite Ensure there is sufficient ventilation around the appliance Push the appliance up against the wall with its rear side facing the wall The spacers on the back must touch the wall Ensure that the wall is made of heat resistant material e g tiles natural stone or granite Clean all components as described in the section C...

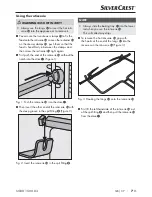
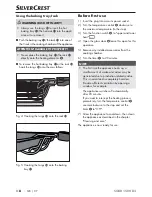
Page 10: ...t the notch into the drive Figure 1 Fig 1 Push the rotisserie 6 into the drive Then insert the other end of the rotisserie 6 with the deep groove in the spit fitting Figure 2 Fig 2 Insert the rotisserie 6 in the spit fitting NOTE Always slide the baking tray into the lower rail when you use the rotisserie 6 This will collect any drips To remove the hot rotisserie 6 grip with the hooks at the end of ...

Page 11: ...l clockwise to the maximum temperature to the stop 3 Turn the function switch to upper and lower heat 4 Open the glass door leave this open for this operation 5 Remove any installed accessories from the cooking chamber 6 Turn the timer to 20 minutes NOTE The first time the appliance heats up a small amount of smoke and odour may be generated due to production related residue This is normal and is c...

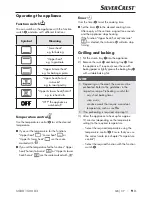
Page 12: ... cooking time After expiry of the set time a signal tone sounds and the appliance stops heating If the function Upper heat hot air rotisserie is selected the rotisserie 6 will also stop turning Grilling and baking 1 Put the crumb tray into the appliance 2 Remove the rack and baking tray from the appliance If required cover these with baking paper or lightly grease the baking tray with suitable bak...

Page 13: ...to the required grilling or baking time The control lamp indicates that the appliance is now switched on The switch of the timer now rotates itself anti clockwise to OFF The appliance switches off automatically after the set period there is a beep and the control lamp switches off NOTE If you want to interrupt the heating process prematurely turn the temperature control counter clockwise to the stop...

Page 14: ...kg guts removed Spices salt paprika Cooking oil 1 Season the chicken on the inside and outside with salt and paprika powder Brush it from the outside with heat resistant cooking oil 2 Push the chicken onto the spit and fix it in place with the skewer clamps 0 Ensure that the notches on the rotisserie 6 remain free so that you can remove the rotisserie 6 with the help of the tongs 3 Depending on the...

Page 15: ...chamber with an oven spray as this may make residues on the heating elements impossible to remove Wipe the appliance with a damp cloth If neces sary put a little mild detergent on the cloth and wipe this off afterwards with a cloth dampened with clean water Dry everything properly Clean the cooking chamber and the glass door with a moist cloth If necessary put a little mild detergent on the cloth a...

Page 16: ...e desired function The cooking time of the food seems very long The glass door has been opened often to check the cooking progress Do not open the glass door any more often than is absolutely necessary The wrong temperature level has been set Check the temperature settings Smoke and smells develop during use There is detergent or food residue on the heating elements Remove the food from the ap pli...

Page 17: ... occurrence If the defect is covered by the warranty your product will either be repaired or replaced by us The repair or replacement of a product does not signify the beginning of a new warranty period Warranty period and statutory claims for defects The warranty period is not prolonged by repairs effected under the warranty This also applies to replaced and repaired components Any damage and defe...

Page 18: ...n a defective product to us free of charge to the service address that will be provided to you Ensure that you enclose the proof of pur chase till receipt and information about what the defect is and when it occurred You can download these instructions along with many other manuals product videos and software on www lidl service com Service Service Great Britain Tel 0871 5000 720 0 10 Min E Mail k...

Page 19: ... in the nuts chocolate flakes or mashed bananas 4 Place the prepared dough into standard muffin moulds and place them on the baking tray 5 Bake the muffins at 220 C on the bottom rail using top bottom heat for about 15 minutes Hawaiian toast Ingredients for 4 pieces of toast 4 slices of toasting bread 1 2 tablespoons of remoulade 120 g cooked ham 1 2 tin of pineapples 4 slices of cheese for gratinating...

Page 20: ...aking tray with baking paper and place the cookies on this 7 Bake the cookies on the top rail of a preheated oven at 180 C using top and bottom heat for about 10 15 minutes until they are golden brown NOTE This quantity of dough is sufficient for several baking trays Bread rolls Ingredients 300 g flour or wholemeal flour 2 heaped teaspoons of baking powder 200 g linseeds 1 egg 500 g quark or curd chee...

Page 21: ...arge star nozzle with the meringue mixture and squeeze out rosettes slithers or other shapes onto a baking tray lined with baking paper Leave a little space between each shape 8 Preheat the oven with grill to approx 100 C with hot air 9 Bake the meringues with hot air at approx 100 C for about 2 hours Buttered croutons Ingredients 2 slices of toasting bread 1 tbsp butter Preparation 1 Cut the brea...

Page 22: ...uliflower about 250 g 3 lemon slices 1 tbsp butter 1 heaped tsp flour 1 tbsp lemon juice 1 tbsp slivered almonds 2 tbsp gratin cheese grated Salt pepper nutmeg Preparation 1 Divide the cauliflower into florets and wash them 2 Cook the cauliflower with the lemon slices in boiling salted water for 8 10 minutes until the cauliflower is al dente Retain about 150 ml of the cooking water before pouring the re...

Page 23: ...heese mixture and mix it all coarsely with a blender 5 Cut the remaining salmon into thin strips 6 Add the salmon and the dill to the mixture and blend all ingredients together 7 Place individual tablespoonfuls of the mixture on a flaky pastry sheet and fold them over 8 Coat the resulting pouch with egg yolk 9 Place the burek pieces on a baking sheet Leave sufficient space between the individual pouc...

Page 24: ...tăvii pentru firimituri 26 Utilizarea rotisorului 27 Utilizarea tăvii de copt grătarului 28 Înainte de prima utilizare 28 Deservirea aparatului 29 Comutator funcţional 29 Butonul de reglare a temperaturii 29 Temporizatorul 29 Frigerea şi coacerea 29 Frigerea la rotisor 30 Curăţarea şi îngrijirea 32 Depozitarea 32 Remedierea defecţiunilor 33 Eliminarea 34 Garanţia Kompernass Handels GmbH 34 Service ...

Page 25: ...zarea profesională Orice altă utilizare este considerată neconformă cu destinaţia şi poate conduce la pagube materiale sau vătămări corporale Furnitura Cuptor electric cu grill 1 tavă de copt 1 grătar 2 cleşti Rotisor cu 2 ţepuşe 1 tavă pentru firimituri Instrucţiuni de utilizare INDICAŢIE Imediat după dezambalare verificaţi dacă furnitura este completă şi nu prezintă deteriorări Adresaţi vă centru...

Page 26: ...iorate Evitaţi pătrunderea oricăror lichide în carcasă Nu expuneţi aparatul mediilor umede şi nu l utilizaţi în aer liber De ase menea este interzisă aşezarea vaselor cu lichide pe cuptor cum ar fi vazele Pericol de incendiu şi de electrocutare Dacă din întâmplare în carcasa aparatului se infiltrează lichide scoateţi imediat ştecărul din priză şi predaţi aparatul unui specialist în vederea reparării...

Page 27: ...ani nu trebuie se afle în apropierea aparatului şi a cablului de conexiune Poziţionaţi cablul de alimentare astfel încât să nu se calce pe el sau să devină un obstacol pentru persoane În timpul utilizării nu atingeţi niciodată uşa de sticlă sau carcasa deoarece acestea devin foarte fierbinţi Pentru a deschide uşa de sticlă utilizaţi o lavetă de bucătărie sau ceva similar în scopul prevenirii arsuril...

Page 28: ...ţi cum sunt plitele sau flăcările deschise Utilizaţi aparatul numai cu accesoriile originale din pachetul de livrare Nu îndoiţi şi nu striviţi cablul de alimentare Scoateţi întotdeauna cablul din priză trăgând de ştecăr nu trageţi direct de cablu În timpul funcţionării în imediata apropiere a cuptorului electric cu grill nu trebuie să se afle materiale inflamabile de ex prosoape de bucătărie lavete e...

Page 29: ...risire suficientă pe toate părţile aparatului Împingeţi aparatul cu partea din spate la perete Distanţierele de pe partea din spate trebuie să atingă peretele Asiguraţi vă că peretele este realizat dintr un material termorezistent de ex este acoperit cu faianţă piatră naturală sau granit Curăţaţi toate componentele în modul descris în capitolul Curăţarea şi îngrijirea Utilizarea aparatului Uşa de ...

Page 30: ...fără canelură în mecanismul de antrenare fig 1 Fig 1 Introduceţi rotisorul 6 în mecanismul de antrenare Apoi aşezaţi celălalt capăt al rotisorului 6 cu canelura adâncă în suportul pentru rotisor fig 2 Fig 2 Introduceţi rotisorul 6 în suport INDICAŢIE Împingeţi întotdeauna tava de copt pe şina inferioară atunci când utilizaţi rotisorul 6 În acest mod vor fi captate lichidele care se scurg Pentru a s...

Page 31: ...c la temperatura maximă 3 Rotiţi comutatorul funcţional pe Încălzire în partea superioară şi încălzire în partea inferioară 4 Deschideţi uşa de sticlă şi lăsaţi o deschisă pentru această operaţiune 5 Scoateţi eventualele accesorii din interiorul aparatului 6 Rotiţi temporizatorul la 20 de minute INDICAŢIE La prima încălzire a aparatului se pot degaja uşoare mirosuri şi fum din cauza resturilor răm...

Page 32: ...rioară ventilaţie orientaţi vă cu ajutorul scalei cu marcajul Temporizatorul Cu ajutorul temporizatorului poate fi reglat timpul de preparare Reglaţi temporizatorul pe timpul de preparare dorit După încheierea perioadei setate este emis un semnal sonor iar aparatul opreşte încălzirea În cazul selectării funcţiei Încălzire în partea superioară ventilaţie rotisor se opreşte şi rotirea rotisorului 6 ...

Page 33: ...i pe timpul dorit Becul de control indică faptul că aparatul este pornit Acum comutatorul temporizatorului se deplasează în sens invers acelor de ceasornic spre OFF 0 După expirarea timpului setat aparatul se opreşte automat este emis un semnal sonor iar becul de control se stinge INDICAŢIE Pentru a întrerupe anticipat procesul de încălzire rotiţi butonul de reglare a temperaturii până la limită î...

Page 34: ... LA ROTISOR Ingrediente Pui pentru rotisor cca 1 3 kg gata pentru preparare Condimente sare boia Ulei alimentar 1 Condimentaţi puiul în interior şi la exterior cu sare şi boia Ungeţi l la exterior cu ulei alimentar pentru prăjit 2 Introduceţi puiul pe frigare şi fixaţi l cu ţepuşele pentru rotisor 0 Asiguraţi vă că decupajele din rotisor 6 se menţin libere pentru a putea apuca rotisorul 6 cu cleşte...

Page 35: ...ray pentru cuptor deoarece reziduurile de pe elemenţii de încălzire nu se vor mai putea îndepărta Ştergeţi aparatul cu o lavetă umedă Dacă este necesar adăugaţi un detergent delicat pe lavetă şi ştergeţi cu o lavetă umezită cu apă curată Uscaţi totul foarte bine Curăţaţi interiorul aparatului şi uşa de sticlă cu o lavetă umedă Dacă este necesar adăugaţi un detergent delicat pe lavetă şi ştergeţi c...

Page 36: ...rare a alimentelor este prea lung Uşa de sticlă a fost deschisă de prea multe ori pentru a verifica stadiul de prepa rare Nu deschideţi uşa de sticlă mai des decât este neapărat necesar Este setată o temperatură eronată Verificaţi setările temperaturii Pe durata utilizării este degajat fum şi se înregistrează zgomote Pe elemenţii de încălzire se află reziduuri de detergent sau de alimente Scoateţi al...

Page 37: ...raţia sau înlocuirea produsului nu începe o nouă perioadă de garanţie Perioada de garanţie şi pretenţiile legale privind defectele Perioada de garanţie nu este prelungită după efectuarea reparaţiilor realizate în perioada de garanţie Acest lucru este valabil şi pentru piesele înlocuite şi reparate Eventualele deteriorări şi deficienţe prezente deja la cumpărare trebuie semnalate imediat după dezam...

Page 38: ...ăm să aveţi în vedere faptul că următoarea adresă nu reprezintă o adresă pentru service Contactaţi mai întâi centrul de service indicat KOMPERNASS HANDELS GMBH BURGSTRASSE 21 44867 BOCHUM GERMANY www kompernass com Reţete În acest capitol vă sunt oferite câteva exemple pentru prepararea mâncărurilor Aceste exemple sunt recomandări Timpul de preparare poate varia Reţete fără garanţie Toate ingredie...

Page 39: ...a cu încălzire în partea superioară şi inferioară cca 20 de minute Respectaţi instrucţiunile de pe ambalajul produsului în ceea ce priveşte temperatura Biscuiţi Ingrediente 125 g unt 125 g zahăr 1 vanilie 1 priză de sare 1 ou 1 albuş 250 g de făină tip 405 1 linguriţă de praf de copt Coaja rasă de la jumătate de lămâie Prepararea 1 Bateţi untul spumă 2 Adăugaţi zahărul zahărul vanilat coaja de lăm...

Page 40: ...area 1 vărsaţi albuşul rece într un castron fără grăsime Nu trebuie să existe resturi de gălbenuş deoarece spuma nu va avea consistenţă 2 Bateţi albuşul la viteză mică pentru a evita formarea bulelor de aer 3 Condimentaţi cu un praf de sare 4 Adăugaţi treptat jumătate din zahăr când albuşul începe să se întărească 5 Bateţi l apoi la viteză maximă până devine tare 6 Adăugaţi zahărul rămas Astfel be...

Page 41: ...est caz cu cca 5 minute Baghete cu carne tocată Ingrediente 2 baghete mici 250 g carne tocată amestec 2 roşii 1 ceapă tocată 2 linguri de pastă de roşii 40 g parmezan ras 4 felii caşcaval sare şi piper Prepararea 1 Tăiaţi baghetele şi scobiţi interiorul 2 Amestecaţi carnea tocată pasta de roşii ceapa parmezanul puţină sare şi puţin piper 3 Formaţi din amestec 4 chiftele mari pe cât posibil de plat...

Page 42: ... de copt 8 Coaceţi sufleul la cca 200 C în cuptorul preîncălzit cu căldură de sus şi de jos timp de cca 20 minute pe şina inferioară Buzunare cu somon Ingrediente 1 pachet foi de plăcintă cca 8 bucăţi 1 pachet somon afumat felii cca 200 g 1 lămâie 1 ceapă 1 pachet cremă de brânză 200 g mărar proaspăt sare şi piper 1 gălbenuş Prepararea 1 Separaţi foile de plăcintă şi lăsaţi le să se decongeleze da...

Page 43: ...SGBR 1500 B3 40 RO ...

Page 44: ...έτηση δίσκου συλλογής ψίχουλων 47 Χρήση περιστρεφόμενης σούβλας 47 Χρήση ταψιού σχάρας 48 Πριν την πρώτη χρήση 49 Χρήση της συσκευής 49 Διακόπτης λειτουργίας 49 Ρυθμιστής θερμοκρασίας 49 Χρονοδιακόπτης 50 Ψήσιμο στη σχάρα και ψήσιμο 50 Ψήσιμο με την περιστρεφόμενη σούβλα 51 Καθαρισμός και φροντίδα 54 Αποθήκευση 54 Διόρθωση σφαλμάτων 55 Απόρριψη 56 Εγγύηση της Kompernass Handels GmbH 56 Σέρβις 57 Ε...

Page 45: ...ωνη με τους κανονισμούς και μπορεί να οδηγήσει σε υλικές ζημιές ή ακόμη και σε σωματικές βλάβες Παραδοτέος εξοπλισμός Φουρνάκι με γκριλ 1 ταψί 1 σχάρα 2 λαβίδες Περιστρεφόμενη σούβλα με 2 τσιμπίδες 1 δίσκος συλλογής ψίχουλων Οδηγίες χρήσης ΥΠΟΔΕΙΞΗ Ελέγξτε τον παραδοτέο εξοπλισμό ως προς την πληρότητα και για ζημιές απευθείας μετά την αποσυσκευασία Απευθυνθείτε εάν απαιτείται στο τμήμα σέρβις Περι...

Page 46: ...ε υγρά να διεισδύουν μέσα στο περίβλημα της συσκευής Απαγορεύεται η έκθεση της συσκευής σε υγρασία καθώς και η χρήση της σε εξωτερικούς χώρους Επίσης δεν επιτρέπεται να τοποθετείτε επάνω στη συσκευή αντικείμενα γεμάτα με υγρά όπως π χ βάζα Υπάρχει κίνδυ νος πυρκαγιάς και ηλεκτροπληξίας Στην περίπτωση που ωστόσο εισχωρήσουν υγρά μέσα στο περίβλημα αποσυν δέστε αμέσως το βύσμα της συσκευής από την π...

Page 47: ... να παραμένουν μακριά από τη συσκευή και το καλώδιο σύνδεσης Τοποθετείτε το καλώδιο έτσι ώστε να μην μπορεί να το πατή σει κανείς ή να σκοντάψει σε αυτό Ποτέ μην αγγίζετε τη γυάλινη πόρτα ή το περίβλημα κατά τη διάρκεια της χρήσης διότι αυτά μπορεί να είναι πολύ ζεστά Για το άνοιγμα της γυάλινης πόρτας χρησιμοποιείτε ένα πανί κουζίνας ή κάτι παρόμοιο ώστε να αποφεύγετε εγκαύματα Ποτέ μην αγγίζετε ...

Page 48: ... με πηγές θερμότητας όπως μάτια κουζίνας ή φλόγες Χρησιμοποιείτε τη συσκευή μόνο με τα παραδοτέα γνήσια εξαρτήματα Μην διπλώνετε ή μαγκώνετε το καλώδιο Πιάνετε πάντα το βύσμα κατά την αποσύνδεση από την πρίζα μην τραβάτε ποτέ από το ίδιο το καλώδιο Κατά τη διάρκεια της λειτουργίας δεν επιτρέπεται να υπάρχουν εύφλεκτα υλικά πολύ κοντά στον αυτόματο φούρνο με γκριλ π χ πετσέτα πανιά κουζίνας κλπ Ποτ...

Page 49: ...πέτρα όπως γρανίτη Φροντίζετε για επαρκή αερισμό γύρω από τη συσκευή Σπρώξτε τη συσκευή με την πίσω πλευρά μέχρι τον τοίχο Οι αποστάτες στην πίσω πλευρά πρέπει να αγγίζουν τον τοίχο Φροντίζετε ώστε ο τοίχος να αποτελείται από θερμανθεκτικό υλικό π χ επένδυση από πλακάκια φυσική πέτρα ή γρανίτη Καθαρίζετε όλα τα εξαρτήματα όπως περιγρά φεται στο Κεφάλαιο Καθαρισμός και φροντί δα Χρήση της συσκευής ...

Page 50: ...κ 1 Εικ 1 Ώθηση περιστρεφόμενης σούβλας 6 στο σύστημα μετάδοσης κίνησης Στη συνέχεια τοποθετήστε το άλλο άκρο της περιστρεφόμενης σούβλας 6 με τη βαθιά εγκοπή στην υποδοχή της περιστρεφόμενης σούβλας Εικ 2 Εικ 2 Τοποθέτηση περιστρεφόμενης σούβλας 6 στην υποδοχή περιστρεφόμενης σούβλας ΥΠΟΔΕΙΞΗ Σπρώχνετε πάντα το ταψί στη χαμηλότερη ράγα όταν χρησιμοποιείτε την περιστρεφό μενη σούβλα 6 Έτσι τα υγρά...

Page 51: ... Γυρίστε το διακόπτη λειτουργίας στη θέση Επάνω και κάτω αντίσταση 4 Ανοίξτε τη γυάλινη πόρτα και αφήστε την ανοιχτή για αυτή τη διαδικασία 5 Απομακρύνετε τυχόν τοποθετημένα εξαρτήματα από το χώρο ψησίματος 6 Γυρίστε το χρονοδιακόπτη στα 20 λεπτά ΥΠΟΔΕΙΞΗ Κατά το πρώτο ζέσταμα της συσκευής μπορεί να προκύψουν υπολείμματα από τη διαδι κασία ετοιμασίας όπως και μικρή ανάπτυξη καπνού και οσμής Αυτό ε...

Page 52: ... μπορείτε να ρυθμίσετε το χρόνο ψησίματος Θέστε το χρονοδιακόπτη στον επιθυμητό χρόνο ψησίματος Με το πέρας του ρυθμισμέ νου χρόνου ακούγεται ένας ήχος και η συσκευή σταματά τη θέρμανση Εάν έχει επιλεγεί η λειτουργία Επάνω αντίσταση Αέρας Περιστρεφόμενη σούβλα στα ματάει και η περιστροφή της περιστρεφόμενης σούβλας 6 Ψήσιμο στη σχάρα και ψήσιμο 1 Τοποθετήστε το δίσκο συλλογής ψίχουλων στη συσκευή ...

Page 53: ...ποιημένη Ο διακόπτης του χρονοδιακόπτη κινείται τώρα προς τα αριστερά στη θέση OFF Η συσκευή απενεργοποιείται αυτόματα μετά το ρυθμισμένο χρόνο ακούγεται ένας ήχος και η λυχνία ελέγχου σβήνει ΥΠΟΔΕΙΞΗ Εάν επιθυμείτε να διακόψετε πρόωρα τη θερμα ντική διαδικασία γυρίστε το ρυθμιστή θερμοκρα σίας τέρμα αριστερά και θέστε το χρονοδια κόπτη στη θέση OFF 0 7 Μετά τη θερμαντική διαδικασία βγάλτε τη σχάρ...

Page 54: ...τε το κοτόπουλο μέσα και έξω με αλάτι και τη σκόνη πιπεριάς Απλώνετε εξωτε ρικά θερμανθεκτικό μαγειρικό λάδι 2 Σπρώχνετε το κοτόπουλο στη σούβλα και το στερεώνετε με τις τσιμπίδες περιστρεφόμενης σούβλας 0 Φροντίστε ώστε οι εσοχές που βρίσκονται στην περιστρεφόμενη σούβλα 6 να μένουν ελεύθερες ώστε να μπορείτε να πιάσετε την περιστρεφόμενη σούβλα 6 με τη βοήθεια της λαβίδας 3 Αναλόγως του σχή ματο...

Page 55: ... για φούρνους διότι τα υπολείμματα στις θερμαντικές ράβδους δεν θα αφαιρούνται πλέον Σκουπίζετε τη συσκευή με ένα νωπό πανί Εάν χρειάζεται προσθέτετε ήπιο απορρυπαντικό στο πανί και ξεπλένετε με πανί βρεγμένο με καθαρό νερό Στεγνώνετέ τα όλα καλά Καθαρίζετε το χώρο ψησίματος και τη γυάλινη πόρτα με ένα νωπό πανί Εάν χρειάζεται προσθέτετε ήπιο απορρυπαντικό στο πανί και ξεπλένετε με πανί βρεγμένο μ...

Page 56: ...αίνεται πολύ μεγάλος Η γυάλινη πόρτα άνοιξε πολλές φορές για να ελεγχθεί η πρόοδος του ψησίματος Μην ανοίγετε τη γυάλινη πόρτα συχνότερα από ότι χρειάζεται Έχει ρυθμιστεί λάθος θερμοκρασία Ελέγξτε τις ρυθμίσεις θερμοκρα σίας Κατά τη χρήση εμφανίζεται καπνός και θόρυβος Στις θερμαντικές ράβδους υπάρχουν υπολείμματα από τον καθαρισμό καθώς και υπολείμματα φαγητών Απομακρύνετε τα φαγητά από τη συσκευ...

Page 57: ...το που βρίσκεται η έλλειψη και πότε προέκυψε Εάν το ελάττωμα καλύπτεται από την εγγύησή μας θα λάβετε το επισκευασμένο ή ένα νέο προϊόν Περίοδος εγγύησης και νομικές απαιτήσεις λόγω ελλείψεων Ο χρόνος εγγύησης δεν παρατείνεται μέσω της πα ροχής εγγύησης Αυτό ισχύει και για εξαρτήματα τα οποία έχουν αντικατασταθεί και επισκευαστεί Ενδεχόμενες ήδη υπάρχουσες ζημιές και ελλείψεις κατά την αγορά πρέπε...

Page 58: ... Επικοινωνήστε κατ αρχήν με την αναφερόμενη υπηρεσία σέρβις KOMPERNASS HANDELS GMBH BURGSTRASSE 21 44867 BOCHUM GERMANY www kompernass com Συνταγές Σε αυτό το κεφάλαιο σας δίνουμε μερικά παρα δείγματα για την προετοιμασία φαγητών Αυτά τα παραδείγματα είναι προτάσεις Η διάρκεια προε τοιμασίας μπορεί να ποικίλει Συνταγές χωρίς εγγύηση Όλα τα υλικά και τα στοιχεία προετοιμασίας αποτελούν ενδεικτικές ...

Page 59: ...Ψήστε την πίτσα σε επάνω και κάτω θέρμανση για περ 20 λεπτά Προσοχή στα στοιχεία συσκευασίας σχετικά με τη θερμοκρασία Κουλουράκια Υλικά 125 γρ βούτυρο 125 γρ ζάχαρη 1 πακετάκι βανίλια 1 πρέζα αλάτι 1 αυγό 1 ασπράδι 250 γρ αλεύρι τύπος 405 1 ΚΓ μπέικιν πάουντερ Ξύσμα μισού λεμονιού Ετοιμασία 1 Χτυπάτε το βούτυρο έως ότου γίνει αφρός 2 Προσθέτετε τη ζάχαρη τη βανίλια το ξύσμα λεμονιού και τα αυγά 3...

Page 60: ...εν πρέπει να αναμει χθεί καθόλου κρόκος αλλιώς το χτυπημένο ασπράδι δε θα είναι σφιχτό 2 Χτυπάτε το ασπράδι σε αργή βαθμίδα ώστε να μη δημιουργούνται πολύ μεγάλες φουσκάλες στο χτυπημένο ασπράδι 3 Βάζετε μια πρέζα αλάτι 4 Προσθέτετε το ήμισυ της ζάχαρης λίγο λίγο όταν το χτυπημένο ασπράδι αρχίζει να σφίγγει 5 Τότε χτυπάτε σε πιο υψηλή βαθμίδα έως ότου σφίξει 6 Προσθέτετε την υπόλοιπη ζάχαρη Έτσι η...

Page 61: ...ομάτες 1 κρεμμύδι κομμένο 2 ΚΣ τομάτα πελτέ 40 γρ τριμμένη παρμεζάνα 4 φέτες τυρί Αλάτι και πιπέρι Ετοιμασία 1 Κόβετε τις μπαγκέτες και βγάζετε την ψίχα 2 Ανακατεύετε τον κιμά τον πελτέ τομάτας τα κρεμ μύδια την παρμεζάνα λίγο αλάτι και πιπέρι 3 Σχηματίζετε από τον κιμά 4 μεγάλα ισομεγέθη μπιφτέκια και τα τοποθετείτε επάνω στα μισά κομμάτια των μπαγκετών 4 Κόβετε την τομάτα σε φέτες και τις μοιράζ...

Page 62: ...στην κάτω ράγα Πουγκάκια φύλλου με γέμιση σολομού Υλικά 1 πακ φύλλα ζύμης περ 8 τεμάχια 1 πακ σολομός καπνιστός σε φέτες περ 200 γρ 1 λεμόνι 1 κρεμμύδι 1 πακ νωπό τυρί 200 γρ Φρέσκος άνηθος Αλάτι και πιπέρι 1 κρόκος Ετοιμασία 1 Ξεχωρίζετε τα φύλλα ζύμης μεταξύ τους και τα αφήνετε εάν χρειάζεται να ξεπαγώσουν 2 Ανακατεύετε το νωπό τυρί με αλάτι πιπέρι και με το χυμό του λεμονιού 3 Κόβετε τα κρεμμύδ...

Page 63: ...SGBR 1500 B3 60 GR CY ...

Page 64: ...es Gerätes 66 Glastür 66 Krümelblech einlegen 66 Drehspieß benutzen 67 Backblech Gitterrost benutzen 68 Vor dem ersten Gebrauch 68 Bedienen des Gerätes 69 Funktionsschalter 69 Temperaturregler 69 Timer 69 Grillen und Backen 69 Grillen mit Drehspieß 70 Reinigung und Pflege 72 Aufbewahrung 72 Fehlerbehebung 73 Entsorgung 74 Garantie der Kompernaß Handels GmbH 74 Service 75 Importeur 75 Rezepte 76 ...

Page 65: ...en Haushalten bestimmt Nutzen Sie es nicht gewerblich Jede andere Verwendung gilt als nicht bestimmungs gemäß und kann zu Sachschäden oder sogar zu Personenschäden führen Lieferumfang Grill und Backautomat 1 Backblech 1 Gitterrost 2 Zangen Drehspieß mit 2 Klemmen 1 Krümelblech Bedienungsanleitung HINWEIS Kontrollieren Sie den Lieferumfang direkt nach dem Auspacken auf Vollständigkeit und Beschä di...

Page 66: ...en Sie dürfen das Gerät keiner Feuchtigkeit aussetzen und nicht im Freien benutzen Darüber hinaus dürfen Sie keine mit Flüssigkeiten gefüllten Gegenstände wie z B Vasen auf dem Gerät abstellen Es besteht Brandgefahr und Gefahr eines elektrischen Schlags Falls doch einmal Flüssigkeit in das Gerätegehäuse gelangt ziehen Sie sofort den Netzste cker des Geräts aus der Netzsteckdose und lassen Sie es r...

Page 67: ...r als 8 Jahre sind von Gerät und Anschlusslei tung fernzuhalten Verlegen Sie das Netzkabel so dass niemand darauf treten oder darüber stolpern kann Berühren Sie niemals die Glastür oder das Gehäuse wäh rend der Benutzung da diese sehr heiß werden Verwen den Sie zum Öffnen der Glastür einen Topflappen o ä um Verbrennungen zu vermeiden Berühren Sie niemals die Heizstäbe oder das Sichtfenster während d...

Page 68: ... oder offenen Flammen in Berührung kommen Betreiben Sie das Gerät ausschließlich mit dem mitgeliefer ten Originalzubehör Knicken oder quetschen Sie das Netzkabel nicht Ziehen Sie das Netzkabel stets am Stecker aus der Steckdo se ziehen Sie nicht am Kabel selbst Es dürfen sich während des Betriebs keine leicht brennbaren Materialien in unmittelbarer Umgebung des Grill und Back automaten befinden z B ...

Page 69: ...tsplatten oder Natursteinarbeitsplatten wie Granit auf Sorgen Sie für ausreichende Belüftung rund um das Gerät Schieben Sie das Gerät mit der Rückseite bis an die Wand Die Abstandhalter an der Rückseite müssen die Wand berühren Achten Sie darauf dass die Wand aus hitzebeständigem Material besteht z B ein Fliesenspiegel Naturstein oder Granit Reinigen Sie alle Teile wie im Kapitel Reinigung und Pfle...

Page 70: ...ohne Nut in den Antrieb Abb 1 Abb 1 Drehspieß 6 in den Antrieb schieben Legen Sie dann das andere Ende des Drehspie ßes 6 mit der tiefen Nut in die Drehspießauf nahme Abb 2 Abb 2 Drehspieß 6 in die Drehspießaufnahme legen HINWEIS Schieben Sie immer das Backblech in die untere Schiene wenn Sie den Drehspieß 6 verwenden So werden herunterfallende Flüssigkeiten aufgefangen Um den heißen Drehspieß 6 z...

Page 71: ...hlag im Uhrzeigersinn auf die höchste Temperatur 3 Drehen Sie den Funktionsschalter auf Ober und Unterhitze 4 Öffnen Sie die Glastür und lassen Sie diese für diesen Vorgang geöffnet 5 Entnehmen Sie eventuell eingesetztes Zubehör aus dem Garraum 6 Drehen Sie den Timer auf 20 Minuten HINWEIS Beim erstmaligen Aufheizen des Gerätes kann es durch fertigungsbedingte Rückstände zu leichter Rauch und Geruch...

Page 72: ... Garzeit Nach Beendigung der eingestellten Zeit erklingt ein Signalton und das Gerät stoppt das Heizen Falls die Funktion Oberhitze Umluft Dreh spieß gewählt ist stoppt auch das Drehen des Drehspießes 6 Grillen und Backen 1 Legen Sie das Krümelblech in das Gerät 2 Nehmen Sie den Gitterrost und das Backblech aus dem Gerät Legen Sie diese gegebenenfalls mit Backpapier aus bzw bestreichen Sie das Bac...

Page 73: ...zw Backzeit Die Kontrollleuchte zeigt an dass das Gerät ein geschaltet ist Der Schalter des Timers bewegt sich nun gegen den Uhrzeigersinn auf OFF zu Das Gerät schaltet sich nach der eingestellten Zeit automatisch aus ein Signalton erklingt und die Kontrollleuchte erlischt HINWEIS Wenn Sie den Heizvorgang vorzeitig unterbre chen wollen drehen Sie den Temperaturregler bis zum Anschlag gegen den Uhr...

Page 74: ...öl 1 Würzen Sie das Grillhähnchen von innen und außen mit Salz und Paprikapulver Strei chen Sie es von außen mit hitzebeständigem Speiseöl ein 2 Schieben Sie das Grillhähnchen auf den Drehspieß 6 und fixieren Sie es mit den Drehspießklemmen 0 Achten Sie dabei darauf dass die Vertiefungen am Drehspieß 6 frei bleiben damit Sie den Drehspieß 6 mit Hilfe der Zange 3 greifen können Je nach Form des Gril...

Page 75: ...kofenspray da sich Rückstände auf den Heizstäben nicht mehr entfernen lassen Wischen Sie das Gerät mit einem feuchten Tuch ab Bei Bedarf geben Sie ein mildes Spülmittel auf das Tuch und wischen Sie mit einem mit kla rem Wasser befeuchteten Tuch nach Trocknen Sie alles gut ab Reinigen Sie den Garraum und die Glastür mit einem feuchten Tuch Bei Bedarf geben Sie ein mildes Spülmittel auf das Tuch und...

Page 76: ...en erscheint sehr lang Die Glastür wurde sehr oft geöffnet um den Garfortschritt zu kontrollieren Öffnen Sie die Glastür nicht öfter als unbedingt notwendig Es ist eine falsche Temperatur eingestellt Überprüfen Sie die Temperatur einstellungen Während der Benut zung tritt Rauch und Geruchsentwicklung auf An den Heizstäben befinden sich Reini gungs oder Lebensmittelrückstände Entnehmen Sie die Speisen...

Page 77: ...n er aufgetreten ist Wenn der Defekt von unserer Garantie gedeckt ist erhalten Sie das reparierte oder ein neues Produkt zurück Mit Reparatur oder Austausch des Produkts beginnt kein neuer Garantiezeitraum Garantiezeit und gesetzliche Mängelansprüche Die Garantiezeit wird durch die Gewährleistung nicht verlängert Dies gilt auch für ersetzte und reparierte Teile Eventuell schon beim Kauf vorhan den...

Page 78: ...nnen Sie dann unter Beifügung des Kaufbelegs Kassenbon und der Angabe worin der Mangel besteht und wann er aufgetreten ist für Sie portofrei an die Ihnen mitgeteilte Service Anschrift übersenden Auf www lidl service com können Sie diese und viele weitere Handbücher Produktvideos und Software herunter laden Service Service Deutschland Tel 0800 5435 111 Kostenfrei aus dem dt Festnetz Mobilfunknetz E...

Page 79: ...ack mit Nüssen Schokoflo cken oder zerdrückten Bananen mischen 4 Den fertigen Teig in typische Muffin Formen geben und diese auf das Backblech stellen 5 Die Muffins bei 220 C mit Ober und Unter hitze etwa 15 Minuten auf der unteren Schiene backen Hawaiitoast Zutaten für 4 Toasts 4 Scheiben Toast 1 2 Esslöffel Remoulade 120 g gekochter Schinken 1 2 Dose Ananas 4 Scheiben Käse zum Überbacken Curry Zuberei...

Page 80: ...usstechformen oder Spritzbeutel bringen 6 Das Spritzgebäck auf das mit Backpapier ausgelegte Backblech legen 7 Das Spritzgebäck im vorgeheizten Backofen bei ca 180 C Ober und Unterhitze ca 10 15 Minuten auf der oberen Schiene goldgelb backen HINWEIS Die Teigmenge reicht für mehrere Backbleche Brötchen Zutaten 300 g Mehl oder Vollkornmehl gut 2 Teelöffel Backpulver 200 g Leinsamen 1 Ei 500 g Quark 1...

Page 81: ...en und mit wenig Abstand Ro setten Zungen oder sonstige Formen auf das mit Backpapier belegte Backblech spritzen 8 Den Grill und Backautomaten auf ca 100 C Umluft vorheizen 9 Das Baiser auf der oberen Schiene bei ca 100 C Umluft ca 2 Stunden backen lassen Buttercroutons Zutaten 2 Scheiben Toastbrot 1 EL Butter Zubereitung 1 Schneiden Sie das Toastbrot in kleine Würfel 2 Schmelzen Sie die Butter be...

Page 82: ...l ca 250 g 3 Zitronenscheiben 1 EL Butter 1 gehäufter TL Mehl 1 EL Zitronensaft 1 EL Mandelstifte 2 EL Gratinkäse gerieben Salz Pfeffer Muskat Zubereitung 1 Teilen Sie den Blumenkohl in Röschen und waschen Sie diese 2 Garen Sie den Blumenkohl mit den Zitronen scheiben in kochendem Salzwasser für 8 10 Minuten so dass der Blumenkohl bissfest ist Fangen Sie beim Abgießen ca 150 ml des Kochwassers auf ...

Page 83: ... Frischkäsemasse und pürieren Sie alles grob mit einem Stabmixer 5 Schneiden Sie den restlichen Lachs in feine Streifen 6 Geben Sie den Lachs und den Dill zu der Masse hinzu und vermischen Sie alles 7 Geben Sie je einen Esslöffel mit der Masse auf eine Blätterteigplatte und klappen Sie diese zusammen 8 Bestreichen Sie die entstandene Tasche mit Eigelb 9 Legen Sie die Blätterteigtaschen auf das Back...

Page 84: ...RNASS HANDELS GMBH BURGSTRASSE 21 44867 BOCHUM DEUTSCHLAND GERMANY www kompernass com Last Information Update Versiunea informaţiilor Έκδοση των πληροφοριών Stand der Informationen 06 2016 Ident No SGBR1500B3 042016 1 ...

Reviews: