background image

SilverCrest SIRD 14 C2 


Deutsch  -  43 

Gehen Sie nun folgendermaßen vor: 


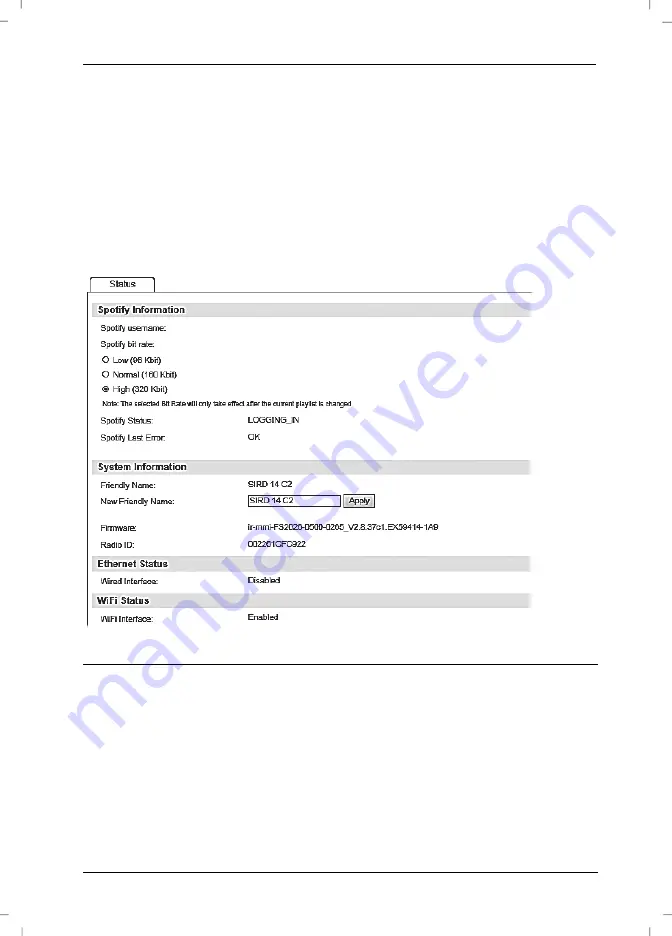
Geben Sie die IP-Adresse (Zahlen und Punkte) Ihres Radios in der Befehlszeile Ihres Internet-
Browsers ein und bestätigen Sie mit „Enter“.  


Auf der nun erscheinenden Seite finden Sie unter dem Punkt „Friendly Name“ den aktuellen 
Radio-Namen. 


Geben Sie unter dem Punkt „New friendly Name“ einen neuen Radio-Namen, z.B. „Küche“ ein 
und bestätigen Sie den neuen Namen mit „Apply“. 

Sie können nun das Internet Radio mit dem geänderten Namen eindeutig in der SilverCrest Smart-

Audio App erkennen. So können Sie sicher sein, dass Sie das gewünschte Gerät per SilverCrest 

Smart-Audio App bedienen. 


Systemeinstellungen 

In diesem Menü finden Sie weitere Einstellmöglichkeiten Ihres Internet Radios. 

Equalizer 

Hier können Sie Einstellungen am Equalizer vornehmen. Es stehen folgende Klangvoreinstellungen 
zur Verfügung: „Normal“, „Mittig“, „Jazz“, „Rock“, „Soundtrack“, „Klassik“, „Pop“ und 
„Nachrichten“. Die Option „Mein EQ“ steht für Ihre individuelle EQ-Einstellung. Ihre individuelle 
EQ-Einstellung können Sie in der Option „Meine EQ-Einstellung“ anpassen. Stellen Sie dort Bass, 
Höhen und die Lautstärke (Loundness) ein. Sobald Sie alle Einstellungen vorgenommen haben, 
drücken Sie die Taste BACK [4]. Bestätigen Sie nun die Abfrage zum Speichern mit „JA“, um die 
Änderungen zu übernehmen oder wählen Sie „NEIN“, um nicht zu speichern. 

Summary of Contents for 279398

Page 1: ......

Page 2: ......

Page 3: ...V 1 1 Deutsch 2 Français 57 Italiano 114 English 166 ...

Page 4: ...halten 16 Erstinbetriebnahme 16 Menüsprache auswählen 17 Datum und Uhrzeit einstellen 17 Netzwerkverbindung halten 19 WLAN Region wählen 20 Interneteinstellungen 20 WPS verschlüsseltes Netzwerk die einfachste Art der Verbindungsherstellung 20 Verbindungsherstellung ohne WPS 23 Das Konfigurationsmenü 25 Navigation innerhalb des Konfigurationsmenüs 25 Die Menüstruktur 26 Taste INFO Informationen anz...

Page 5: ... Sprache 46 Werkseinstellung 46 Software update 46 Einrichtungsassistent Einrichtungsass 46 Info 46 Displaybeleuchtung 46 Ambient Light 47 Multi room 47 Hauptmenü 48 Einschlaffunktion Schlummer 48 Wecker 49 Weckruf abschalten 50 Lagerung bei Nichtbenutzung 51 Fehlerbehebung 51 QR Codes 53 Umwelthinweise und Entsorgungsangaben 54 Konformitätsvermerke 54 Hinweise zu Garantie und Serviceabwicklung 55...

Page 6: ... die eingebaute WLAN Antenne herstellen Machen Sie sich vor der ersten Inbetriebnahme mit dem Internet Radio vertraut und lesen Sie diese Bedienungsanleitung aufmerksam durch Beachten Sie vor allem die Sicherheitshinweise und benutzen Sie das Gerät nur wie in dieser Bedienungsanleitung beschrieben und für die angegebenen Einsatzbereiche Bewahren Sie diese Bedienungsanleitung gut auf Händigen Sie a...

Page 7: ... die Tatsache des Empfangs an Dritte weitergegeben werden Lieferumfang Nehmen Sie das Gerät und alle Zubehörteile aus der Verpackung Entfernen Sie alle Verpackungsmaterialien und überprüfen Sie ob alle Teile vollständig und unbeschädigt sind Im Falle einer unvollständigen oder beschädigten Lieferung wenden Sie sich bitte an den Hersteller A Internet Radio SilverCrest SIRD 14 C2 B Fernbedienung C 3...

Page 8: ...schlüsselung WEP WPA WPA2 Anschlüsse 10 100 Ethernet LAN RJ 45 Kopfhörer 3 5 mm Stereoklinkenbuchse USB 2 0 AUX IN 3 5 mm Stereoklinkenbuchse Abmessungen B x H x T ca 21 8 x 11 8 x 15 1 cm Gewicht inkl Netzteil ca 1575 g Betriebstemperatur 5 C bis 35 C Betriebsluftfeuchtigkeit 85 rel Feuchte zulässige Lagerbedingungen 10 C bis 50 C max 85 rel Feuchte Netzteil Hersteller Ktec Typ KSASB0241200200HE ...

Page 9: ...AHR Dieses Symbol kennzeichnet Gefahren für die Gesundheit bis zur Lebensgefahr und oder Sachschäden durch elektrischen Schlag Verwenden Sie ausschließlich das mitgelieferte Netzteil Hersteller Ktec Typenbezeichnung KSASB0241200200HE zum Betrieb des Internet Radios Dieses Symbol kennzeichnet weitere informative Hinweise zum Thema GEFAHR Achten Sie darauf dass keine direkten Wärmequellen z B Heizun...

Page 10: ...elektrische Geräte nur im Rahmen ihrer Möglichkeiten verwenden Lassen Sie Kinder und Personen mit Einschränkungen niemals unbeaufsichtigt elektrische Geräte benutzen Es sei denn sie wurden entsprechend eingewiesen oder werden durch eine für Ihre Sicherheit zuständige Person beaufsichtigt Kinder sollten grundsätzlich beaufsichtigt werden damit sichergestellt werden kann dass sie mit diesem Gerät ni...

Page 11: ...assen Sie alle Kabel immer am Stecker an und ziehen Sie nicht am Kabel selbst Stellen Sie keine Möbelstücke oder andere schweren Gegenstände auf Kabel und achten Sie darauf dass diese nicht geknickt werden insbesondere am Stecker und an den Anschlussbuchsen Führen Sie Kabel nicht über heiße oder scharfe Stellen und Kanten um Beschädigungen zu vermeiden Machen Sie niemals einen Knoten in ein Kabel ...

Page 12: ...onen des Herzschrittmachers durch Funkwellen beeinträchtigt werden können Die übertragenen Funkwellen können Störgeräusche in Hörgeräten verursachen Bringen Sie das Gerät nicht mit eingeschalteter Funkkomponente in die Nähe entflammbarer Gase oder in eine explosionsgefährdete Umgebung z B Lackiererei da die übertragenen Funkwellen eine Explosion oder ein Feuer auslösen können Die Reichweite der Fu...

Page 13: ... aggressiven Flüssigkeiten Versuchen Sie nicht das Gehäuse des Gerätes zu öffnen Dabei würde Ihr Garantieanspruch verfallen Betriebsumgebung Das Gerät ist nicht für den Betrieb in Räumen mit hoher Luftfeuchtigkeit z B Badezimmer oder übermäßigem Staubaufkommen ausgelegt Betriebstemperatur und Betriebsluftfeuchtigkeit 5 C bis 35 C max 85 rel Feuchte Urheberrecht Alle Inhalte dieser Anleitung unterl...

Page 14: ...eitere Kapitel der Bedienungsanleitung lesen So haben Sie immer eine Referenz zum betreffenden Bedienelement vor Augen Vorderseite 1 Display 2 Rechter Lautsprecher 3 NAVIGATE Regler Menünavigation manuelle Sendersuche OK 4 BACK Taste eine Menüebene zurückspringen 5 MENU Taste Konfigurationsmenü aufrufen 6 FAVOURITE Taste 7 MODE Taste Betriebsart auswählen 8 INFO Taste Displayanzeigeinhalt wählen 9...

Page 15: ... SIRD 14 C2 Deutsch 13 Rückseite 11 Teleskopantenne DAB FM Empfang 12 Hauptschalter 13 USB Buchse 14 LAN Buchse Netzwerkanschluss RJ 45 15 DC IN Buchse Netzteilanschluss Polung 16 Kopfhörer Buchse 17 AUX IN Buchse ...

Page 16: ...ringern 21 OK 22 Favoriten 23 nächster Titel 24 SHUFFLE REPEAT Zufallswiedergabe Wiederholung 25 Nummernblock 26 INFO 27 EQ Equalizer 28 Stop 29 SLEEP SNOOZE Einschlaffunktion Weckpause 30 Play Pause 31 vorheriger Titel 32 MENU Menü aufrufen 33 MODE Betriebsart wählen 34 Navigationstasten 35 Ein Standby ...

Page 17: ...eim Einlegen der Batterie auf die richtige Polung nach oben Diese ist im Batteriefach dargestellt Schieben Sie anschließend die Batteriefachabdeckung wieder auf das Batteriefach Batteriewechsel Sollte ein Batteriewechsel notwendig werden ersetzen Sie die alte Batterie durch eine neue 3V Knopfzelle Typ CR2025 Gehen Sie vor wie im vorherigen Abschnitt beschrieben Internetverbindung Sie haben 2 Mögli...

Page 18: ...o mit dem Hauptschalter 12 aus Stellen Sie im ausgeschalteten Zustand alle für den gewünschten Betrieb notwendigen Verbindungen z B Netzwerkkabel etc her Die Bedienung wird auf den folgenden Seiten in der Regel mit den Tasten des Internet Radios beschrieben Alternativ kann die Bedienung auch mit den entsprechenden Tasten der Fernbedienung ausgeführt werden Erstinbetriebnahme Beim ersten Einschalte...

Page 19: ...und drücken Sie auf den NAVIGATE Regler 3 um Ihre Auswahl zu bestätigen Das Symbol kennzeichnet die aktuelle Einstellung Wurde das 12 Stundenformat gewählt wird im Display 1 hinter der Uhrzeit AM für Vormittagsstunden bzw PM für Nachmittagsstunden angezeigt Anschließend haben Sie folgende Auswahlmöglichkeiten Update über DAB Uhrzeit automatisch über DAB Empfang einstellen Update über FM Uhrzeit au...

Page 20: ...t werden Für Mitteleuropa wählen Sie UTC 01 00 aus Wählen Sie anschließend Ein wenn die Sommerzeit aktuell aktiv ist bzw Aus wenn die Sommerzeit nicht aktiv ist Das Symbol kennzeichnet die aktuelle Einstellung Das Symbol kennzeichnet die aktuelle Einstellung Wenn Sie die Option Kein Update gewählt haben werden Sie aufgefordert Datum und Uhrzeit manuell einzustellen ...

Page 21: ... Sie die Minute durch Drehen des NAVIGATE Reglers 3 ein und drücken Sie auf den NAVIGATE Regler 3 um die Eingabe zu bestätigen Nur wenn das 12 Stundenformat für die Uhrzeit gewählt wurde wird AM angezeigt Wählen Sie nun durch Drehen des NAVIGATE Reglers 3 AM für Vormittagsstunden oder PM für Nachmittagsstunden aus und drücken Sie auf den NAVIGATE Regler 3 um die Eingabe zu bestätigen Netzwerkverbi...

Page 22: ...in Netzwerkkabel mit Ihrem Router verbunden haben Die Verbindung wird nun direkt hergestellt Manuelle Konfig Manuelle Eingabe der Verbindungsdaten WPS verschlüsseltes Netzwerk die einfachste Art der Verbindungsherstellung Wenn Ihr Router WPS unterstützt können Sie diese komfortable Funktion für eine einfache Einrichtung verwenden Dies ist die einfachste Art das Internet Radio mit dem Router zu ver...

Page 23: ...au über Tastendruck Das Internet Radio fordert Sie auf die Verbindungstaste WPS Ihres Routers zu drücken Symbolbild Verbindungstaste WPS kann je nach Routermodell abweichend angeordnet und bezeichnet sein Anschließend drücken Sie den NAVIGATE Regler 3 um fortzufahren Das Internet Radio versucht jetzt eine Verbindung mit Ihrem Router herzustellen Nach erfolgreichem Verbindungsaufbau zum Router ersc...

Page 24: ...ste INFO 8 und halten Sie diese für ca 1 Sekunde gedrückt PIN WPS Aufbau über PIN Eingabe Es wurde eine PIN vom Internet Radio generiert Diese PIN ist immer nur für den aktuellen Vorgang gültig wird der Vorgang wiederholt wird auch eine neue PIN generiert Geben Sie nun die PIN die auf dem Display 1 angezeigt wird an Ihrem Router ein Beachten Sie dazu die Dokumentation Ihres Routers Anschließend dr...

Page 25: ...VIGATE Reglers 3 ein Zeichen und bestätigen Sie Ihre Eingabe durch Drücken des NAVIGATE Reglers 3 Alternativ können Sie die Eingabe mit dem Nummernblock 25 oder den Navigationstasten 34 und der Taste OK 21 der Fernbedienung vornehmen Nachdem Sie in dieser Weise den Netzwerkschlüssel komplett eingegeben haben wählen Sie durch Drehen des NAVIGATE Reglers 3 OK aus und bestätigen Sie Ihre Eingabe durc...

Page 26: ...t nun in Ihr Netzwerk eingebunden und kann verwendet werden Bei bestehender Internetverbindung können auch Internet Radiosender empfangen werden Kabel Haben Sie das Internet Radio per Netzwerkkabel mit Ihrem Router verbunden wählen Sie durch Drehen des NAVIGATE Reglers 3 in der Liste den Eintrag Kabel aus Bestätigen Sie Ihre Auswahl durch Drücken des NAVIGATE Reglers 3 Das Internet Radio versucht ...

Page 27: ...stellen der einzelnen Betriebsarten des Internet Radios erfolgt über ein Menü welches über verschiedene Ebenen verfügt Navigation innerhalb des Konfigurationsmenüs Um eine Betriebsart zu wählen drücken Sie einmal die Taste MODE 7 Im Display sehen sie die 6 verschiedenen Betriebsarten Die aktive Betriebsart ist etwas größer dargestellt Wählen Sie durch Drehen des NAVIGATE Reglers 3 eine Betriebsart...

Page 28: ...IRD 14 C2 26 Deutsch Die Menüstruktur Die Untermenüs können abhängig von der individuellen Konfiguration unterschiedlich dargestellt werden Weitere Informationen zu den Untermenüs finden Sie im Kapitel Betriebsarten ...

Page 29: ...3 Internet Radio aus und bestätigen Sie Ihre Auswahl durch Drücken des NAVIGATE Reglers 3 Das Internet Radio verbindet sich nun mit dem Internet um eine Liste der Radiostationen zu laden Neben den Menüeinträgen Systemeinstellungen und Hauptmenü finden Sie folgende Einträge Zuletzt gehört Zeigt eine Liste der zuletzt wiedergegebenen Radiosender Podcasts etc an Senderliste Ruft eine Liste verfügbare...

Page 30: ...r nach Länder sortiert Genre Sender nach Genre sortiert Sender suchen Nach einem Sender suchen Populäre Sender Zeigt eine Liste von populären Sendern an Neue Sender Zeigt eine Liste von neuen Sendern an Die Senderauswahl kann je nach ausgewählter Rubrik weiter eingeschränkt werden Wurde ein Sender ausgewählt und durch Drücken des NAVIGATE Reglers 3 bestätigt wird dieser direkt wiedergegeben Favori...

Page 31: ...rnet Radio Portal zu registrieren müssen Sie zuerst einen Zugriffscode generieren Wählen Sie die Betriebsart Internet Radio Gehen Sie nun im Menü des Internet Radios auf Senderliste Hilfe Zugriffscode erhalten Sollten Sie beim Generieren des Zugriffcodes die Fehlermeldung Netzwerk Timeout erhalten drücken Sie den NAVIGATE Regler 3 um den Vorgang erneut zu starten oder versuchen Sie es zu einem spä...

Page 32: ...one iOS Android laden und installieren Ein kostenpflichtiger Spotify Account Weitere Informationen finden Sie unter www spotify com Spotify mit dem SilverCrest SIRD 14 C2 verwenden Stellen Sie sicher dass sich das Internet Radio und Ihr Smartphone im selben WLAN Netz befinden Drücken Sie einmal die Taste MODE 7 wählen Sie die Betriebsart Spotify Connect durch Drehen des NAVIGATE Reglers 3 und best...

Page 33: ... App als Fernbedienung verwenden Um Spotify Connect verwenden zu können benötigen Sie ein Spotify Premium Konto Wenn Sie noch keins abonniert haben besuchen Sie http www spotify com freetrial und testen Sie Spotify Connect 30 Tage lang kostenlos 1 Verbinden Sie Ihr Gerät mit demselben WLAN mit dem auch Ihr Smartphone Tablet oder PC verbunden ist auf dem die Spotify App ausgeführt wird 2 Öffnen Sie...

Page 34: ...tung Betriebsart Wiedergabe von einem UPNP Server Musikplayer Wiedergabe wiederholen Musikplayer Zufallswiedergabe Musikplayer WLAN Empfang alle Betriebsarten kein WLAN Empfang alle Betriebsarten STEREO DAB FM RDS Empfang FM DAB USB Wiedergabegerät angeschlossen Musikplayer Empfangsqualität DAB FM ...

Page 35: ...lt haben wählen Sie diesen Menüpunkt durch Drehen des NAVIGATE Reglers 3 und bestätigen Ihre Auswahl durch Drücken des NAVIGATE Reglers 3 Jetzt werden Ihnen die angelegten Medienbibliotheken angezeigt Wählen Sie die gewünschte Medienbibliothek durch Drehen des NAVIGATE Reglers 3 und bestätigen Ihre Auswahl durch Drücken des NAVIGATE Reglers 3 Die nun folgenden Untermenüs werden vom Server der Medi...

Page 36: ...l indem Sie JA durch Drehen des NAVIGATE Reglers 3 wählen und bestätigen Sie Ihre Auswahl durch Drücken des NAVIGATE Reglers 3 Die angezeigten Menüs werden von der Menüstruktur des USB Datenträgers generiert Blättern Sie unter Verwendung des NAVIGATE Reglers 3 und der Taste BACK 4 durch die Ordner Im Display 1 werden Ihnen Ordner und Dateinamen angezeigt nicht zwingend der Titelname Wenn Sie den g...

Page 37: ... Aus Hier können Sie die Zufallswiedergabe der aktuellen Playlist bzw des aktuellen Ordners ein und ausschalten Drücken Sie auf den NAVIGATE Regler 3 um zwischen Zufall Aus und Zufall An zu wechseln Bei eingeschalteter Funktion wird im unteren Bereich des Displays 1 angezeigt Playlist leeren Hier können Sie die Einträge der Playlist des Internet Radios leeren Drücken Sie dazu auf den NAVIGATE Regl...

Page 38: ...cken des NAVIGATE Reglers 3 um die Wiedergabe des Senders zu starten Abhängig vom Radiosender werden Ihnen im Display 1 weitere Informationen wie zum Beispiel Sendername der Titel und Interpret des aktuellen Liedes oder aktuelle Nachrichten angezeigt Drehen Sie am NAVIGATE Regler 3 wird Ihnen die Senderliste angezeigt und Sie können durch Drücken des NAVIGATE Reglers 3 einen anderen Radiosender au...

Page 39: ...zufügen Ist Ihnen das Senderensemble jedoch nicht bekannt verwenden Sie die Option Suchlauf Senderliste bereinigen Ungültige bzw nicht empfangbare Sender sind in der Senderliste mit dargestellt und können mit dieser Option entfernt werden Wählen Sie durch Drehen des NAVIGATE Reglers 3 JA oder NEIN und bestätigen Sie Ihre Auswahl durch Drücken des NAVIGATE Reglers 3 Dynamic Range Control Hier könne...

Page 40: ... der letzten Drehrichtung des NAVIGATE Reglers 3 startet der Sendersuchlauf auf bzw abwärts Sender speichern aufrufen Gehen Sie wie folgt vor um einen Sender zu speichern Um den aktuell wiedergegebenen Radiosender zu speichern drücken Sie die Taste FAVOURITE 6 ca 2 Sekunden bis sich die Favoritenliste öffnet Wählen Sie nun einen der 10 Speicherplätze mit dem NAVIGATE Regler 3 aus Drücken Sie den N...

Page 41: ... vor Verbinden Sie ein Ende des Audio Klinkenkabels D mit dem Kopfhörerausgang Ihrer externen Audioquelle Stecken Sie nun das andere Ende des Audio Klinkenkabels D in die AUX IN Buchse 17 des Internet Radios Starten Sie die Wiedergabe der externen Audioquelle Sie können die Lautstärke mit dem VOLUME Regler 9 und an Ihrer externen Audioquelle Ihren Bedürfnissen anpassen Drücken Sie die Taste MENU 5...

Page 42: ...dio ein Richten Sie dazu zum Beispiel den Windows Media Player 12 wie folgt ein Öffnen Sie den Windows Media Player Klicken Sie oben in der Menüleiste auf Streamen Klicken Sie auf Medienstreaming aktivieren bzw Weitere Streamingoptionen Aktivieren Sie nun das Medienstreaming für das Internet Radio SilverCrest SIRD 14 C2 beachten Sie dazu den Bildschirmanweisungen Nun können Sie einen Titel auf dem...

Page 43: ...est Smart Audio App Diese App erlaubt es Ihnen das Internet Radio bequem und einfach mit Ihrem Smartphone oder Tablet PC zu steuern Die Steuerungsapplikation SilverCrest Smart Audio können Sie im Apple App Store und im Google Play Store herunterladen Die SilverCrest Smart Audio App ermöglicht Ihnen das Navigieren zwischen den verschiedenen Funktionen das Wechseln des Radiosenders das Einstellen de...

Page 44: ...glich Möchten Sie das Internet Radio in allen Betriebsarten mit der App steuern müssen Sie im Menü des Internet Radios unter Systemeinstellungen Interneteinstellg Netzwerkverbindung im Standby halten JA auswählen Verwenden Sie das Internet Radio danach einmal in der Betriebsart Internet Radio um die WLAN Verbindung aufzubauen Steuerung weiterer Internet Radios Wenn Sie mehrere Internet Radios die ...

Page 45: ... dass Sie das gewünschte Gerät per SilverCrest Smart Audio App bedienen Systemeinstellungen In diesem Menü finden Sie weitere Einstellmöglichkeiten Ihres Internet Radios Equalizer Hier können Sie Einstellungen am Equalizer vornehmen Es stehen folgende Klangvoreinstellungen zur Verfügung Normal Mittig Jazz Rock Soundtrack Klassik Pop und Nachrichten Die Option Mein EQ steht für Ihre individuelle EQ...

Page 46: ...endet werden Hier können Einstellungen zum Netzwerk Verbindungsart DHCP IP Einstellungen Gateway Adresse DNS SSID Authentifizierung Kodierungsart Schlüssel vorgenommen werden Da die Einstellungen individuell auf Ihr Netzwerk angepasst werden müssen wird hier nicht weiter darauf eingegangen NetRemote PIN Setup Hier können Sie sich die NetRemote PIN anzeigen lassen und ändern Die Standard NetRemote ...

Page 47: ...ng verwenden müssen Sie in dieser Option JA auswählen Verwenden Sie das Internet Radio danach einmal in der Betriebsart Internet Radio um die WLAN Verbindung dauerhaft aufzubauen Zeiteinstellungen In diesem Menü können Sie Einstellungen zum Datum und Uhrzeit vornehmen Zeit Datumseinst Hier können Sie Datum und Uhrzeit manuell einstellen Weitere Informationen entnehmen Sie bitte dem Kapitel Datum u...

Page 48: ...date ist im Auslieferungszustand aktiviert Um diese Funktion auszuschalten wählen Sie NEIN aus Mit JA können Sie die Funktion wieder aktivieren Jetzt prüfen Wählen Sie diese Option um direkt nach einem neuen Update zu suchen Steht ein neues Update zur Verfügung wird Ihnen dies im Display 1 angezeigt Folgen Sie in diesem Fall den Anweisungen im Display 1 Schalten Sie das Gerät während des Updates a...

Page 49: ...tzung des Internet Radios als Teil eines Multi room Systems benötigen Sie die Steuerungsapplikation SilverCrest Smart Audio Diese können Sie im Apple App Store und im Google Play Store herunterladen Weitere Informationen zur Bedienung von Multi room Systemen finden Sie in der Dokumentation der SilverCrest Smart Audio App Hier ein kurzer Überblick über die Einstellmöglichkeiten im Multi room Menü D...

Page 50: ...nd die Weckfunktion einstellen Sie können folgende Betriebsarten wählen Internet Radio Spotify Musikplayer DAB FM AUX in Schlummer Wecker und Systemeinstellungen Einschlaffunktion Schlummer Mit der Einschlaffunktion können Sie das Gerät nach Ablauf einer ausgewählten Zeit automatisch abschalten lassen Sie können die Einschlaffunktion in allen Betriebsarten verwenden Drücken Sie im eingeschalteten ...

Page 51: ... der Fernbedienung ausschalten Während der aktivierten Einschlaffunktion wird die Restlaufzeit des Timers permanent im unteren Bereich des Displays 1 klein angezeigt Wecker Sie können in dieser Option zwei Weckzeiten einstellen Stellen Sie zuvor sicher dass die Uhrzeit korrekt eingestellt ist Wählen Sie zunächst zwischen Wecker 1 und Wecker 2 aus Es stehen nun folgende Option zur Verfügung Aktivie...

Page 52: ...ss diese Option nicht zur Verfügung steht wenn der Modus Summer ausgewählt wurde Lautstärke Stellen Sie hier durch Drehen des NAVIGATE Reglers 3 die gewünschte Wecklautstärke ein Bestätigen Sie diese durch Drücken des NAVIGATE Reglers 3 Speichern Markieren Sie diese Option und drücken Sie den NAVIGATE Regler 3 um die zuvor vorgenommenen Einstellungen zu speichern Bei aktiviertem Wecker wird im Dis...

Page 53: ...üfen Sie ob der Hauptschalter 12 auf der Rückseite des Internet Radios auf der Stellung ON steht Keine WLAN Verbindung Die Entfernung zum Router ist zu groß verringern Sie diese Überprüfen Sie ob der Netzwerkschlüssel korrekt eingegeben wurde Keine LAN Verbindung Prüfen Sie ob das Netzwerkkabel korrekt in der LAN Buchse 14 des Internet Radios und in der LAN Buchse Ihres Routers steckt Verwenden Si...

Page 54: ...direkt auf Ihr Internet Radio Die Batterie ist schwach oder leer Bitte ersetzen Sie diese gegen eine neue des gleichen Typs Beachten Sie dazu das Kapitel Batterie in die Fernbedienung einlegen Der Wecker weckt nicht Prüfen Sie ob Sie alle Voreinstellungen für die Weckzeit korrekt eingegeben haben Überprüfen Sie die korrekte Einstellung der Uhrzeit ...

Page 55: ...t in die Befehlszeile Ihres Internet Browsers eingeben Hier haben Sie die Möglichkeit für dieses Gerät verfügbare APPs herunterzuladen URL http www multiroom sound com app download Diese Web Seite gibt Ihnen ausführliche Informationen zum Aufbau und der Installation des SilverCrest Multiroom Systems URL http www multiroom sound com about Hier finden Sie Informationen die genau auf Ihr Gerät abgest...

Page 56: ...Wiederverwertung abgegeben werden Folien und Kunststoffe des Lieferumfangs werden über Ihr örtliches Entsorgungsunternehmen eingesammelt und umweltgerecht entsorgt Denken Sie an den Umweltschutz Verbrauchte Batterien gehören nicht in den Hausmüll Sie müssen bei einer Sammelstelle für Altbatterien abgegeben werden Bitte beachten Sie dass Batterien nur im entladenen Zustand in die Sammelbehälter für...

Page 57: ... kostenpflichtig Garantieumfang Das Gerät wurde nach strengen Qualitätsrichtlinien sorgfältig produziert und vor Auslieferung gewissenhaft geprüft Die Garantieleistung gilt für Material oder Fabrikationsfehler Diese Garantie erstreckt sich nicht auf Produktteile die normaler Abnutzung ausgesetzt sind und daher als Verschleißteile angesehen werden können oder für Beschädigungen an zerbrechlichen Te...

Page 58: ...s für den Kauf bereit Für den Fall dass eine telefonische Lösung nicht möglich ist wird durch unsere Hotline in Abhängigkeit der Fehlerursache ein weiterführender Service veranlasst Service Telefon 02921 89 13 000 E Mail service DE targa online com Telefon 01 26 76 195 E Mail service AT targa online com Telefon 044 55 10 057 E Mail service CH targa online com IAN 279398 Hersteller Bitte beachten S...

Page 59: ...ension de la radio Internet 71 Configuration initiale 71 Sélection de la langue des menus 72 Réglage de la date et de l heure 72 Gardez réseau connecté 74 Sélection de la région du réseau sans fil WLAN 75 Réseau 75 Réseau crypté WPS la solution de connexion la plus simple 75 Établissement d une connexion sans le protocole WPS 78 Menu de configuration 80 Navigation dans le menu de configuration 81 ...

Page 60: ...2 Assistant réglages 102 Informations 102 Rétroéclairage 102 Ambient Light Luminosité ambiante 103 Multi room 103 Menu principal 104 Mode sommeil 104 Alarme 105 Désactivation de l alarme 106 Consignes de stockage en cas de non utilisation du produit 106 Résolution des problèmes 107 Codes QR 108 Réglementation environnementale et informations sur la mise au rebut 109 Avis de conformité 109 Informat...

Page 61: ...ttention Veillez à respecter les consignes de sécurité et n utilisez la radio Internet que de la manière décrite dans le manuel d utilisation et pour les usages indiqués Conservez ce manuel d utilisation dans un endroit sûr Si vous cédez la radio Internet à quelqu un d autre veillez à lui remettre également tous les documents qui s y rapportent Utilisation prévue Cette Radio Internet est un appare...

Page 62: ...lage et vérifiez que toutes les pièces sont complètes et intactes Si un ou plusieurs composants manquent ou sont endommagés veuillez contacter le fabricant A Radio Internet SilverCrest SIRD 14 C2 B Télécommande C Pile bouton de 3 V CR2025 D Câble audio avec connecteur de type jack E Adaptateur secteur F Ce mode d emploi représenté par un dessin ...

Page 63: ...PA WPA2 Connecteurs et prises Ethernet 10 100 LAN RJ 45 Oreillettes prises stéréo 3 5 mm USB 2 0 Entrée AUX prises stéréo 3 5 mm Dimensions L x H x P environ 21 8 x 11 8 x 15 1 cm Poids avec adaptateur secteur environ 1 575 g Température de fonctionnement 5 C à 35 C Humidité de fonctionnement 85 d humidité relative Conditions de stockage 10 C à 50 C humidité relative de 85 max Adaptateur secteur F...

Page 64: ...ans risque de ce produit et la sécurité de l utilisateur DANGER Cette icône signale un risque d électrocution représentant un danger pour la santé des individus un risque de mort et ou un risque de dommages matériels Veuillez utiliser l adaptateur d alimentation fourni fabricant Ktec Numéro du modèle KSASB0241200200HE pour faire fonctionner votre radio Internet Ce symbole signale la présence d inf...

Page 65: ...ER Enfants et personnes handicapées Les appareils électriques doivent être tenus hors de portée des enfants Les appareils électriques ne peuvent être utilisés par des personnes handicapées que dans la limite de leurs capacités Ne laissez jamais les enfants et les personnes handicapées utiliser les appareils électriques sans surveillance à moins qu ils aient reçu les instructions nécessaires et qu ...

Page 66: ... par exemple pour les vacances lorsque vous souhaitez le nettoyer En mode veille l adaptateur secteur continue de consommer de l électricité Pour déconnecter entièrement l appareil de l alimentation électrique débranchez l adaptateur secteur de la prise de courant Veuillez suivre ces instructions pour éviter tout risque de blessure fatale ou d incendie Ne couvrez jamais l adaptateur secteur pour é...

Page 67: ...portée des enfants Si vous pensez qu une pile a pu être avalée ou introduite dans n importe quelle partie du corps consultez immédiatement un médecin DANGER Interface RF Éteignez l appareil à bord des avions dans les hôpitaux les salles d opération ou à proximité d instruments médicaux électroniques Les signaux de radiofréquence peuvent nuire au bon fonctionnement des appareils les plus sensibles ...

Page 68: ...alifiée Toutes les réparations doivent exclusivement être réalisées par un personnel technique qualifié N ouvrez en aucun cas le boîtier de l appareil Utilisez uniquement un chiffon propre et sec pour le nettoyer N utilisez jamais de liquides agressifs N essayez pas d ouvrir le boîtier de l appareil la garantie serait automatiquement annulée Conditions de fonctionnement L appareil n a pas été conç...

Page 69: ...hapitres de ce manuel d utilisation Cela vous permettra de vous référer à tout moment aux différents éléments Panneau avant 1 Écran 2 Haut parleur droit 3 Bouton NAVIGATE navigation dans les menus recherche manuelle de stations OK 4 Bouton BACK retour au niveau précédent du menu 5 Bouton MENU ouverture du menu de configuration 6 Bouton FAVOURITE favoris 7 Bouton MODE sélection du mode de fonctionn...

Page 70: ...çais Panneau arrière 11 Antenne télescopique réception DAB FM 12 Interrupteur principal 13 Port USB 14 Port LAN port réseau RJ 45 15 Prise DC IN branchement de l adaptateur secteur polarité 16 Prise casque 17 Prise AUX IN entrée AUX ...

Page 71: ...avoris 23 Titre suivant 24 SHUFFLE REPEAT lecture aléatoire répétition 25 Pavé numérique 26 INFO 27 EQ égaliseur 28 Arrêt 29 SLEEP SNOOZE veille automatique répétition de l alarme 30 Lecture Pause 31 Titre précédent 32 MENU affichage du menu 33 MODE sélection du mode de fonctionnement 34 Touches de navigation 35 Marche veille ...

Page 72: ...ent avec le signe orienté vers le haut Un schéma présent dans le compartiment de la pile indique le sens d insertion Ensuite faites coulisser le couvercle du compartiment pour le remettre dans sa position d origine Remplacement de la pile Lorsqu il devient nécessaire de changer la pile remplacez la par une nouvelle pile bouton de 3 V CR2025 Procédez comme indiqué dans la section précédente Connexi...

Page 73: ...ez l interrupteur principal 12 pour la mettre complètement hors tension Une fois l appareil hors tension vous pouvez connecter tous les câbles de votre choix câble réseau etc Les instructions des pages suivantes concernent les fonctions accessibles à l aide des boutons de la radio Internet Vous pouvez également utiliser les boutons correspondants de la télécommande Configuration initiale Lorsque v...

Page 74: ... format 24 heures et appuyez sur le bouton NAVIGATE 3 afin de confirmer votre sélection L icône indique le réglage actuellement sélectionné Si vous sélectionnez le format 12 heures sur l écran 1 l heure sera suivie des lettres AM le matin et des lettres PM l après midi Ensuite les options suivantes sont disponibles MAJ via DAB L heure est automatiquement synchronisée à partir d une station DAB MAJ...

Page 75: ...u horaire dans la fenêtre suivante Sélectionnez UTC 01 00 pour l Europe centrale Ensuite choisissez On si l heure d été est actuellement activée sinon choisissez Off L icône indique le réglage actuellement sélectionné L icône indique le réglage actuellement sélectionné Si vous choisissez Pas de MAJ vous devez renseigner la date et l heure manuellement ...

Page 76: ... de confirmer L indication des minutes clignote Tournez le bouton NAVIGATE 3 pour régler les minutes et appuyez sur le bouton NAVIGATE 3 afin de confirmer L indication AM n apparaît que si vous avez choisi le format 12 heures Tournez le bouton NAVIGATE 3 pour sélectionner AM pour le matin ou PM pour l après midi et appuyez sur le bouton NAVIGATE 3 afin de confirmer votre sélection Gardez réseau co...

Page 77: ...recherche Une nouvelle recherche des réseaux sans fil disponibles est alors lancée Câblé Choisissez cette option si vous ne voulez pas connecter votre radio Internet à un réseau sans fil mais à un réseau câblés par le biais de votre routeur La connexion sera immédiatement établie Config manuelle Saisie manuelle des détails de connexion Réseau crypté WPS la solution de connexion la plus simple Si v...

Page 78: ...is le réseau sans fil sélectionné Voir le chapitre Sauter le WPS Touche d installation établissement de la connexion WPS par le biais d une touche La Radio Internet vous invite à appuyer sur le bouton de connexion WPS sur votre routeur Illustration schématique le bouton de connexion WPS peut se trouver à un autre endroit ou être étiqueté autrement selon le modèle du routeur Ensuite appuyez sur le ...

Page 79: ...ton INFO 8 enfoncé pendant au moins une seconde Code PIN établissement de la connexion WPS par saisie du code PIN La Radio Internet génère un code PIN Ce code PIN n est valable que pour la tâche actuelle Lorsque la tâche est répétée un nouveau code PIN est généré Tapez le code PIN qui apparaît à l écran 1 sur votre routeur Veuillez consulter la documentation technique qui accompagne votre routeur ...

Page 80: ...saisie d une clé réseau Saisissez la clé réseau de votre réseau crypté Tournez le bouton NAVIGATE 3 pour sélectionner un caractère et appuyez sur le bouton NAVIGATE 3 afin de le confirmer Vous pouvez aussi utiliser le pavé numérique 25 ou les boutons de navigation 34 et le bouton OK 21 de la télécommande Une fois que vous avez terminé de saisir la clé réseau selon cette procédure tournez le bouton...

Page 81: ...t donc pas nécessaire de la saisir à nouveau Maintenant votre radio Internet est connectée au réseau et prête à être utilisée S il y a une connexion Internet il est possible de syntoniser des stations de radio Internet Câblé Si votre radio Internet est connectée au routeur par le biais d un câble réseau tournez le bouton NAVIGATE 3 afin de sélectionner l option Câblé dans la liste Appuyez sur le b...

Page 82: ...imentés Elle vous permet d ajuster des paramètres spécifiques au réseau type de connexion DHCP Config IP Adresse passerelle DNS SSID Authentification Type de cryptage incorrecte Clé Nous ne pouvons pas fournir de descriptions plus approfondies à ce stade car les paramètres des différents réseaux sont très spécifiques Menu de configuration Les différents modes de fonctionnement de votre radio Inter...

Page 83: ...us gros Tournez le bouton NAVIGATE 3 pour sélectionner un mode Appuyez sur le bouton NAVIGATE 3 pour confirmer votre sélection Vous pouvez aussi utiliser les boutons de navigation 34 et le bouton OK 21 de la télécommande pour réaliser ces étapes Appuyez sur le bouton MENU 5 pour afficher le menu principal du mode de fonctionnement sélectionné Pour remonter d un niveau dans le menu appuyez sur le b...

Page 84: ... 82 Français Structure des menus Les sous menus peuvent avoir une apparence différente selon votre propre configuration Vous trouverez d autres informations concernant les sous menus dans le chapitre Modes de fonctionnement ...

Page 85: ... Internet et appuyez sur le bouton NAVIGATE 3 afin de confirmer Votre Radio Internet établira une connexion à Internet et chargera une liste de stations de radio En plus des options Configuration et Menu principal les entrées suivantes sont disponibles Dernières écoutes cette option permet d afficher une liste des stations podcasts etc qui ont été écoutés dernièrement Liste de stations cette optio...

Page 86: ...Chercher stations rechercher une station Stations populaires affiche une liste des stations populaires Nouvelles stations affiche une liste de nouvelles stations Selon la catégorie sélectionnée il est possible de spécifier d autres critères de recherche Une fois qu une station a été sélectionnée et confirmée en appuyant sur le bouton NAVIGATE 3 elle est diffusée immédiatement Enregistrement de fav...

Page 87: ...o Internet vous devez d abord générer un code d accès Sélectionnez le mode de fonctionnement Radio Internet Ensuite depuis le menu Radio Internet allez à Liste de stations Aide Obtenir le code d accès Si le message d erreur Attente réseau s affiche lors de la génération du code d accès appuyez sur le bouton NAVIGATE 3 pour redémarrer le processus ou réessayez plus tard Ce message d erreur ne signi...

Page 88: ...te Spotify soumis à un abonnement payant Pour plus d informations visitez le site www spotify com Utilisation de Spotify avec votre SilverCrest SIRD 14 C2 Assurez vous que votre radio Internet et votre smartphone sont connectés au même réseau LAN sans fil Appuyez une fois sur le bouton MODE 7 sélectionnez le mode de fonctionnement Spotify Connect en tournant le bouton NAVIGATE 3 puis appuyez sur l...

Page 89: ...ication Spotify comme télécommande Pour pouvoir utiliser Spotify Connect vous devez posséder un compte Spotify Premium Si ce n est pas le cas il vous suffit de vous rendre à l adresse http www spotify com freetrial pour bénéficier d une version d essai gratuite de 30 jours Étape 1 Connectez votre appareil au même réseau Wi Fi que votre téléphone tablette PC ou ordinateur où l application Spotify e...

Page 90: ... serveur UPnP Lecteur de musique Répétition de la lecture Lecteur de musique Aléatoire Lecteur de musique Réception WiFi tous les modes de fonctionnement Pas de réception WiFi tous les modes de fonctionnement Stéréo DAB FM Réception RDS FM DAB Périphérique de lecture USB connecté Lecteur de musique Qualité du signal DAB FM ...

Page 91: ...otre réseau local sélectionnez cette option du menu en tournant le bouton NAVIGATE 3 puis appuyez sur le bouton NAVIGATE 3 pour confirmer votre sélection Le média partagé créé est alors affiché Tournez le bouton NAVIGATE 3 pour sélectionner le média partagé de votre choix et appuyez sur le bouton NAVIGATE 3 afin de confirmer votre sélection Les sous menus suivants seront générés par le serveur de ...

Page 92: ...oulez ouvrir le dossier sélectionnez Oui en tournant le bouton NAVIGATE 3 puis appuyez sur le bouton NAVIGATE 3 pour confirmer votre sélection Les menus affichés sont générés à partir de la structure de dossiers du périphérique de stockage USB Utilisez le bouton NAVIGATE 3 et sur le bouton BACK 4 pour parcourir les dossiers L écran 1 affiche les noms de dossier et de fichier mais pas nécessairemen...

Page 93: ...activer la lecture aléatoire pour la liste de lecture ou le dossier en cours Appuyez sur le bouton NAVIGATE 3 pour basculer entre Lecture aléatoire Arrêt et Lecture aléatoire Marche Lorsque cette fonction est activée apparaît en bas de l écran 1 Vider ma liste de lecture Cette option permet d effacer les entrées de la liste de lecture de votre radio Internet Pour ce faire appuyez sur le bouton NAV...

Page 94: ...la station Selon la station de radio l écran 1 peut afficher d autres informations telles que le Nom de la station le Titre et l Artiste du morceau en cours ou les dernières actualités Tournez le bouton NAVIGATE 3 pour afficher la liste des stations et appuyez sur le bouton NAVIGATE 3 pour sélectionner une autre station de radio Enregistrement rappel de stations favorites Procédez comme suit pour ...

Page 95: ... un ensemble à la liste de stations Si vous ne connaissez pas l ensemble de stations utilisez l option Recherche complète Tournez le bouton NAVIGATE 3 pour sélectionner OUI ou NON puis appuyez sur le bouton NAVIGATE 3 pour confirmer Élagage invalide Toutes les stations invalides ou les stations qui peuvent plus être reçues sont accompagnées du symbole dans la liste des stations Vous pouvez utilise...

Page 96: ...he de stations se fait dans l ordre croissant ou décroissant des fréquences Enregistrement rappel de stations Procédez comme suit pour enregistrer une station Pour enregistrer la station de radio actuellement syntonisée maintenez le bouton FAVOURITE 6 enfoncé pendant environ 2 secondes jusqu à ce que la liste des favoris apparaisse Utilisez le bouton NAVIGATE 3 pour sélectionner l une des 10 stati...

Page 97: ... comme suit Branchez une extrémité du câble audio D à connecteurs de type jack sur la prise casque de votre source audio externe Ensuite branchez l autre extrémité du câble audio D à connecteurs de type jack sur la prise AUX IN 17 de votre radio Internet Démarrez la lecture sur la source audio externe Si nécessaire vous pouvez régler le volume souhaité à l aide du bouton VOLUME 9 et sur la source ...

Page 98: ...s au même réseau Allumez votre radio Internet en mode de fonctionnement Radio Internet Par exemples configurez le lecteur Windows Media 12 comme suit Ouvrez le lecteur Windows Media Cliquez sur Diffuser en continu dans la barre de menus supérieure Cliquez sur Activer la diffusion multimédia en continu ou Options de diffusion multimédia en continu Ensuite activez la diffusion multimédia en continu ...

Page 99: ...Application SilverCrest Smart Audio Cette application vous permet de commander votre radio Internet de manière très commode depuis votre smartphone ou votre tablette PC Vous pouvez télécharger l application SilverCrest Smart Audio sur l Apple App Store ou le Google Play Store L application SilverCrest Smart Audio vous permet de naviguer entre les différentes fonctions de changer de station de radi...

Page 100: ...a radio Internet dans tous les modes par le biais de l application vous devez sélectionner Oui dans le menu de la radio Internet sous Configuration Réseau Gardez réseau connecté Ensuite utilisez votre radio Internet une fois en mode Radio Internet afin d établir la connexion WLAN Contrôle de plusieurs radios Internet Si vous souhaitez utiliser l application SilverCrest Smart Audio pour contrôler p...

Page 101: ...n nouveau nom depuis l application SilverCrest Smart Audio et être sûr de sélectionner le bon appareil à contrôler depuis cette même application Configuration Ce menu contient des réglages supplémentaires pour votre radio Internet Égaliseur Cette option vous permet de modifier les réglages de l égaliseur Les options de son prédéfinies suivantes sont disponibles Normal Bémol Jazz Rock Film Classiqu...

Page 102: ... utilisateurs expérimentés Elle vous permet d ajuster des paramètres spécifiques au réseau type de connexion DHCP Config IP Adresse passerelle DNS SSID Authentification Type de cryptage incorrecte Clé Nous ne pouvons pas fournir de descriptions plus approfondies à ce stade car les paramètres des différents réseaux sont très spécifiques Configuration PIN NetRemote Ici vous pouvez visualiser et modi...

Page 103: ...e Date heure Ce menu vous permet de régler la date et l heure Réglage heure et date Ici vous pouvez régler la date et l heure manuellement Pour plus d informations veuillez lire le chapitre Réglage de la date et de l heure à la page 72 MAJ automatique Ici vous pouvez activer la synchronisation automatique de la date et de l heure Pour plus d informations veuillez lire le chapitre Réglage de la dat...

Page 104: ...our disponibles immédiatement Si une mise à jour est disponible elle est affichée sur l écran 1 Dans ce cas suivez les instructions à l écran 1 N éteignez pas l appareil et ne le débranchez pas du réseau électrique pendant la mise à jour Cela risquerait d endommager irrémédiablement votre appareil Assistant réglages Cette fonction vous permet de lancer l assistant de réglages à tout moment Les par...

Page 105: ...ions disponibles dans le menu Multi room Voir les détails Cette option vous permet de voir à quel groupe de votre système multi room la radio Internet appartient le cas échéant Créer un nouveau groupe Cette option vous permet de créer un nouveau groupe Vous pouvez ensuite affecter votre radio Internet et d autres enceintes au groupe créé Tournez le bouton NAVIGATE 3 pour sélectionner un caractère ...

Page 106: ...u 5 Tournez le bouton NAVIGATE 3 pour sélectionner l option Menu principal puis appuyez sur le bouton NAVIGATE 3 pour confirmer Tournez le bouton NAVIGATE 3 pour sélectionner l option Mode sommeil puis appuyez sur le bouton NAVIGATE 3 pour confirmer Tournez le bouton NAVIGATE 3 pour basculer entre les options suivantes Mode veille désactivé 15 Minutes 30 Minutes 45 Minutes et 60 Minutes Le temps i...

Page 107: ...que vous sélectionnez Une fois vous devez renseigner la date et l heure de l alarme Heure Cette option vous permet de régler l heure de l alarme L indication des heures clignote Tournez le bouton NAVIGATE 3 pour régler les heures et appuyez sur le bouton NAVIGATE 3 afin de confirmer L indication des minutes clignote Tournez le bouton NAVIGATE 3 pour régler les minutes et appuyez sur le bouton NAVI...

Page 108: ...eure réglée pour l alarme est également indiquée sur l écran 1 Désactivation de l alarme Lorsque l alarme se déclenche vous pouvez la couper comme suit Appuyez plusieurs fois sur n importe quel bouton de la radio Internet ou tournez le bouton Navigate 3 ou le bouton Volume 1 pour que l alarme retentisse à nouveau dans 5 10 15 ou 30 minutes Passé ce délai l alarme retentira à nouveau Le temps resta...

Page 109: ...u Pas de réception en mode radio Internet Il se peut que la station de radio sélectionnée ne soit pas disponible Essayez une autre station de radio Vérifiez si la connexion au routeur ou à Internet est établie Mauvaise réception DAB FM Étirez complètement l antenne télescopique 11 et ou orientez la différemment Lancez une nouvelle recherche de stations L appareil est allumé mais il n y a pas de so...

Page 110: ...nte dans la barre d adresse de votre navigateur Internet Ici vous pouvez télécharger les applications disponibles pour cet appareil URL http www multiroom sound com app download Ce site Internet contient des informations détaillées concernant la configuration et l installation du système multi room SilverCrest URL http www multiroom sound com about Ici vous trouverez des informations spécifiques r...

Page 111: ...points de collecte publics Respectez l environnement Les piles batteries usagées ne doivent pas être jetées avec les déchets ménagers mais déposées dans des points de collecte spécialement habilités à cet effet Sachez que les piles batteries doivent être complètement déchargées avant d être mises au rebut dans des points de collecte appropriés pour les piles batteries usagées Si vous jetez des pil...

Page 112: ...tions incluses dans la garantie L appareil a été fabriqué selon des directives qualité strictes et a été soigneusement contrôlé avant d être livré La garantie s applique aux défauts matériels ou de fabrication Cette garantie ne s étend pas aux pièces soumises à une usure normale et qui peuvent donc être considérées comme des pièces d usure ni aux dégâts sur les pièces fragiles comme p ex les inter...

Page 113: ...e notre assistance téléphonique organisera une intervention technique en fonction de l origine de la panne Indépendamment de la garantie commerciale souscrite le vendeur reste tenu des défauts de conformité du bien et des vices rédhibitoires dans les conditions prévues aux articles L211 4 et suivants du Code de la consommation et aux articles 1641 et suivants du Code Civil Service Téléphone 01 707...

Page 114: ...antie L appareil a été fabriqué selon des directives qualité strictes et a été soigneusement contrôlé avant d être livré La garantie s applique aux défauts matériels ou de fabrication Cette garantie ne s étend pas aux pièces soumises à une usure normale et qui peuvent donc être considérées comme des pièces d usure ni aux dégâts sur les pièces fragiles comme p ex les interrupteurs les piles recharg...

Page 115: ...uve de votre achat S il est impossible d apporter une solution par téléphone notre assistance téléphonique organisera une intervention technique en fonction de l origine de la panne Service Téléphone 02 58 87 036 E Mail service BE targa online com Téléphone 02 02 04 223 E Mail service LU targa online com Téléphone 044 55 10 057 E Mail service CH targa online com IAN 279398 Fabricant Important l ad...

Page 116: ...gnimento dell Internet Radio 127 Impostazione iniziale 127 Selezione della lingua del menu 128 Impostazione di data e ora 128 Tenere rete è collegata 130 Selezione della regione WLAN 131 Rete 131 Rete criptata WPS il modo più semplice di collegarsi 131 Stabilire una connessione senza WPS 134 Menu Configurazione 136 Navigare nel menu Configurazione 136 Struttura del menu 137 Pulsante INFO mostra in...

Page 117: ...ftware 156 Installaz guidata 156 Informazioni 156 Controluce 156 Ambient Light Illuminazione dell ambiente 156 Multi room 157 Menu principale 158 Timer di spegnimento 158 Sveglia 159 Spegnere la sveglia 160 Conservazione del prodotto inutilizzato 160 Risoluzione dei problemi 161 Codici QR 162 Normativa in materia ambientale e informazioni sullo smaltimento 163 Note di conformità 163 Informazioni s...

Page 118: ...te istruzioni operative Seguire attentamente le istruzioni di sicurezza e utilizzare l Internet radio solo nei modi e per le finalità descritti nelle istruzioni operative Conservare queste istruzioni operative in un luogo sicuro In caso di cessione o vendita del dispositivo accertarsi di consegnare con esso tutta la documentazione relativa Utilizzo previsto Questa Internet Radio è un dispositivo e...

Page 119: ...i d imballaggio e controllare che tutti i componenti siano completi e integri In presenza di componenti danneggiati o mancanti contattare il produttore A Internet Radio SilverCrest SIRD 14 C2 B Telecomando C Batteria CR2025 da 3V a pastiglia D Cavo audio con connettore jack E Alimentatore F Queste istruzioni operative illustrazione grafica ...

Page 120: ...WLAN WEP WPA WPA2 Connettori e prese Ethernet 10 100 LAN RJ 45 Cuffie Jack stereo da 3 5 mm USB 2 0 Entrata AUX IN Jack stereo da 3 5 mm Dimensioni L x H x P circa 21 8 x 11 8 x 15 1 cm Peso incl alimentatore circa 1 575 g Temperatura operativa da 5 a 35 C Umidità operativa 85 umidità relativa Condizioni di conservazione da 10 a 50ºC max 85 umidità relativa Alimentatore Produttore Ktec Tipo KSASB0...

Page 121: ...bolo indica pericolo per la salute e rischio di morte e o di danni a oggetti a causa di scosse elettriche Utilizzare solo l alimentatore in dotazione produttore Ktec Numero modello KSASB0241200200HE per alimentare la radio Internet Questo simbolo indica ulteriori informazioni sull argomento PERICOLO Prestare sempre attenzione che il dispositivo non venga esposto a fonti di calore diretto es termos...

Page 122: ...arli e sempre sotto la supervisione di una persona competente responsabile della loro sicurezza I bambini devono essere sottoposti a supervisione per assicurarsi che non giochino con il dispositivo Le componenti più piccole possono venire ingerite Tenere l imballaggio fuori dalla portata di bambini e disabili Rischio di soffocamento ATTENZIONE Rischi associati a livelli di volume eccessivi Prestar...

Page 123: ...menti PERICOLO Batteria Inserire la batteria prestando attenzione alla polarità Fare riferimento all illustrazione nel vano batterie Non tentare di ricaricare le batterie e non gettarle nel fuoco Rimuovere la batteria quando non si utilizza il dispositivo per lunghi periodi di tempo Un utilizzo improprio può causare esplosioni o fuoriuscite di liquido Mai aprire o deformare le batterie In caso con...

Page 124: ...lle apparecchiature Manutenzione Pulizia È necessario portare in riparazione il dispositivo quando ha subito danni come per esempio in caso di danni all apparecchio o all alimentatore penetrazione all interno del dispositivo di liquidi o oggetti o esposizione a pioggia o umidità Inoltre è necessaria la riparazione in caso di malfunzionamento o caduta del prodotto In presenza di fumo rumori od odor...

Page 125: ...nsentirà di guardare le voci citate in ogni momento Pannello anteriore 1 Display 2 Altoparlante destro 3 Manopola NAVIGATE navigazione nel menu ricerca manuale delle stazioni OK 4 Pulsante BACK indietro di un livello di menu 5 Pulsante MENU apre il menu di configurazione 6 Pulsante FAVOURITE 7 Pulsante MODE scelta della modalità operativa 8 Pulsante INFO selezione dei contenuti sul display 9 Manop...

Page 126: ...ello posteriore 11 Antenna telescopica ricezione DAB FM 12 Interruttore di alimentazione principale 13 Porta USB 14 Porta LAN porta di rete RJ 45 15 Presa DC IN collegamento dell alimentatore polarità 16 Presa per le cuffie 17 Entrata AUX IN ...

Page 127: ... 23 Titolo successivo 24 SHUFFLE REPEAT casuale ripete riproduzione 25 Tastierino numerico 26 INFO 27 EQ Equalizzatore 28 Stop 29 SLEEP SNOOZE timer di spegnimento snooze 30 Riproduci Pausa 31 Titolo precedente 32 MENU visualizza il menu 33 MODE scelta della modalità operativa 34 Pulsanti di navigazione 35 On Standby ...

Page 128: ...el relativo alloggiamento Posizionare la batteria correttamente con il segno rivolto verso l alto come indicato nello schema all interno dell alloggiamento stesso Far scivolare quindi il coperchio dell alloggiamento nella posizione originale Sostituzione della batteria Quando si deve sostituire la batteria cambiarla con una nuova uguale Procedere come descritto nel capitolo precedente Collegamento...

Page 129: ...et Radio spostare l interruttore di alimentazione 12 su OFF per spegnerla Una volta spento il dispositivo sarà possibile effettuare i collegamenti desiderati cavo di rete ecc Le istruzioni nelle pagine seguenti si riferiscono a operazioni con i pulsanti della radio Internet In alternativa si possono utilizzare i pulsanti corrispondenti sul telecomando Impostazione iniziale Quando si accenderà l In...

Page 130: ...uello a 24 ore e premerla per confermare la scelta L icona indica l impostazione in corso Selezionando il formato a 12 ore sul display 1 dopo l ora appariranno la mattina AM e il pomeriggio PM Sono disponibili le seguenti opzioni Aggiorn da DAB Sincronizzazione automatica dell ora da una stazione DAB Aggiorn da FM Sincronizzazione automatica dell ora da una stazione FM Aggiorn dalla rete Sincroniz...

Page 131: ...uccessiva sarà necessario indicare il proprio fuso orario Selezionare UTC 01 00 per l Europa Centrale Scegliere quindi On se è in vigore l ora legale Off in caso contrario L icona indica l impostazione in corso L icona indica l impostazione in corso Scegliendo Nessun aggiorn sarà necessario inserire manualmente data e ora ...

Page 132: ...ione dei minuti lampeggerà Ruotare la manopola NAVIGATE 3 per impostare i minuti e premerla per confermare AM appare solo se si è scelto il formato su 12 ore Ruotare la manopola NAVIGATE 3 per selezionare AM o PM e premerla per confermare la scelta Tenere rete è collegata L icona indica l impostazione in corso L impostazione predefinita è NO Di default nelle modalità Standby AUX IN FM DAB USB non ...

Page 133: ...errà eseguita immediatamente Config manuale Inserimento manuale dei dettagli di connessione Rete criptata WPS il modo più semplice di collegarsi Se il router supporta il WPS è possibile utilizzare questa comoda funzione per facilitare l impostazione Infatti questo è il modo più semplice per stabilire una connessione fra l Internet Radio e il router Quando si effettuerà una ricerca delle reti wirel...

Page 134: ...ter illustrazione schematica in base al modello di router il pulsante di connessione WPS potrebbe essere situato in un altro punto ed essere indicato diversamente Premere la manopola NAVIGATE 3 per continuare L Internet Radio cercherà di stabilire una connessione con il router Una volta stabilita la connessione sul display 1 per pochi secondi apparirà quanto segue ...

Page 135: ...INFO 8 per almeno 1 sec PIN stabilire la connessione WPS inserendo il PIN L Internet Radio genera un codice PIN Questo PIN è valido unicamente per il procedimento in corso Quando si ripete il procedimento viene generato un nuovo PIN Inserire il PIN che appare sul display 1 sul router A tal fine consultare la documentazione tecnica del router stesso Premere la manopola NAVIGATE 3 per continuare L I...

Page 136: ... criptata Ruotare la manopola NAVIGATE 3 per selezionare un carattere e premerla per confermare Si possono utilizzare anche il tastierino numerico 25 o i pulsanti di navigazione 34 e quello OK 21 del telecomando Una volta inserita tutta la chiave di rete con questa procedura ruotare la manopola NAVIGATE 3 per selezionare OK e premerla per confermare L Internet Radio cercherà di stabilire una conne...

Page 137: ...ollegata alla rete e pronta all uso In presenza di un collegamento a Internet sarà possibile sintonizzare le stazioni dell Internet Radio Via cavo Se l Internet Radio è stata collegata al router con un cavo di rete ruotare la manopola NAVIGATE 3 per selezionare l opzione Via cavo dall elenco Premere la manopola NAVIGATE 3 per confermare L Internet Radio cercherà di stabilire una connessione con il...

Page 138: ...dalità operative dell Internet Radio vengono configurate tramite un menu a più livelli Navigare nel menu Configurazione Per selezionare una modalità operativa premere il pulsante MODE 7 Sul display verranno visualizzate le 6 modalità disponibili La modalità attiva apparirà leggermente ingrandita Ruotare la manopola NAVIGATE 3 per selezionare una modalità operativa Premere la manopola NAVIGATE 3 pe...

Page 139: ...verCrest SIRD 14 C2 Italiano 137 Struttura del menu L aspetto dei sottomenu può differire in base alle singole configurazioni Ulteriori informazioni sui sottomenu si trovano nel capitolo Modalità operative ...

Page 140: ...oni Config di sistema e Menu principale sono disponibili le seguenti voci Stazione più recente mostra un elenco delle ultime stazioni radio ascoltate dei podcast ecc Lista stazioni apre un elenco delle stazioni disponibili in base alle seguenti categorie Preferiti elenca i preferiti impostati sul portale Internet Sono disponibili per tutte le Internet Radio registrate con lo stesso account Per sal...

Page 141: ...averla confermata premendo la manopola NAVIGATE 3 la riproduzione partirà immediatamente Salvare le Preferite Questa funzione consente di creare un elenco di massimo 10 stazioni radio preferite senza dover registrare la propria Internet Radio sul portale Procedere nel seguente modo Per salvare la stazione sintonizzata tenere premuto il pulsante FAVOURITE 6 per circa 2 sec fino a quando non appare ...

Page 142: ...dice d accesso viene visualizzato il messaggio di errore Timeout di rete premere la manopola NAVIGATE 3 per riavviare il procedimento o riprovare in un secondo momento Questo messaggio di errore non indica un malfunzionamento della radio Internet Registrarsi poi sul sito web www wifiradio frontier com Seguire le istruzioni del sito Per la registrazione sono necessarie le seguenti informazioni codi...

Page 143: ...nfermare la scelta Attivare il wi fi sullo smartphone e aprire Spotify Utilizzare Spotify per cercare i dispositivi di riproduzione disponibili Premere il nome del dispositivo disponibile in questo caso SilverCrest SIRD 14 C2 Verrà stabilita la connessione e sarà possibile iniziare a riprodurre la musica in steaming con l Internet Radio Il controllo della riproduzione e la scelta dei titoli musica...

Page 144: ... com freetrial per una prova gratuita di 30 giorni Punto 1 Collegare il dispositivo alla stessa rete wi fi a cui è collegato il telefono il tablet o il PC su cui gira Spotify Punto 2 Aprire Spotify e far partire la riproduzione di un brano Punto 3 Premere l immagine del brano in basso a sinistra sullo schermo Punto 4 Premere l icona Connetti Punto 5 Scegliere il dispositivo dall elenco Per maggior...

Page 145: ...iproduzione da un server UPNP Lettore musicale Riproduzione ripetuta Lettore musicale Casuale Lettore musicale Ricezione WiFi Tutte le modalità operative Nessuna ricezione WiFi Tutte le modalità operative Stereo DAB FM Ricezione RDS FM DAB Dispositivo di riproduzione USB collegato Lettore musicale Qualità del segnale DAB FM ...

Page 146: ...ando la manopola NAVIGATE 3 e poi premerla per confermare A questo punto verranno visualizzati i media condivisi creati Ruotare la manopola NAVIGATE 3 per selezionare il media condiviso desiderato e premerla per confermare la scelta Il server dei media condivisi genererà i seguenti sottomenu Sarà presente un elenco dei tipi di file e cartelle con nomi come Musica Video Immagini e Playlist Attenzio...

Page 147: ...nerati dalla struttura delle cartelle del dispositivo USB Utilizzare la manopola NAVIGATE 3 e il pulsante BACK 4 per spostarsi fra le cartelle Sul display 1 appariranno i nomi delle cartelle e dei file ma non necessariamente quelli dei titoli Una volta individuato il titolo da riprodurre premere la manopola NAVIGATE 3 per confermare Partirà la riproduzione del titolo In basso sul display 1 apparir...

Page 148: ...si fra Shuffle Off e Shuffle On Quando è attiva questa funzione appare in basso sul display 1 Svuota Mia playlist consente di cancellare le voci della playlist della propria Internet Radio Per fare ciò premere la manopola NAVIGATE 3 Ruotare la manopola NAVIGATE 3 per selezionare SI o NO e premerla per confermare Elimina server L Internet Radio salva i server UPnP che trova sulla rete Nel caso in c...

Page 149: ...zata tenere premuto il pulsante FAVOURITE 6 per circa 2 sec fino a quando non appare l elenco delle stazioni preferite Utilizzare la manopola NAVIGATE 3 per selezionare una delle 10 stazioni preimpostate Premere NAVIGATE 3 per salvare la stazione radio sulla preimpostazione selezionata Attenzione Eventuali preimpostazioni di stazioni verranno sovrascritte Per richiamare una stazione salvata in pre...

Page 150: ...a selezione e premerla per confermare L impostazione selezionata verrà contrassegnata da Ordine stazioni Consente di ordinare l elenco delle stazioni in base alle seguenti opzioni Alfanumerico da A a Z Insieme per numero del canale del gruppo Valido dal segnale più forte a quello più debole Ruotare la manopola NAVIGATE 3 per effettuare la selezione e premerla per confermare L impostazione selezion...

Page 151: ...elenco Premere la manopola NAVIGATE 3 per riprodurre la stazione radio selezionata Premendo il pulsante MENU 5 oltre alle voci Config di sistema e Menu principale è possibile scegliere una delle seguenti opzioni Impostaz di ricerca Questa opzione consente di scegliere se ricercare solo le stazioni con il segnale forte o anche quella con il segnale debole Ruotare la manopola NAVIGATE 3 per effettua...

Page 152: ... di diversi produttori di comunicare fra loro La fonte audio costituisce l unico dispositivo di controllo e di conseguenza il controllo della riproduzione non avviene tramite l Internet Radio Fonti possibili sono computer smartphone Android tablet Android o dispositivi Apple iPhone iPad Computer come fonte I requisiti di sistema per lo streaming DLNA sono Windows 7 e Windows Media Player aggiornat...

Page 153: ...rativa Radio Internet A questo punto è possibile riprodurre un titolo sull Internet Radio tramite l applicazione precedentemente installata A tal fine consultare la documentazione tecnica dell applicazione A questo punto sarà possibile controllare la riproduzione dallo smartphone Tablet PC Selezionando una modalità operativa diversa sull Internet Radio la riproduzione verrà annullata Potrà essere ...

Page 154: ...modalità Radio Internet Di default nelle modalità Standby AUX IN FM DAB USB non è possibile controllare l Internet Radio dall applicazione Se si desidera controllare l Internet Radio in tutte le modalità operative tramite l applicazione è necessario selezionare SÌ in Config di sistema Rete Tenere rete connessa nel menu Radio Internet Utilizzare quindi l Internet Radio una prima volta in modalità R...

Page 155: ...Apply Applica per confermare A questo punto l Internet Radio risulterà facilmente identificabile con il suo nuovo nome da SilverCrest Smart Audio Ciò consentirà di scegliere il corretto dispositivo da controllare con questa applicazione Config di sistema Questo menu contiene ulteriori impostazioni per l Internet Radio Equaliser Consente di modificare le impostazioni dell equalizzatore Sono disponi...

Page 156: ...sponibile è Maggior parte d Europa Impostaz manuali Questa opzione è riservata a utenti esperti Consente di regolare parametri specifici di rete Tipo connessione DHCP Impostazioni IP Ind gateway DNS SSID Autenticazione Tipo crittografia Chiave In questa fase non è possibile fornire ulteriori descrizioni in quanto le impostazioni di ogni singola rete sono altamente specifiche NetRemote PIN Setup Co...

Page 157: ...re data e ora a pag 128 Aggiorn automatico Consente di sincronizzare automaticamente data e ora Per maggiori informazioni consultare il capitolo Impostare data e ora a pag 128 Imposta formato Ruotare la manopola NAVIGATE 3 per selezionare 12 per il formato a 12 ore o 24 per quello a 24 ore e premerla per confermare la scelta Selezionando il formato a 12 ore sul display 1 dopo l ora appariranno la ...

Page 158: ...data Con questa funzione in qualsiasi momento è possibile avviare l installazione guidata Eventuali parametri o stazioni inseriti non verranno cancellati Per maggiori informazioni consultare il capitolo Impostazione iniziale a pag 127 Informazioni Questa voce di menu mostra la versione del software versione del software l ID Radio e il Friendly Name del dispositivo Controluce Consente di modificar...

Page 159: ...e possibile Crea nuovo gruppo Consente di creare un nuovo gruppo Sarà poi possibile assegnare l Internet Radio e altri altoparlanti al gruppo creato Ruotare la manopola NAVIGATE 3 per selezionare un carattere e premere sempre la manopola NAVIGATE 3 per confermare Si possono utilizzare anche il tastierino numerico 25 o i pulsanti di navigazione 34 e quello OK 21 del telecomando Una volta inserito t...

Page 160: ... premere di nuovo NAVIGATE 3 per confermare Ruotare la manopola NAVIGATE 3 per spostarsi fra le seguenti opzioni Sleep OFF 15 min 30 min 45 min e 60 min Il tempo indica i minuti rimanenti prima dello spegnimento del dispositivo Nelle modalità operative Lettore musicale e AUX in la riproduzione deve essere avviata manualmente sull Internet Radio o sulla periferica Per disabilitare il timer di spegn...

Page 161: ...ra e premerla per confermare L indicazione dei minuti lampeggerà Ruotare la manopola NAVIGATE 3 per impostare i minuti e premerla per confermare Se si è scelto il formato su 12 ore AM lampeggerà Ruotare la manopola NAVIGATE 3 per selezionare AM o PM e premerla per confermare la scelta Modalità Consente di impostare le modalità di sveglia Sono disponibili le seguenti opzioni Tone Radio Internet DAB...

Page 162: ...o quella del Volume 9 per ritardare la sveglia di 5 10 15 o 30 minuti Trascorso questo periodo di tempo la sveglia ricomincerà a suonare Il tempo rimanente prima della riattivazione della sveglia appare in basso sul display 1 In alternativa per effettuare la regolazione è possibile utilizzare i pulsanti 21 22 26 29 32 33 o 35 del telecomando Per spegnere la sveglia tenere premuta la manopola VOLUM...

Page 163: ... in modalità Radio Internet La stazione radio selezionata potrebbe non essere disponibile Provare un altra stazione radio Controllare che vi sia la connessione con il router Internet Ricezione DAB FM scarsa Estrarre completamente l antenna telescopica 11 e o ruotarla in una posizione diversa Avviare una nuova ricerca delle stazioni Il dispositivo è acceso ma non emette suono Controllare l impostaz...

Page 164: ...ella barra degli indirizzi del browser Qui è possibile scaricare le applicazioni disponibili per il dispositivo URL http www multiroom sound com app download Questo sito web contiene informazioni dettagliate sull installazione e l impostazione del sistema multiroom SilverCrest URL http www multiroom sound com about Qui sono presenti informazioni specifiche per il dispositivo URL http www multiroom...

Page 165: ...i ai cassonetti per la carta o nei punti di raccolta pubblica per essere riciclati Eventuali pellicole o plastiche contenute nell imballaggio possono essere portate nei punti di raccolta pubblica Rispettare l ambiente Non smaltire le batterie usate fra i rifiuti domestici Portarle in un apposito punto di raccolta Attenzione Le batterie devono essere smaltite totalmente scariche negli appositi punt...

Page 166: ...cadere della garanzia le riparazioni saranno a carico del cliente Copertura della garanzia L apparecchio è stato accuratamente prodotto nel rispetto di elevati standard qualitativi e controllato scrupolosamente prima della consegna La garanzia è valida per difetti di materiale o fabbricazione Tale garanzia non si estende alle parti del prodotto esposte a normale usura i cosiddetti pezzi d usura o ...

Page 167: ...sistente Nel caso in cui non sia possibile trovare una soluzione per via telefonica tramite la nostra assistenza clienti viene contattata una seconda assistenza in base alla causa del difetto Assistenza Telefono 0200 68 97 67 E Mail service IT targa online com Telefono 044 55 10 057 E Mail service CH targa online com Telefono 027 78 11 03 E Mail service MT targa online com IAN 279398 Produttore Co...

Page 168: ... Internet Radio on off 179 First time setup 179 Selecting the menu language 180 Setting date and time 180 Keep network connected 182 Selecting the WLAN region 183 Network 183 WPS encrypted network the easiest way to connect 183 Establishing a connection without WPS 186 Configuration menu 188 Navigating the configuration menu 188 Menu structure 189 INFO button show information 190 Operating modes 1...

Page 169: ...nguage 207 Factory Reset 207 Software update 208 Setup wizard 208 Info 208 Display brightness 208 Ambient Light 208 Multi room 209 Main menu 210 Sleep timer 210 Alarm 211 Switching the alarm off 212 Storage when not using the product 212 Troubleshooting 212 QR codes 214 Environmental regulations and disposal information 215 Conformity notes 215 Warranty and Service Information 216 ...

Page 170: ...rating instructions through carefully Be careful to follow the safety instructions and only use the Internet radio as described in the operating instructions and for the applications given Keep these operating instructions in a safe place If you pass the Internet radio on to someone else make sure to give them all the relevant documents with it Intended use This Internet Radio is a consumer electr...

Page 171: ...material and check whether all the parts are complete and undamaged If you find anything missing or damaged please contact the manufacturer A Internet Radio SilverCrest SIRD 14 C2 B Remote control C 3V button cell battery CR2025 D Audio cable with jack type connector E Power adapter F These operating instructions line art illustration ...

Page 172: ... n WiFi encryption WEP WPA WPA2 Connectors and sockets 10 100 Ethernet LAN RJ 45 Headphones 3 5 mm stereo jacks USB 2 0 AUX IN 3 5 mm stereo jacks Dimensions W x H x D approx 21 8 x 11 8 x 15 1 cm Weight incl power adapter approx 1575 g Operating temperature 5 C to 35 C Operating humidity 85 rel humidity Storage conditions 10 C to 50 C max 85 RH Power adapter Manufacturer Ktec Type KSASB0241200200...

Page 173: ... DANGER This symbol denotes danger for human health and risk of death and or risk of damage to equipment due to electric shock Please only use the supplied power adapter manufacturer Ktec Model number KSASB0241200200HE to power your Internet radio This symbol denotes further information on the topic DANGER Always make sure that no direct heat sources e g radiators can affect the device the device ...

Page 174: ...are instructed accordingly and supervised by a competent person responsible for their safety Children should always be supervised to ensure that they do not play with the product Small parts can represent choking hazards Keep the packaging away from children and persons with disabilities too There is a risk of suffocation WARNING Risks associated with high volumes Be careful when using headphones ...

Page 175: ...ther cables All cables should be laid so that nobody can trip over them or be obstructed by them DANGER Battery Insert the battery with the correct polarity Refer to the diagram inside the battery compartment Do not attempt to recharge the batteries and do not dispose of the batteries in a fire Remove the battery when the remote control is not in use for an extended period Improper use could cause...

Page 176: ...ppliances Maintenance cleaning Repairs are required if this device is damaged in any way for example if the power adapter or device housing is damaged if liquids or objects have entered the device or if the product has been exposed to rain or moisture Repairs are also necessary if the product is not performing normally or if it has been dropped If you notice any smoke unusual noise or strange smel...

Page 177: ...whilst reading the different chapters of this user manual This allows you to refer to the corresponding items at any time Front panel 1 Display 2 Right speaker 3 NAVIGATE knob menu navigation manual station search OK 4 BACK button back one menu level 5 MENU button open the configuration menu 6 FAVOURITE button 7 MODE button operating mode selection 8 INFO button display contents selection 9 VOLUME...

Page 178: ...D 14 C2 176 English Rear panel 11 Telescopic antenna DAB FM reception 12 Main power switch 13 USB port 14 LAN port network port RJ 45 15 DC IN socket power adapter connection polarity 16 Headphones jack 17 AUX IN jack ...

Page 179: ...ume 21 OK 22 Favourites 23 Next title 24 SHUFFLE REPEAT random repeat playback 25 Numeric Keypad 26 INFO 27 EQ Equalizer 28 Stop 29 SLEEP SNOOZE sleep timer snooze alarm 30 Play Pause 31 Previous title 32 MENU display menu 33 MODE operating mode selection 34 Navigation buttons 35 On Standby ...

Page 180: ...ery compartment Fit the battery the right way round with the sign facing up This is shown on a diagram in the battery compartment Next slide the battery compartment cover back to its original position Replacing the battery When you need to change the battery replace it with a new 3V CR2025 button cell battery Proceed as described in the previous section Internet connection There are 2 ways to esta...

Page 181: ...ng to the Internet Radio toggle the main power switch 12 to power it off completely Once powered off you can connect all the cables you want network cable etc The instructions on the following pages refer to operations using the Internet radio buttons Alternatively you can also use the corresponding remote control buttons First time setup When powering the Internet Radio on for the first time the ...

Page 182: ...ormat and press the NAVIGATE knob 3 to confirm your selection The icon indicates the current setting If you select the 12 hour format the display 1 shows AM in the morning or PM in the afternoon after the time After this the following options are available Update from DAB Synchronise the time automatically from a DAB station Update from FM Synchronise the time automatically from an FM station Upda...

Page 183: ... Network you must indicate your time zone in the next window Select UTC 01 00 for Central Europe Next choose On for summer time otherwise select Off The icon indicates the current setting The icon indicates the current setting If you choose No update you will have to enter the date and time manually ...

Page 184: ...inute and press the NAVIGATE knob 3 to confirm AM displays only if you have chosen the 12 hour time format Rotate the NAVIGATE knob 3 to select AM for the morning hours or PM for the afternoon hours and press the NAVIGATE knob 3 to confirm your selection Keep network connected The icon indicates the current setting The default setting is NO Controlling it from the app in the Standby AUX IN FM DAB ...

Page 185: ...e connection is then established immediately Manual config Manual input of connection details WPS encrypted network the easiest way to connect If your router supports WPS you can use this user friendly function for easy setup This is the easiest way to establish a connection between your Internet Radio and your router When searching for wireless networks the device will detect any WPS compatible r...

Page 186: ... your router Diagram for illustration only the connection WPS button may be positioned and labelled differently depending on the router model Next press the NAVIGATE knob 3 to continue The Internet Radio now attempts to establish a connection with your router After the connection has been established the display 1 shows the following for a few seconds ...

Page 187: ...O button 8 for at least 1 second PIN establish WPS connection by entering the PIN The Internet Radio generates a PIN code This PIN is only valid for the current task If the task is repeated a new PIN is generated Enter the PIN on your router that appears on the display 1 Please consult the technical documentation that came with your router Next press the NAVIGATE knob 3 to continue The Internet Ra...

Page 188: ...otate the NAVIGATE knob 3 to select a character and press the NAVIGATE knob 3 to confirm it You can also use the numeric keypad 25 or the navigation buttons 34 and the OK button 21 of the remote control After you have entered the entire network key in this way rotate the NAVIGATE knob 3 to select OK and press the NAVIGATE knob 3 to confirm The Internet Radio now attempts to establish a connection ...

Page 189: ...onnection it is possible to receive Internet Radio stations Wired If your Internet Radio is connected to the router via a network cable rotate the NAVIGATE knob 3 to select the Wired option from the list Press the NAVIGATE knob 3 to confirm your selection The Internet Radio now attempts to establish a connection with your router After the connection has been established the display 1 shows the fol...

Page 190: ...io are configured via a multi level menu Navigating the configuration menu To select an operating mode press the MODE button 7 The 6 available operating mode appear on the display The currently enabled operating mode reads slightly larger Rotate the NAVIGATE knob 3 to select an operating mode Press the NAVIGATE knob 3 to confirm your selection You can also use the navigation buttons 34 and the OK ...

Page 191: ...rest SIRD 14 C2 English 189 Menu structure The submenus may appear differently depending on your individual configuration You can find further information concerning the submenus in the Operating modes chapter ...

Page 192: ...m Your Internet Radio now connects to the Internet to load a list of radio stations As well as the System settings and Main menu options the following entries are available Last listened Shows a list of the last radio stations podcasts etc listened to Station list Opens a list of available stations in the following categories My Favourites lists the favourites you have set on the Internet radio po...

Page 193: ...stations Depending on the category selected further search criteria can be specified Once a station has been selected and confirmed by pressing the NAVIGATE knob 3 it is played immediately Saving favourites This feature lets you create a list of up to 10 favourite radio stations without having to register your Internet Radio on the Internet radio portal Proceed as follows To save the current radio...

Page 194: ...ext from the Internet Radio menu go to Station list Help Get access code If the error message Network timeout appears when generating the access code press the NAVIGATE knob 3 to restart the process or try it again later This error message does not mean that your Internet radio is defective Then register on the website www wifiradio frontier com Follow the instructions on the website The following...

Page 195: ...g mode Spotify Connect by rotating the NAVIGATE knob 3 and then press the NAVIGATE knob 3 to confirm your selection Enable Wi Fi on your smartphone and launch the Spotify App Use the Spotify App to scan for available playback devices Tap the name of the available device in this case the SilverCrest SIRD 14 C2 The connection is established and you can start playing back the streamed music with your...

Page 196: ...ial for your free 30 day trial Step 1 Connect your device to the same Wi Fi network as your phone tablet or PC running the Spotify app Step 2 Open the Spotify app and play any song Step 3 Tap the song image in the bottom left of the screen Step 4 Tap the Connect icon Step 5 Pick your device from the list For more information on how to set up and use Spotify Connect please visit www spotify com con...

Page 197: ...Symbol Description Mode Playback from an UPNP server Music player Repeat playback Music player Random Music player WiFi reception all operating modes No WiFi reception all operating modes Stereo DAB FM RDS reception FM DAB USB playback device connected Music player Signal quality DAB FM ...

Page 198: ...ng the NAVIGATE knob 3 and then pressing the NAVIGATE knob 3 to confirm your selection The shared media created is now displayed Rotate the NAVIGATE knob 3 to select the desired shared media and press the NAVIGATE knob 3 to confirm your selection The following submenus are generated by the shared media server You should find a list of file types and folders names such as Music Video Pictures and P...

Page 199: ...selection The menus displayed are generated from the USB storage device s folder structure Use the NAVIGATE knob 3 and the BACK button 4 to browse through the folders The display 1 shows the folder and file names but not necessarily the title names Once you have found the title you want to play press the NAVIGATE knob 3 to confirm your selection The title is played appears at the bottom of the dis...

Page 200: ...fle play On While this function is enabled reads on the bottom of the display 1 Clear My playlist Lets you clear the playlist entries on your Internet Radio To do this press the NAVIGATE knob 3 Rotate the NAVIGATE knob 3 to select YES or NO and press the NAVIGATE knob 3 to confirm Prune servers The Internet Radio saves UPnP servers it finds via your network connection If some UPnP servers are no l...

Page 201: ...n the selected station preset Please note that any station presets used will be overwritten To recall a previously saved stations briefly press the FAVOURITE button 6 and use the NAVIGATE knob 3 to select the station from the list Press the NAVIGATE knob 3 to play the selected station If you press the MENU button 5 you can choose one of the following options as well as the System Settings and Main...

Page 202: ...arked with a Receiving FM Radio Use this operating mode to listen to FM radio stations Selecting a station Proceed as follows to select a station Extract the telescopic antenna 11 fully Rotate the NAVIGATE knob 3 to tune to the frequency you want manually To search for a station automatically press the NAVIGATE knob 3 You can stop the station search by pressing the NAVIGATE knob 3 again The displa...

Page 203: ... Scan setting This option lets you choose if the device searches for strong stations only or also for weak stations Rotate the NAVIGATE knob 3 to select and press the NAVIGATE knob 3 to confirm The selected setting is marked with a Audio setting This lets you define that weak stations are to be received in Mono only This can help to reduce noise Rotate the NAVIGATE knob 3 to select and press the N...

Page 204: ...s not on the Internet Radio Possible sources are computers Android smartphones Android tablets or Apple iPhone iPad devices Computer source device The system requirements for DLNA streaming are Windows 7 and an up to date Windows Media Player Please note that your computer and Internet Radio have to be logged into the same network Power your Internet Radio on in the Internet radio operating mode C...

Page 205: ...ing mode on your Internet Radio playback is cancelled Playback can only be restarted from the smartphone Tablet PC SilverCrest Smart Audio App This app lets you control your Internet Radio conveniently from your smartphone or Tablet PC You can download the SilverCrest Smart Audio control app from the Apple App Store and from the Google Play Store The SilverCrest Smart Audio App allows you to navig...

Page 206: ...ontrol the Internet Radio in all operating modes via the app in the Internet Radio menu you must select YES in System settings Network Keep network connected After this use your Internet Radio in the Internet radio operating mode once to establish the WLAN connection Controlling more Internet Radios If you want to use the SilverCrest Smart Audio App to control multiple Internet Radios installed in...

Page 207: ...rnet Radio with its new name from the SilverCrest Smart Audio App This ensures that you choose the correct device to be controlled from the SilverCrest Smart Audio App System settings This menu contains more settings options for your Internet Radio Equalizer Here you can change the equalizer settings The following preset sound options are available Normal Flat Jazz Rock Movie Classic Pop and News ...

Page 208: ... should only be used by experienced users It allows you to adjust network specific parameters Connection type DHCP IP settings Gateway address DNS SSID Authentication Encryption type key We cannot provide any further descriptions at this stage as the individual settings for each network are very specific NetRemote PIN Setup Here you can view and edit the NetRemote PIN The default NetRemote PIN is ...

Page 209: ...the date and time Set Time Date Here you can set the date and time manually For more information please read the Setting date and time chapter on page 180 Auto update Here you can set the date and time to be synchronised automatically For more information please read the Setting date and time chapter on page 180 Set format Rotate the NAVIGATE knob 3 to select 12 for 12 hour display format or 24 fo...

Page 210: ...the update This could result in a complete device failure Setup wizard With this function you can start the setup wizard at any time Any parameters or stations entered already are not deleted For more information please read the First time setup chapter on page 179 Info This menu item shows the software version SW version Radio ID and Friendly Name model name of your Internet Radio Display brightn...

Page 211: ...plicable Create new group This lets you create a new group You can then assign your Internet Radio and other speakers to the group created Rotate the NAVIGATE knob 3 to select a character and press the NAVIGATE knob 3 to confirm it You can also use the numeric keypad 25 or the navigation buttons 34 and the OK button 21 of the remote control After you have entered the entire group name in this way ...

Page 212: ...o confirm Rotate the NAVIGATE knob 3 to toggle between the following options Sleep OFF 15 Minutes 30 Minutes 45 Minutes and 60 Minutes The time is the remaining time until the device will power off The Music player and AUX in operating modes require playback to be started manually on the Internet Radio or the external audio source Select Sleep OFF to disable the sleep timer In this case the device...

Page 213: ... to confirm The minute flashes Rotate the NAVIGATE knob 3 to set the minute and press the NAVIGATE knob 3 to confirm AM will flash only if you have chosen the 12 hour time format Rotate the NAVIGATE knob 3 to select AM for the morning hours or PM for the afternoon hours and press the NAVIGATE knob 3 to confirm your selection Mode This let you set how you want to be woken up The following options a...

Page 214: ...y 1 Alternatively you can use the buttons 21 22 26 29 32 33 or 35 on the remote control to adjust Press and hold the VOLUME knob 9 or the On Standby button 35 of the remote control for approx 2 seconds to quit the alarm Storage when not using the product If you will not be using the device for a long period of time unplug it from the mains and store the device in a dry and cool place Also remove t...

Page 215: ... Check if there is a connection to the router Internet Poor DAB FM reception Extract the telescopic antenna 11 fully and or move it to a different position Launch a new station search Device switched on but no sound Check the volume setting Please check if you have connected headphones and if so disconnect them Please check if the correct operating mode has been selected The remote control does no...

Page 216: ...ing URL into your Internet browsers address bar Here you can download apps available for this device URL http www multiroom sound com app download This website contains detailed information about setting up and installing the SilverCrest multi room system URL http www multiroom sound com about Here you can find specific information for your device URL http www multiroom sound com 279398 This link ...

Page 217: ...ints for recycling Any film or plastic contained in the packaging should be taken to your public collection points for disposal Respect the environment Old batteries must not be disposed of with domestic waste They must be handed in at a collection point for waste batteries Please note that batteries must be disposed of fully discharged at appropriate collection points for old batteries If disposi...

Page 218: ...e was carefully manufactured in compliance with stringent quality guidelines and subjected to thorough testing before it left the works The warranty applies to material and manufacturing faults This warranty does not cover product components which are subject to normal wear and which can therefore be regarded as wearing parts or damage to fragile components such as switches rechargeable batteries ...

Page 219: ...is not possible to solve the problem on the phone our hotline support staff will initiate further servicing procedures depending on the fault Service Phone 020 70 49 04 03 E Mail service GB targa online com Phone 01 4370121 E Mail service IE targa online com Phone 027 78 11 03 E Mail service MT targa online com Phone 02 20 09 025 E Mail service CY targa online com IAN 279398 Manufacturer Please no...

Page 220: ......

Reviews: