background image

SDBS 2400 A1

■ 

26

 GB

IE


This appliance may be used by children aged 8 years or 
more and by persons with reduced physical, sensory or 
mental capabilities or lack of experience and/or knowledge 
if they are supervised, or have been instructed in the safe 
use of the appliance and have understood the potential 
risks. Do not allow children to play with the appliance. 
Cleaning and user maintenance may not be carried out by 
children unless they are supervised.


Do not allow children to play with the appliance.


All repairs must be carried out by authorised specialist 
companies or by the Customer Service department. Improper 
repairs may put the user at risk. It will also invalidate any 
warranty claims.


Repairs to the appliance during the warranty period may 
only be carried out by a customer service department 
authorised by the manufacturer. Otherwise, no warranty 
claims will be held for any subsequent damages.


Defective components must always be replaced with original 
replacement parts. Compliance with safety requirements can 
only be guaranteed if original replacement parts are used.


Do not place any objects on the appliance, especially not 
on the connecting hose between the base station and the iron.


Do not operate or place the appliance close to an open 
flame (e.g. candles).

Summary of Contents for 290359

Page 1: ... VAPEUR Mode d emploi DAMPFBÜGELSTATION Bedienungsanleitung STEAM GENERATOR Operating instructions CENTRO DE PLANCHADO DE VAPOR Instrucciones de uso FERRO COM CALDEIRA Manual de instruções STOOMSTRIJKIJZER STATION Gebruiksaanwijzing NAPAŘOVACÍ ŽEHLIČKA S PARNÍ STANICÍ Návod k obsluze ...

Page 2: ...se yourself with all functions of the device Avant de lire le mode d emploi ouvrez la page contenant les illustrations et familiarisez vous ensuite avec toutes les fonctions de l appareil Vouw vóór het lezen de pagina met de afbeeldingen open en maak u vertrouwd met alle functies van het apparaat Před čtením si otevřete stranu s obrázky a potom se seznamte se všemi funkcemi přístroje Antes de empe...

Page 3: ...A B C ...

Page 4: ...eßen 9 Sicherheitshinweise 9 Lieferumfang und Transportinspektion 9 Auspacken 9 Entsorgung der Verpackung 10 Anforderungen an den Aufstellort 10 Elektrischer Anschluss 10 Bedienung und Betrieb 11 Vor dem ersten Gebrauch 11 Reinigung und Wartung 15 Sicherheitshinweise 15 Kalkfilter wechseln 15 Gerät reinigen 16 Fehlerbehebung 17 Lagerung Entsorgung 18 Lagerung 18 Gerät entsorgen 18 Garantie der Komp...

Page 5: ...stellers gestattet Bestimmungsgemäße Verwendung Dieses Gerät ist nur zum Trocken oder Dampfbügeln aller Arten von Kleidungs stücken Vorhängen und Geweben auch hängend bestimmt Eine andere oder darüber hinausgehende Benutzung gilt als nicht bestimmungsgemäß Das Gerät ist nicht zur Verwendung in gewerblichen oder industriellen Bereichen vorgesehen Ansprüche jeglicher Art wegen Schäden aus nicht best...

Page 6: ...HINWEIS Ein Hinweis kennzeichnet zusätzliche Informationen die den Umgang mit dem Gerät erleichtern Sicherheit In diesem Kapitel erhalten Sie wichtige Sicherheitshinweise im Umgang mit dem Gerät Dieses Gerät entspricht den vorgeschriebenen Sicherheits bestimmungen Ein unsachgemäßer Gebrauch kann zu Personen und Sachschäden führen Grundlegende Sicherheitshinweise Beachten Sie für einen sicheren Umg...

Page 7: ...paraturen am Gerät nur von autorisierten Fach betrieben oder dem Kundenservice durchführen Durch un sachgemäße Reparaturen können Gefahren für den Benutzer entstehen Zudem erlischt der Garantieanspruch Eine Reparatur des Gerätes während der Garantiezeit darf nur von einem vom Hersteller autorisierten Kundendienst vorgenommen werden sonst besteht bei nachfolgenden Schäden kein Garantieanspruch mehr...

Page 8: ...nger als 8 Jahre alt sind Tauchen Sie das Gerät niemals in Wasser ein Wischen Sie es nur mit einem leicht feuchten Tuch ab Setzen Sie das Gerät nicht dem Regen aus und benutzen Sie es auch niemals in feuchter oder nasser Umgebung Fassen Sie das Netzkabel immer am Stecker an und ziehen Sie nicht am Kabel selbst Fassen Sie das Netzkabel oder den Netzstecker niemals mit feuchten Händen an Stellen Sie...

Page 9: ... auf der Abstellfläche der Basisstation ab Ziehen Sie den Netzstecker aus der Steck dose wenn Sie das Bügeln unterbrechen GEFAHR DURCH VERBRÜHEN ODER VERBRENNEN Vorsicht heiße Oberfläche Während das Bügeleisen eingeschaltet ist sowie einige Minuten nach dem Abschalten ist die Bügelsohle sehr heiß Berühren Sie dann niemals die Bügelsohle Fassen Sie das Dampfbügeleisen nur am Griff an wenn es heiß ist ...

Page 10: ...die Pumpe durchbrennen könnte Achten Sie darauf dass weder Netzkabel noch Verbindungs schlauch in Kontakt mit der heißen Bügelsohle kommen Verkratzen Sie die Bügelsohle nicht Vermeiden Sie einen Kontakt der Bügelsohle mit Metallteilen wie z B Knöpfe oder Reißverschlüsse Betreiben Sie das Dampfbügeleisen und die Basisstation nur auf einer stabilen geraden und ebenen Fläche Technische Daten Dampfbüg...

Page 11: ...e Temperaturregler Aufheizkontrollleuchte Verbindungsschlauch Abstellfläche Bügelsohle Abbildung B Schachtabdeckung Kalkfilter Wassertankverschluss Wassertank Abbildung C Dampfkontrollleuchte eco 3 Dampfkontrollleuchte max Kontrollleuchte anti calc Taste RESET 0 Taste Ein Aus 6 Taste Dampfstärke ...

Page 12: ...Sachschäden zu vermeiden Lieferumfang und Transportinspektion Das Gerät wird standardmäßig mit folgenden Komponenten geliefert Dampfbügelstation Klettband zum Fixieren des Netzkabels Bedienungsanleitung HINWEIS Prüfen Sie die Lieferung auf Vollständigkeit und auf sichtbare Schäden Bei einer unvollständigen Lieferung oder Schäden infolge mangelhafter Verpackung oder durch Transport wenden Sie sich ...

Page 13: ...icht mehr benötigte Verpackungs materialien gemäß den örtlich geltenden Vorschriften HINWEIS Heben Sie wenn möglich die Originalverpackung während der Garantiezeit des Gerätes auf um das Gerät im Garantiefall ordnungsgemäß verpacken zu können Anforderungen an den Aufstellort Die Arbeitsfläche auf der Sie die Basisstation aufstellen muss stabil eben und hitzebeständig sein Elektrischer Anschluss Ste...

Page 14: ...kab lagerungen die Funktionen des Gerätes beeinträchtigen Mischen Sie das Leitungswasser mit destilliertem Wasser entsprechend der Tabelle Wasserhärte Anteil destilliertes Wasser zu Leitungswasser sehr weich weich mittel 1 1 hart 2 1 sehr hart 3 1 Wasser mit Zusätzen wie Stärke Parfüm Weichspüler oder anderen Chemi kalien darf nicht in den Wassertank gelangen Das Gerät könnte dadurch beschädigt we...

Page 15: ...ken Sie die Taste Ein Aus 0 um das Gerät einzuschalten Die in der Taste Ein Aus 0 integrierte Kontrollleuchte leuchtet und die Dampfkontroll leuchte max 3 blinkt 2 Drehen Sie den Temperaturregler und stellen Sie so die gewünschte Bügeltemperatur ein 3 Die Aufheizkontrollleuchte leuchtet während des Aufheizens Sobald die Aufheizkontrollleuchte erlischt ist die eingestellte Temperatur erreicht und S...

Page 16: ...estoßen Leuchtet die Dampfkontrollleuchte eco wird weniger Dampf ausge stoßen Sobald die Dampfkontrolleuchte eco bzw max 3 je nach Einstel lung dauerhaft leuchtet können Sie mit dem Dampfbügeln beginnen 5 Während Sie das Bügelgut bügeln können Sie nun die Dampf Taste drücken und halten um anhaltend Dampf aus der Bügelsohle auf das Bügelgut zu geben Um den Dampfausstoß zu beenden lassen Sie die Dam...

Page 17: ...ontrollleuchte max 3 wird viel Dampf ausgestoßen Leuchtet die Dampfkontrollleuchte eco wird weniger Dampf ausge stoßen Sobald die Dampfkontrolleuchte eco bzw max 3 je nach Einstel lung dauerhaft leuchtet können Sie mit dem Dampfbügeln beginnen 5 Halten Sie das Bügeleisen in senkrechter Position und drücken Sie die Dampf Taste 6 Berühren Sie das Gewebe leicht mit der Bügelsohle und bedampfen Sie es...

Page 18: ... Feuchtigkeit in das Gerät eindringt um eine irreparable Beschädigung des Gerätes zu vermeiden Benutzen Sie zur Reinigung der Oberflächen weder scharfe Scheuer oder Lösungsmittel noch eine Drahtbürste oder andere scheuernde Gegenstände Kalkfilter wechseln HINWEISE Beachten Sie folgende Hinweise im Umgang mit dem Kalkfilter Nicht zum Verzehr zum Trinken geeignet Bewahren Sie den Kalkfilter außerhalb de...

Page 19: ... aus dem Kalkfilterschacht heraus 6 Setzen Sie den neuen Kalkfilter in den Kalkfilterschacht ein und drücken Sie diesen herunter so dass er fest sitzt 7 Schließen Sie die Schachtabdeckung 8 Stecken Sie den Netzstecker in eine Netzsteckdose und schalten Sie das Gerät mit der Taste Ein Aus 0 ein 9 Drücken Sie die Taste RESET ca 3 Sekunden Die Kontrollleuchte anti calc erlischt Das Wechseln des Kalkfilte...

Page 20: ... Dampferzeugung wurde lange nicht benutzt oder wird zum ersten Mal benutzt Halten Sie die Taste Dampf länger Der Dampf benötigt einige Zeit bis dieser aus der Bügelsohle austritt Wasser tropft aus der Bügelsohle Wird das Dampfbügeln kurz unterbrochen kondensiert der sich abkühlende Dampf im Ver bindungsschlauch Dies führt zur Tropfenbildung Das ist normal Halten Sie das Bügeleisen über ein Auffangt...

Page 21: ... Lagern Sie das Gerät an einem trockenen und sauberen Ort Gerät entsorgen Werfen Sie das Gerät keinesfalls in den normalen Hausmüll Dieses Produkt unterliegt der europäischen Richtlinie 2012 19 EU WEEE Waste Electrical and Electronic Equipment Entsorgen Sie das Gerät über einen zugelassenen Entsorgungsbetrieb oder über Ihre kommunale Entsorgungseinrichtung Beachten Sie die aktuell geltenden Vorsch...

Page 22: ...che Die Garantiezeit wird durch die Gewährleistung nicht verlängert Dies gilt auch für ersetzte und reparierte Teile Eventuell schon beim Kauf vorhandene Schäden und Mängel müssen sofort nach dem Auspacken gemeldet werden Nach Ablauf der Garantiezeit anfallende Reparaturen sind kostenpflichtig Garantieumfang Das Gerät wurde nach strengen Qualitätsrichtlinien sorgfältig produziert und vor Auslieferu...

Page 23: ...Sie dann unter Beifügung des Kaufbe legs Kassenbon und der Angabe worin der Mangel besteht und wann er aufgetreten ist für Sie portofrei an die Ihnen mitgeteilte Service Anschrift übersenden Auf www lidl service com können Sie diese und viele weitere Handbücher Produktvideos und Software herunterladen Service Service Deutschland Tel 0800 5435 111 Kostenfrei aus dem dt Festnetz Mobilfunknetz E Mail...

Page 24: ...t SDBS 2400 A1 bestellen Kalkfilter Bestellen Sie die Ersatzteile über unsere Service Hotline siehe Kapitel Service oder bequem auf unserer Webseite unter www kompernass com HINWEIS Halten Sie die IAN Nummer die Sie auf dem Umschlag dieser Bedienungsanleitung finden für Ihre Bestellung bereit ...

Page 25: ...SDBS 2400 A1 22 DE AT CH ...

Page 26: ...on 31 Package contents and transport inspection 31 Unpacking 31 Disposal of the packaging 32 Set up location requirements 32 Electrical connection 32 Handling and use 33 Before first use 33 Cleaning and maintenance 37 Safety information 37 Replacing the limescale filter 37 Cleaning the appliance 38 Troubleshooting 39 Storage disposal 40 Storage 40 Disposal of the appliance 40 Kompernass Handels GmbH...

Page 27: ...ritten authorisation of the manufacturer Proper use This appliance is only intended for the dry ironing or steam ironing of all types of clothing curtains and fabrics including hanging The appliance is not intended for any other purpose nor for use beyond the scope described The appliance is not intended for use in commercial or industrial environments The manufacturer accepts no responsibility fo...

Page 28: ...e NOTE A note provides additional information which will assist you in using the appliance Safety This section contains important safety instructions for using the appliance This appliance complies with statutory safety regulations Improper use may result in personal injury and property damage Basic safety instructions To ensure safe operation of the appliance follow the safety guidelines set out ...

Page 29: ...by authorised specialist companies or by the Customer Service department Improper repairs may put the user at risk It will also invalidate any warranty claims Repairs to the appliance during the warranty period may only be carried out by a customer service department authorised by the manufacturer Otherwise no warranty claims will be held for any subsequent damages Defective components must always...

Page 30: ...er than eight years old while switched on or cooling down Never immerse the appliance in water Wipe it only with a slightly damp cloth Do not expose the appliance to rain and never use it in a humid or wet environment Always hold the plug when handling the power cable and never pull on the cable itself Never touch the power cable or the plug with wet hands Do not place the appliance itself or furn...

Page 31: ...F INJURY Always place the iron on the base station placement area Pull the plug out of the power socket if you take a break during ironing RISK OF SCALDING OR BURNING Caution hot surfaces The iron remains very hot while switched on and also a few minutes after being switched off Never touch the iron sole of the iron When the steam iron is hot hold it only by the handle Children should be supervised...

Page 32: ...rwise the pump could burn out Ensure that neither the power cable or the connection hose come into contact with the hot sole of the iron Do not scratch the sole of the iron Avoid contact between the sole of the iron and metal parts such as buttons or zips Operate the steam iron and the base station only on a stable flat and level surface Technical details Ironing station Voltage supply 220 240 V 50...

Page 33: ...n Temperature control Heat up indicator lamp Connecting hose Placement area Sole of the iron Figure B Shaft cover Limescale filter Water tank filler cap Water tank Figure C eco steam indicator lamp 3 max steam indicator lamp anti calc indicator lamp RESET button 0 On Off Button 6 Steam strength button ...

Page 34: ...to avoid damage to property Package contents and transport inspection The appliance is supplied with the following components as a standard Steam Generator Velcro tape for fastening the mains cable Operating instructions NOTE Check the package for completeness and signs of visible damage If the delivery is incomplete or damage has occurred as a result of defec tive packaging or during transport co...

Page 35: ...aging materials that are no longer needed in accordance with applicable local regulations NOTE If possible keep the original appliance packaging for the entire duration of the warranty period so that the appliance can be packaged properly for return shipment in the event of a warranty claim Set up location requirements The work service on which you place the base station must be stable flat and hea...

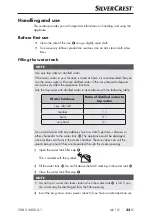
Page 36: ...ccordance with the following table Water hardness Ratio of distilled water to tap water very soft soft medium 1 1 hard 2 1 very hard 3 1 Do not add water with any additives such as starch perfume softeners or other chemicals to the water tank The appliance could be damaged since residues can form in the steam chamber These residues can soil the goods being ironed if they are deposited through the ...

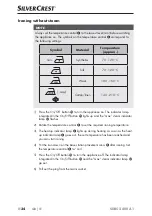
Page 37: ...grated in the On Off button 0 lights up and the max steam indicator lamp 3 flashes 2 Rotate the temperature control to set the required ironing temperature 3 The heat up indicator lamp lights up during heating As soon as the heat up indicator lamp goes out the set temperature has been reached and you can start ironing 4 Put the iron down on the base station placement area after ironing Set the tempe...

Page 38: ...f the eco indicator lamp is lit up less steam will be produced As soon as the eco or max 3 indicator lamps light up continuously depending on the setting you can start steam ironing 5 While you are ironing you can now press and hold the steam button to continuously spray steam onto the goods to be ironed from the sole of the iron Release the steam button to stop producing steam NOTE When you press...

Page 39: ...s lit up a lot of steam will be produced If the eco indicator lamp is lit up less steam will be produced As soon as the eco or max 3 indicator lamps light up continuously depending on the setting you can start steam ironing 5 Hold the steam iron in a vertical position and press the steam button 6 Touch the fabric lightly with the sole of the iron and steam it to remove creases 7 Release the steam ...

Page 40: ...nce ensure that no moisture penetrates it during cleaning Do not use abrasive or chemical cleaners wire brushes or other abrasive objects to clean the appliance s surfaces Replacing the limescale filter NOTES Note the following information when handling the limescale filter Not suitable for consumption drinking Keep the limescale filter out of the reach of children Store the spare limescale filter in ...

Page 41: ...er shaft 5 Pull the limescale filter upwards out of the limescale filter shaft 6 Place the new limescale filter in the limescale filter shaft and press it down until it is firmly seated 7 Close the shaft cover 8 Insert the plug into a mains power socket and switch on the appliance using the On Off switch 0 9 Press the RESET button for about 3 seconds The anti calc indicator lamp goes out You have now co...

Page 42: ...m unit has not been used for a long time or is being used for the first time Press and hold down the steam button The steam takes a little time until it discharges from the sole of the iron Water drips out of the sole of the iron If steam ironing is paused briefly the cooling steam condenses in the connecting hose This leads to drip formation This is normal Hold the iron over a collecting cloth or c...

Page 43: ...pliance in a dry and clean location Disposal of the appliance Never dispose of the appliance in your normal domestic waste This product is subject to the provisions of European Directive 2012 19 EU WEEE Waste Electrical and Electronic Equipment Dispose of the appliance via an approved disposal company or your municipal waste facility Please comply with all applicable regulations Please contact you...

Page 44: ...cts The warranty period is not prolonged by repairs effected under the warranty This also applies to replaced and repaired components Any damage and defects present at the time of purchase must be reported immediately after unpacking Repairs carried out after expiry of the warranty period shall be subject to a fee Scope of the warranty This appliance has been manufactured in accordance with strict ...

Page 45: ...uct to us free of charge to the service address that will be provided to you Ensure that you enclose the proof of purchase till receipt and information about what the defect is and when it occurred You can download these instructions along with many other manuals product videos and software on www lidl service com Service Service Great Britain Tel 0871 5000 720 0 10 Min E Mail kompernass lidl co u...

Page 46: ... for product SDBS 2400 A1 Limescale filter Order the replacement parts via the service hotline see section Service or simply visit our website at www kompernass com NOTE Have the IAN number of the appliance ready can be found on the cover of these operating instructions when you place your order ...

Page 47: ...SDBS 2400 A1 44 GB IE ...

Page 48: ...ré et inspection après transport 53 Déballage 53 Élimination de l emballage 54 Exigences requises sur le lieu d installation 54 Raccordement électrique 54 Utilisation et fonctionnement 55 Avant la première utilisation 55 Nettoyage et maintenance 59 Consignes de sécurité 59 Remplacer le filtre antitartre 59 Nettoyage de l appareil 60 Dépannage 61 Entreposage mise au rebut 62 Entreposage 62 Mise au r...

Page 49: ... qu avec l accord écrit du fabricant Usage conforme Cet appareil est uniquement conçu pour le repassage à sec ou à la vapeur de toutes sortes de vêtements rideaux et tissus même suspendus Tout usage autre ou dépassant ce cadre est réputé non conforme Cet appareil n est pas conçu pour être utilisé dans des contextes commerciaux ou industriels Les prétentions de toute nature pour dommages résultant ...

Page 50: ...tient des informations supplémentaires facilitant le maniement de l appareil Sécurité Ce chapitre contient des consignes de sécurité importantes visant la manipulation de l appareil Cet appareil est conforme aux consignes de sécurité pres crites Tout usage non conforme peut entraîner des dom mages corporels et des dégâts matériels Consignes de sécurité fondamentales Veuillez vous conformer aux con...

Page 51: ... de l appareil exclusivement à des entreprises agréées ou au service après vente Toute réparation non conforme peut entraîner des risques pour l utilisateur À cela s ajoute l annulation de la garantie Toute réparation de l appareil pendant la période de garantie doit être confiée exclusivement à un service clientèle agréé par le fabricant sinon les dommages consécutifs ne seront pas couverts par la...

Page 52: ...plongez jamais l appareil dans l eau Nettoyez le avec un chiffon légèrement humide N exposez pas l appareil à la pluie et ne l utilisez jamais dans un environnement humide ou mouillé Pour débrancher le cordon d alimentation saisissez toujours la fiche secteur et ne tirez pas sur le cordon Ne manipulez jamails le cordon ou la prise secteur avec les mains mouillées Ne placez ni l appareil ni des meubl...

Page 53: ... surface de dépose de la station Débranchez la fiche secteur de la prise lorsque vous arrêtez de repasser DANGER DE VOUS BRÛLER OU ÉBOUILLANTER Prudence surface brûlante Pendant que le fer à repasser est allumé ainsi que quelques minutes après l arrêt la semelle de repassage est brûlante Ne touchez jamais la semelle de repassage Tenir le fer à repasser à vapeur uniquement par sa poignée lorsqu il e...

Page 54: ... que ni le cordon d alimentation ni le flexible de raccordement n entre en contact avec la semelle brûlante Ne rayez pas la semelle de repassage Évitez tout contact entre la semelle de repassage et des pièces métalliques comme par ex des boutons ou fermetures éclair Utilisez le fer à vapeur et la station uniquement sur une surface stable antidérapante et plane Caractéristiques techniques Centrale v...

Page 55: ...Flexible de raccordement Surface de dépose Semelle de repassage Figure B Couvercle du logement Filtre antitartre Bouchon du réservoir à eau Réservoir à eau Figure C Voyant de contrôle de la vapeur eco 3 Voyant de contrôle de la vapeur max Voyant de contrôle anti calc Touche RESET 0 Touche Marche Arrêt 6 Touche intensité de vapeur ...

Page 56: ...d éviter tous dégâts matériels Matériel livré et inspection après transport L appareil est livré accompagné standard des composants suivants Centrale vapeur Bande velcro pour fixer le cordon d alimentation Mode d emploi REMARQUE Vérifiez si la livraison est au complet et ne présente aucun dégât apparent En cas de livraison incomplète ou de dommages résultant d un emballage défectueux ou du transport...

Page 57: ...ballage qui ne servent plus en respectant la réglementation locale REMARQUE Si possible conservez l emballage d origine pendant la période de garantie de l appareil afin de pouvoir emballer ce dernier en bonne et due forme en cas de recours en garantie Exigences requises sur le lieu d installation La surface de travail sur laquelle vous posez la station doit être stable plane et résistante à la cha...

Page 58: ...t d entraver les fonctions de l appareil Mélangez l eau du robinet et l eau distillée selon les proportions indiquées dans le tableau Dureté de l eau Proportion eau distillée et eau du robinet très douce douce moyennement dure 1 1 dure 2 1 très dure 3 1 De l eau avec des additifs comme de l amidon du parfum de l adoucissant ou d autres produits chimiques ne doit pas parvenir dans le réservoir à ea...

Page 59: ... sur la touche Marche Arrêt 0 pour allumer l appareil Le voyant de contrôle intégré dans la touche Marche Arrêt 0 s allume et le voyant de contrôle de vapeur max 3 clignote 2 Tournez le thermostat afin de régler la température de repassage souhaitée 3 Le voyant d échauffement s allume pendant le chauffage Lorsque le voyant d échauffement s éteint la température réglée est atteinte et vous pouvez comme...

Page 60: ...e moins de vapeur est alors diffusée Dès que le voyant de contrôle de la vapeur eco ou max 3 en fonction du réglage s allume durablement vous pouvez commencer à repasser à la vapeur 5 Pendant que vous repassez les vêtements vous pouvez appuyer sur le bouton vapeur et le maintenir appuyé afin de diffuser continuellement de la vapeur depuis la semelle de repassage sur le vêtement à repasser Pour stoppe...

Page 61: ... s allume beaucoup de vapeur est diffusée Si le voyant de contrôle de la vapeur eco s allume moins de vapeur est alors diffusée Dès que le voyant de contrôle de la vapeur eco ou max 3 en fonction du réglage s allume durablement vous pouvez commencer à repasser à la vapeur 5 Tenez le fer à repasser à la verticale et appuyez sur la touche vapeur 6 Effleurez le tissu avec la semelle de repassage et vapor...

Page 62: ...re dans ce dernier afin d éviter tous dégâts irréparables Pour nettoyer les surfaces n utilisez aucun produit nettoyant agressif ou dissolvant ni de brosse métallique ou d autres objets qui risquent de rayer Remplacer le filtre antitartre REMARQUES Tenez compte des remarques suivantes lors de la manipulation du filtre anti tartre Impropre à la consommation à la boisson Conservez le filtre antitartre h...

Page 63: ...tartre 5 Sortez le filtre antitartre par le haut du logement de filtre antitartre 6 Placez le nouveau filtre antitartre dans le logement et appuyez dessus jusqu à ce qu il soit bien en place 7 Fermez le couvercle du logement 8 Branchez la fiche secteur dans une prise secteur et allumez l appareil avec la touche Marche Arrêt 0 9 Appuyez sur la touche RESET pendant env 3 secondes Le voyant de contrôle a...

Page 64: ...as été utilisée depuis long temps ou est utilisée pour la première fois Maintenez la touche vapeur appuyée plus longtemps La vapeur a besoin d un certain temps avant de sortir par la semelle de repassage De l eau goutte de la semelle de repassage Si le repassage vapeur est brièvement interrompu la vapeur se condense dans le flexible de raccordement en refroidissant Ceci entraîne la formation de gou...

Page 65: ...un endroit sec et sans poussières Mise au rebut de l appareil Ne jetez en aucun cas l appareil avec les ordures ménagères normales Ce produit est assujetti à la directive européenne 2012 19 EU DEEE déchets d équipements électriques et électro niques Éliminez l appareil par l intermédiaire d une entreprise de traitement des déchets autori sée ou via le service de recyclage de votre commune Respecte...

Page 66: ...ode de garantie Cette disposi tion s applique également aux pièces remplacées ou réparées Les dommages et vices éventuellement déjà présents à l achat doivent être signalés immédiatement après le déballage Toute réparation survenant après la période sous garantie fera l objet d une facturation Étendue de la garantie L appareil a été fabriqué avec soin conformément à des directives de qualité stric...

Page 67: ...ientèle cité ci dessous par téléphone ou par e mail Vous pouvez ensuite retourner un produit enregistré comme étant défectueux en joignant le ticket de caisse et en indiquant en quoi consiste le vice et quand il est survenu sans devoir l affranchir à l adresse de service après vente communiquée Sur www lidl service com vous pouvez télécharger ce manuel ainsi que beaucoup d autres des vidéos produit...

Page 68: ...uit SDBS 2400 A1 Filtre antitartre Commandez les pièces de rechange via notre ligne téléphonique de service après vente Voir chapitre Service après vente ou tout simplement sur notre site web www kompernass com REMARQUE Tenez le numéro IAN que vous trouverez sur la couverture de ce manuel d utilisation prêt pour la commande ...

Page 69: ...SDBS 2400 A1 66 FR BE ...

Page 70: ...idsvoorschriften 75 Inhoud van het pakket en inspectie na transport 75 Uitpakken 75 De verpakking afvoeren 76 Eisen aan de plaats van opstelling 76 Elektrische aansluiting 76 Bediening en gebruik 77 Vóór het eerste gebruik 77 Reiniging en onderhoud 81 Veiligheidsvoorschriften 81 Kalkfilter vervangen 81 Apparaat reinigen 82 Problemen oplossen 83 Opbergen afvoeren 84 Opbergen 84 Apparaat afvoeren 84 ...

Page 71: ...mming met bestemming Dit apparaat is uitsluitend bestemd voor het droog of stoomstrijken van alle soorten kleding gordijnen en weefsels ook hangend Een ander of verdergaand ge bruik geldt als niet in overeenstemming met de bestemming Het apparaat is niet bedoeld voor gebruik in bedrijfsmatige of industriële omgevingen De fabrikant aanvaardt geen aansprakelijkheid voor schade als gevolg van het nie...

Page 72: ...oorkomen OPMERKING Een opmerking bevat extra informatie die de omgang met het apparaat vergemakkelijkt Veiligheid In dit hoofdstuk krijgt u belangrijke veiligheidsvoorschriften voor de omgang met het apparaat Dit apparaat voldoet aan de gestelde veiligheidsvoor schriften Een verkeerd gebruik kan leiden tot persoonlijk letsel en materiële schade Basisveiligheidsvoorschriften Neem de volgende veilig...

Page 73: ...apparaat alleen uitvoeren door geautoriseerde vakbedrijven of door de klantenservice Ondeskundige reparaties kunnen resulteren in gevaren voor de gebruiker Bovendien vervalt dan de garantie Een reparatie van het apparaat tijdens de garantieperiode mag alleen worden uitgevoerd door een klantenservice die door de fabrikant is geautoriseerd anders vervalt de garantie bij volgende schadegevallen Defec...

Page 74: ...van kinderen die jonger zijn dan 8 jaar Dompel het apparaat nooit onder in water Veeg het alleen af met een licht bevochtigde doek Stel het apparaat niet bloot aan regen en gebruik het ook nooit in een vochtige of natte omgeving Pak het snoer altijd bij de stekker vast en trek niet aan het snoer zelf Pak het snoer of de stekker nooit met vochtige handen vast Zet het apparaat meubelstukken en derge...

Page 75: ... van het basis station Haal de stekker uit het stopcontact als u het strijken onderbreekt GEVAAR VOOR SCHROEIEN OF VERBRANDEN Voorzichtig heet oppervlak Terwijl het strijkijzer is ingeschakeld en enkele minuten na uitschakeling is de strijkzool zeer heet Raak de strijkzool dan nooit aan Pak het stoomstrijkijzer als het heet is alleen bij de hand greep vast Bij kinderen is supervisie noodzakelijk o...

Page 76: ...nder water omdat anders de pomp kan doorbranden Let erop dat het netsnoer en de verbindingsslang niet in aan raking komen met de hete strijkzool Maak geen krassen op de strijkzool Voorkom contact van de strijkzool met metalen delen zoals knopen of ritssluitingen Gebruik het apparaat alleen op een stabiele egale onder grond die waterpas is Technische gegevens Stoomstrijkstation Voeding 220 240 V 50...

Page 77: ...emperatuurregelaar Indicatielampje opwarmen Verbindingsslang Neerzetvlak Strijkzool Afbeelding B Schachtafdekking Kalkfilter Sluiting waterreservoir Waterreservoir Afbeelding C Stoomindicatielampje eco 3 Stoomindicatielampje max Indicatielampje anti calc Toets RESET 0 Aan uitknop 6 Toets stoomsterkte ...

Page 78: ... materiële schade te voorkomen Inhoud van het pakket en inspectie na transport Het apparaat wordt standaard met de volgende componenten geleverd Stoomstrijkijzer station Klittenband voor vastzetten van het netsnoer Gebruiksaanwijzing OPMERKING Controleer of het pakket compleet is en of er sprake is van zichtbare schade Neem contact op met de service hotline zie het hoofdstuk Service als het pakket...

Page 79: ...digde verpakkingsmaterialen af conform de plaatselijk geldende voorschriften OPMERKING Bewaar indien mogelijk de originele verpakking gedurende de garan tieperiode van het apparaat om het apparaat bij een garantiekwestie volgens de voorschriften te kunnen verpakken Eisen aan de plaats van opstelling Het werkvlak waarop u het basisstation plaatst moet stabiel egaal en hitte bestendig zijn Elektrisc...

Page 80: ...lgens de tabel Waterhardheid Aandeel gedestilleerd water bij leidingwater zeer zacht zacht gemiddeld 1 1 hard 2 1 zeer hard 3 1 Water met toevoegingen zoals zetmeel parfum wasverzachter of andere chemicaliën mag niet in het waterreservoir terechtkomen Het apparaat zou daardoor beschadigd kunnen raken omdat zich resten in het stoomreser voir kunnen vormen Deze resten kunnen het strijkgoed verontrei...

Page 81: ...greerde indicatielampje brandt en het stoomindicatie lampje max 3 knippert 2 Draai de temperatuurregelaar en stel zo de gewenste strijktemperatuur in 3 Het indicatielampje voor opwarmen brandt tijdens het opwarmen Zodra het indicatielampje voor opwarmen dooft is de ingestelde temperatuur bereikt en kunt u beginnen met strijken 4 Zet het strijkijzer na het strijken op het neerzetvlak van het basiss...

Page 82: ...duceerd Als het stoomindicatielampje eco brandt wordt er minder stoom geproduceerd Zodra het stoomindicatielampje eco resp max 3 al naar gelang de instelling continu brandt kunt u beginnen met stoomstrijken 5 Terwijl u het strijkgoed strijkt kunt u de stoomtoets ingedrukt houden om continu stoom uit de strijkzool op het strijkgoed te sproeien Om de stoomproductie te stoppen laat u de stoomtoets lo...

Page 83: ...3 brandt wordt er veel stoom geproduceerd Als het stoomindicatielampje eco brandt wordt er minder stoom geproduceerd Zodra het stoomindicatielampje eco resp max 3 al naar gelang de instelling continu brandt kunt u beginnen met stoomstrijken 5 Houd het strijkijzer in verticale positie en druk op de stoomtoets 6 Raak het weefsel licht aan met de strijkzool en voeg stoom toe om plooien te verwijderen...

Page 84: ...in het apparaat binnendringt tijdens het reinigen om onherstelbare schade aan het apparaat te voorkomen Gebruik voor de reiniging van de oppervlakken geen scherpe schuurmid delen of oplosmiddelen en ook geen draadborstel of andere schurende voorwerpen Kalkfilter vervangen OPMERKINGEN Neem de volgende aanwijzingen in acht voor de omgang met het kalkfilter Niet geschikt voor consumptie drinken Berg he...

Page 85: ...ter naar boven toe uit de kalkfilterschacht 6 Plaats het nieuwe kalkfilter in de kalkfilterschacht en druk het omlaag tot het vastzit 7 Sluit de schachtafdekking 8 Steek de stekker in het stopcontact en schakel het apparaat in met de aan uitknop 0 9 Houd de toets RESET ca 3 seconden ingedrukt Het indicatielampje anti calc dooft De vervanging van het kalkfilter is nu gereed Apparaat reinigen Reinig de ...

Page 86: ...r een temperatuur in het instelbereik De stoomfunctie is lange tijd niet gebruikt of wordt voor het eerst gebruikt Druk langer op de stoomtoets Het duurt enige tijd voordat er stoom uit de strijkzool komt Er druppelt water uit de strijkzool Als het stoomstrijken kort wordt onderbroken condenseert de afkoelende stoom in de verbin dingsslang Dit resulteert in druppelvorming Dat is normaal Houd het s...

Page 87: ...waar het apparaat op een droge en schone plaats Apparaat afvoeren Deponeer het apparaat in geen geval bij het gewone huisvuil Dit product is onderworpen aan de Europese richtlijn 2012 19 EU AEEA afgedankte elektrische en elektronische apparatuur Voer het apparaat af via een erkend afvalverwerkingsbedrijf of via uw gemeen telijke afvalverwerking Neem de momenteel geldende voorschriften in acht Neem...

Page 88: ...erlengd Dat geldt ook voor vervangen en gerepareerde onderdelen Eventueel al bij aankoop aanwezige schade en gebreken moeten meteen na het uitpakken worden gemeld Voor repa raties na afloop van de garantieperiode worden kosten in rekening gebracht Garantieomvang Het apparaat is op basis van strenge kwaliteitsnormen met de grootst mogelijke zorg vervaardigd en voorafgaand aan de levering nauwkeurig ...

Page 89: ... genoemde serviceafdeling telefonisch of via e mail Een als defect geregistreerd product kunt u dan zonder portokosten naar het aan u doorgegeven serviceadres sturen Voeg het aankoopbewijs kassabon bij en vermeld waaruit het gebrek bestaat en wanneer het is opgetreden Op www lidl service com kunt u deze en vele andere handboeken productvideo s en software downloaden Service Service Nederland Tel 0...

Page 90: ... u de volgende reserveonderdelen bestellen Kalkfilter Bestel de reserveonderdelen via onze service hotline zie het hoofdstuk Service of op onze website www kompernass com OPMERKING Houd het IAN nummer dat op het omslag van deze gebruiksaanwijzing staat bij de hand bij het bestellen ...

Page 91: ...SDBS 2400 A1 88 NL BE ...

Page 92: ...yny 97 Rozsah dodávky a kontrola po přepravě 97 Vybalení 97 Likvidace obalu 98 Požadavky na místo instalace 98 Elektrická přípojka 98 Obsluha a provoz 99 Před prvním použitím 99 Čištění a údržba 103 Bezpečnostní pokyny 103 Výměna filtru proti vodnímu kameni 103 Čištění přístroje 104 Odstranění závad 105 Skladování likvidace 106 Skladování 106 Likvidace přístroje 106 Záruka společnosti Kompernass Ha...

Page 93: ...přístroj je určen pouze pro žehlení na sucho nebo parní žehlení všech druhů oděvů záclon a textilií také visící Jiné použití než k určenému účelu nebo nad jeho rámec je považováno za použití v rozporu s určením Přístroj není vhodný k použití v živnostenských provozovnách nebo průmyslových podnicích Nároky na náhradu škody jakéhokoli druhu vzniklé v důsledku použití v rozporu s určením neodborné op...

Page 94: ...ýstražném upozornění UPOZORNĚNÍ Upozornění označuje doplňující informace usnadňující manipulaci s přístrojem Bezpečnost V této kapitole jsou uvedeny důležité bezpečnostní pokyny týkající se manipulace s přístrojem Tento přístroj odpovídá předepsaným bezpečnostním předpisům Neodborné použití může vést ke zranění osob a hmotným škodám Základní bezpečnostní pokyny Pro bezpečnou manipulaci s přístroje...

Page 95: ...pravy na zařízení nechte provádět pouze autorizovanými odbornými firmami nebo zákaznickým servisem Neod bornou opravou může pro uživatele vzniknout nebezpečí Navíc zanikají záruční nároky Opravu přístroje během záruční doby smí provádět pouze výrobcem autorizovaný zákaznický servis jinak při násled ném poškození zaniká nárok na záruku Vadné součástky smějí být nahrazovány pouze originálními náhradn...

Page 96: ...jsou mladší než 8 let Přístroj nikdy neponořujte do vody Otřete jej pouze lehce navlhčeným hadříkem Nevystavujte přístroj působení deště a rovněž jej nikdy nepo užívejte ve vlhkém nebo mokrém prostředí Síťový kabel uchopte vždy za zástrčku a nikdy netahejte za samotný kabel Nikdy se kabelu ani zástrčky nedotýkejte vlhkýma rukama Na síťový kabel nestavte ani přístroj ani nábytek apod a dbejte na to...

Page 97: ...NĚNÍ Žehličku vždy odstavte na odstavnou plochu základní stanice Při přerušení žehlení vytáhněte síťovou zástrčku ze zásuvky NEBEZPEČÍ OPAŘENÍ NEBO POPÁLENÍ Pozor horký povrch Během zapnutí žehličky a několik minut po vypnutí je žehlicí plocha velmi horká Poté se nikdy nedotýkejte žehlicí plochy Pokud je napařovací žehlička horká dotýkejte se jí pouze na rukojeti Děti musí být pod dohledem a to pr...

Page 98: ...ože jinak by se čerpadlo mohlo propálit Dbejte na to aby ani síťový kabel a ani spojovací hadice nepřišly do styku s horkou žehlicí plochou Žehlící plochu nepoškrábejte Zabraňte styku žehlicí plochy s kovovými předměty jako např knoflíky nebo zipy Napařovací žehličku a základní stanici provozujte pouze na stabilní přímé a rovné ploše Technické údaje Parní žehlící stanice Napájecí napětí 220 240 V 5...

Page 99: ...r teploty kontrolka zahřívání spojovací hadice odstavná plocha žehlící plocha Obrázek B šachtový poklop filtr proti vodnímu kameni uzávěr nádržky na vodu nádržka na vodu Obrázek C kontrolka páry eco 3 kontrolka páry max kontrolka anti calc tlačítko RESET 0 tlačítko zap vyp 6 tlačítko intenzity páry ...

Page 100: ...niku hmotných škod Rozsah dodávky a kontrola po přepravě Přístroj se standardně dodává s následujícími komponentami napařovací žehlička s parní stanicí suchý zip pro upevnění síťového kabelu návod k obsluze UPOZORNĚNÍ Zkontrolujte kompletnost dodávky a zda není viditelně poškozená V případě neúplné dodávky nebo poškození vzniklého v důsledku vadného obalu nebo během přepravy kontaktujte servisní p...

Page 101: ...ž nepotřebný obalový materiál zlikvidujte podle místních platných předpisů UPOZORNĚNÍ Pokud možno uschovejte originální obal během záruční doby přístroje aby bylo možné v případě uplatnění záruky přístroj řádně zabalit Požadavky na místo instalace Pracovní plocha na kterou umístíte základní stanici musí být stabilní rovná a tepelně odolná Elektrická přípojka Zastrčte zástrčku síťového kabelu do řá...

Page 102: ...m případě mohou usazeniny vodní ho kamene omezit funkci přístroje Smíchejte vodu z vodovodu s destilovanou vodou podle tabulky Tvrdost vody Podíl destilované vody vůči vodě z vodovodu velmi měkká měkká středně tvrdá 1 1 tvrdá 2 1 velmi tvrdá 3 1 Voda s přísadami jako je škrob parfémy změkčovadla nebo jiné chemikálie se nesmí dostat do nádržky na vodu Přístroj by se tím mohl poškodit pro tože se v ...

Page 103: ...C Vlna 100 160 C max Bavlna lněné plátno 140 210 C 1 Pro zapnutí přístroje stiskněte tlačítko zap vyp 0 Kontrolka integrovaná v tlačítku zap vyp 0 svítí a kontrolka páry max 3 bliká 2 Otočte regulátorem teploty a nastavte tak požadovanou žehlicí teplotu 3 Během zahřívání svítí kontrolka zahřívání Jakmile kontrolka zahřívání zhasne je dosažena nastavená teplota a můžete začít žehlit 4 Po žehlení od...

Page 104: ...ství páry Svítí li kontrolka páry eco vystupuje malé množství páry Jakmile kontrolka páry eco resp max 3 podle nastavení trvale svítí můžete začít s parním žehlením 5 Během žehlení textilií můžete nyní stisknout tlačítko páry a toto podržet stisknuté pro trvalé napařování přes žehlící plochu na žehlený textil K ukončení výstupu páry tlačítko páry pusťte UPOZORNĚNÍ Když se tlačítko páry stiskne můž...

Page 105: ... páry 6 Svítí li kontrolka páry max 3 vystupuje velké množství páry Svítí li kontrolka páry eco vystupuje malé množství páry Jakmile kontrolka páry eco resp max 3 podle nastavení trvale svítí můžete začít s parním žehlením 5 Držte žehličku ve svislé poloze a stiskněte tlačítko páry 6 Tkaniny se lehce dotýkejte žehlicí plochou a napařte ji abyste odstranili záhyby 7 K ukončení výstupu páry tlačítko...

Page 106: ...troje aby nedošlo k jeho neo pravitelnému poškození Nepoužívejte k čištění povrchů žádné ostré abrazivní nebo rozpouštědla ani drátěné kartáče nebo abrazivní předměty Výměna filtru proti vodnímu kameni UPOZORNĚNÍ Při manipulaci s filtrem proti vodnímu kameni dodržujte následující pokyny Není vhodné k požívání ani k pití Filtr proti vodnímu kameni uchovávejte mimo dosah dětí Náhradní filtr proti vodní...

Page 107: ...ytáhněte filtr proti vodnímu kameni směrem nahoru ze šachty na filtr proti vodnímu kameni 6 Vložte nový filtr proti vodnímu kameni do šachty na filtr proti vodnímu kameni a zatlačte jej dolů tak aby pevně dosedal 7 Zavřete šachtový poklop 8 Zastrčte zástrčku do síťové zásuvky a zapněte přístroj tlačítkem zap vyp 0 9 Stiskněte tlačítko RESET na cca 3 sekundy Kontrolka anti calc zhasne Výměna filtru prot...

Page 108: ...sahu nastavení Tvoření páry nebylo již dlouho použito nebo je použito poprvé Podržte déle stisknuté tlačítko páry Než začne pára vystupovat z žehlicí plochy uplyne jistá doba Voda kape ze žehlicí plochy Pokud se parní žehlení krátce přeruší kondenzuje se ochlazená pára ve spojovací hadici To vede k tvorbě kapiček To je normální Podržte žehličku nad záchytnou utěrkou nebo záchytnou nádobou a stiskn...

Page 109: ...stroj uchovávejte na suchém a čistém místě Likvidace přístroje V žádném případě nevyhazujte přístroj do normálního domovního odpadu Tento výrobek podléhá evropské směrnici č 2012 19 EU WEEE Waste Electrical and Electronic Equipment Zlikvidujte přístroj prostřednictvím schváleného likvidačního podniku nebo vašeho komunálního sběrného dvora Dodržujte aktuálně platné předpisy V případě pochybností se...

Page 110: ...ční doba neprodlužuje To platí i pro vyměněné a opravené součásti Poškození nebo vady vyskytující se případně již při nákupu se musí oznámit ihned po vybalení Po uplynutí záruční doby podléhají veškeré opravy zpoplatnění Rozsah záruky Přístroj byl vyroben pečlivě podle přísných směrnic kvality a před expedicí byl svědomitě vyzkoušen Záruka se vztahuje na materiálové nebo výrobní vady Tato záruka s...

Page 111: ...dené servisní oddělení telefonicky nebo e mailem Výrobek zaevidovaný jako vadný výrobek pak můžete při přiložení dokladu o nákupu pokladní lístek a při uvedení v čem spočívá vada a kdy k ní došlo poslat výrobek pro Vás bez poštovného na adresu kterou Vám oznámí servis Na webových stránkách www lidl service com si můžete stáhnout tyto a mnoho dalších příruček videí o výrobku a software Servis Servi...

Page 112: ...jící náhradní díly Filtr proti vodnímu kameni Objednejte náhradní díly prostřednictvím naší servisní linky viz kapitola Servis nebo pohodlně na našich webových stránkách www kompernass com UPOZORNĚNÍ Pro Vaši objednávku mějte připravené číslo IAN které najdete na obalu tohoto návodu k obsluze ...

Page 113: ...SDBS 2400 A1 110 CZ ...

Page 114: ...ridad 119 Volumen de suministro e inspección de transporte 119 Desembalaje 119 Desecho del embalaje 120 Requisitos del lugar de instalación 120 Conexión eléctrica 120 Manejo y funcionamiento 121 Antes del primer uso 121 Limpieza y mantenimiento 125 Indicaciones de seguridad 125 Cambio del filtro antical 125 Limpieza del aparato 126 Eliminación de fallos 127 Almacenamiento desecho 128 Almacenamiento...

Page 115: ...s con la autorización por escrito del fabricante Uso previsto Este aparato solo está previsto para el planchado en seco o con vapor de todo tipo de ropa cortinas y tejidos también colgantes Cualquier uso diferente o que supere lo indicado se considerará contrario al uso previsto Este aparato no está previsto para su uso comercial o industrial Se excluyen las reclamaciones de cualquier tipo por los...

Page 116: ...ÓN La indicación proporciona información adicional que facilita el manejo del aparato Seguridad En este capítulo obtendrá indicaciones de seguridad importantes para manejar el aparato Este aparato cumple las normas de seguridad prescritas Un uso inadecuado puede causar lesiones personales y daños materiales Indicaciones básicas de seguridad Para manejar con seguridad el aparato deben tenerse en cu...

Page 117: ...el servicio de asistencia técnica pueden reparar el aparato Una reparación inade cuada puede provocar riesgos para el usuario Además se anulará la garantía La reparación del aparato durante el periodo de garantía debe ser realizada exclusivamente por un servicio de asis tencia técnica autorizado por el fabricante de lo contrario los posibles daños posteriores no estarán cubiertos por la garantía L...

Page 118: ...able de conexión fuera del alcance de los niños meno res de 8 años No sumerja nunca el aparato en agua Limpie el aparato exclusivamente con un paño ligeramente húmedo No exponga el aparato a la lluvia ni lo utilice en lugares mojados o húmedos Extraiga siempre el cable de red del enchufe tirando de la clavija y nunca directamente del propio cable No toque nunca la clavija de red o el cable con las...

Page 119: ...re la plancha sobre la superficie de apoyo de la estación de base Extraiga la clavija de red de la base de enchufe cuando realice una pausa en el planchado PELIGRO DE ESCALDADURAS O QUEMADURAS Cuidado superficies calientes La suela está muy caliente mientras la plancha está activada y durante algunos minutos después de apagarse No toque nunca la suela de la plancha Sujete la plancha de vapor exclusi...

Page 120: ...e de red ni el conducto de conexión entren en contacto con la suela caliente No arañe la suela de la plancha Evite que la suela entre en contacto con piezas metálicas como p ej botones o cierres de cremallera Utilice la plancha de vapor y la estación de base exclusiva mente sobre una superficie estable recta y plana Características técnicas Estación de la plancha de vapor Alimentación de tensión 22...

Page 121: ...atura Piloto de control del calentamiento Conducto de conexión Superficie de apoyo Suela Figura B Tapa Filtro antical Cierre del depósito de agua Depósito de agua Figura C Piloto de control del vapor eco 3 Piloto de control del vapor max Piloto de control anti calc Botón RESET 0 Botón de encendido apagado 6 Botón de intensidad del vapor ...

Page 122: ... Volumen de suministro e inspección de transporte El aparato se suministra de serie con los siguientes componentes Centro de planchado de vapor Tira de velcro para la fijación del cable de red Instrucciones de uso INDICACIÓN Compruebe la integridad del suministro y si hay daños visibles Si el suministro está incompleto o se observan daños debido a un embalaje deficiente o al transporte póngase en co...

Page 123: ...dispuesta por las normativas locales aplicables INDICACIÓN Si es posible conserve el embalaje original durante el periodo de garantía del aparato para poder empaquetarlo correctamente en caso de una reclamación conforme a la garantía Requisitos del lugar de instalación La estación de base debe colocarse sobre una superficie de trabajo estable plana y termorresistente Conexión eléctrica Conecte la c...

Page 124: ...n la tabla Dureza del agua Proporción de agua destilada con respecto al agua corriente Muy blanda blanda Media 1 1 Dura 2 1 Muy dura 3 1 No debe llenarse nunca el depósito de agua con agua con aditivos como almidón perfume suavizante u otros productos químicos De lo contrario po dría dañarse el aparato por la formación de residuos en la cámara de vapor Además dichos residuos podrían manchar el tej...

Page 125: ...do 0 y parpadea el piloto de control del vapor max 3 2 Gire el regulador de temperatura y ajuste la temperatura deseada 3 El piloto de control del calentamiento se ilumina durante el calentamiento Cuando el piloto de control del calentamiento se apague se habrá alcanzado la temperatura ajustada y podrá comenzarse el planchado 4 Después del planchado coloque la plancha sobre la superficie de apoyo d...

Page 126: ...ax 3 sale mucho vapor Si se ilumina el piloto de control del vapor eco sale menos vapor En cuanto el piloto de control del vapor eco y o max 3 según el ajuste se ilumine permanentemente puede iniciarse el planchado 5 Mientras plancha el tejido puede pulsar y mantener pulsado el botón del vapor para dejar salir vapor de forma continua por la suela Para finalizar la salida del vapor suelte el botón d...

Page 127: ...el vapor max 3 sale mucho vapor Si se ilumina el piloto de control del vapor eco sale menos vapor En cuanto el piloto de control del vapor eco y o max 3 según el ajuste se ilumine permanentemente puede iniciarse el planchado 5 Mantenga la plancha en posición vertical y pulse el botón del vapor 6 Toque el tejido ligeramente con la suela y aplique el vapor para eliminar las arrugas 7 Para finalizar l...

Page 128: ...segúrese de que no penetre humedad en el aparato para evitar daños irreparables No utilice productos de limpieza ni disolventes abrasivos ni cepillos de alambre u otros objetos abrasivos para la limpieza de las superficies Cambio del filtro antical INDICACIONES Observe las siguientes indicaciones para manipular el filtro antical El filtro antical no es apto para el consumo ni para beber Guarde el filtr...

Page 129: ...del filtro antical hacia arriba para extraerlo del alojamiento 6 Coloque el nuevo filtro antical en el alojamiento y presiónelo hacia abajo para que encastre 7 Cierre la tapa 8 Inserte la clavija de red en una base de enchufe y encienda el aparato por medio del interruptor de encendido apagado 0 9 Pulse la tecla RESET durante aprox 3 segundos A continuación se apaga el piloto de control anti calc Co...

Page 130: ... la generación de vapor o se ha utilizado por primera vez Mantenga pulsado el botón de vapor durante más tiempo El vapor precisa un poco de tiempo para salir por la suela Sale agua por la suela Si se interrumpe brevemente el planchado con vapor el vapor se condensa en el conducto de conexión al enfriarse y se acaban formando gotas Este comportamiento es normal Mantenga la plancha sobre un pañuelo ...

Page 131: ...l aparato en un lugar limpio y seco Desecho del aparato No deseche nunca el aparato con la basura doméstica Este producto está sujeto a la Directiva europea 2012 19 EU RAEE residuos de aparatos eléctricos y electrónicos Deseche el aparato en un centro de residuos autorizado o a través de las ins talaciones municipales de desecho de residuos Observe las normas vigentes En caso de duda póngase en co...

Page 132: ...a duración de la garantía no se prolonga por hacer uso de ella Este principio también se aplica a las piezas sustituidas y reparadas Si después de la compra del aparato se detecta la existencia de daños o de defectos al desembalarlo deben notificarse de inmediato Cualquier reparación que se realice una vez finalizado el plazo de garantía estará sujeta a costes Alcance de la garantía El aparato se ha...

Page 133: ...n por teléfono o por correo electrónico Podrá enviar el producto calificado como defectuoso junto con el justificante de compra comprobante de caja y la descripción del defecto y de las circunstancias en las que se haya producido de forma gratuita a la dirección de correo proporcionada En www lidl service com podrá descargar este manual de usuario y muchos otros más así como vídeos sobre los product...

Page 134: ...iltro antical Encargue los recambios a través de nuestra línea directa de asistencia técnica consulte el capítulo Asistencia técnica o cómodamente a través de nuestro sitio web www kompernass com INDICACIÓN Al realizar su pedido tenga a mano el número IAN que encontrará en la portada de estas instrucciones de uso ...

Page 135: ...SDBS 2400 A1 132 ES ...

Page 136: ...m e inspeção de transporte 141 Desembalagem 141 Eliminação da embalagem 142 Requisitos em relação ao local de instalação 142 Ligação elétrica 142 Operação e funcionamento 143 Antes da primeira utilização 143 Limpeza e manutenção 147 Instruções de segurança 147 Substituir filtro anticalcário 147 Limpar o aparelho 148 Resolução de falhas 149 Armazenamento eliminação 150 Armazenamento 150 Eliminação d...

Page 137: ...escrito do fabricante Utilização correta Este aparelho foi concebido apenas para engomar a seco ou a vapor todo o tipo de roupa cortinados e tecidos também pendurados Qualquer utilização diferente ou fora do âmbito descrito é considerada incorreta O aparelho não se destina à utilização em áreas comerciais ou industriais Não é assumida qualquer responsabilidade por danos resultantes da utilização i...

Page 138: ...eriais NOTA Uma nota fornece informações adicionais que facilitam o manuseamento do aparelho Segurança Este capítulo contém instruções de segurança importantes para o manuseamento do aparelho Este aparelho cumpre as normas de segurança recomendadas Uma utilização incorreta pode causar danos pessoais e materiais Instruções básicas de segurança Para um manuseamento seguro do aparelho respeite as seg...

Page 139: ...presas autorizadas ou ao Serviço de Assistência Técnica Repara ções inadequadas podem acarretar perigos para o utiliza dor Além disso a garantia extingue se Uma reparação do aparelho dentro do período de garantia deve ser efetuada apenas por um serviço de assistência técnica autorizado pelo fabricante caso contrário extingue se o direito à garantia em caso de danos subsequentes Os componentes avar...

Page 140: ...nificada O ferro de engomar a vapor e o respetivo cabo de ligação enquanto este se encontra ligado ou a arrefecer devem ser mantidos fora do alcance de crianças com idades inferiores a 8 anos Nunca mergulhe o aparelho em água Limpe o apenas com um pano ligeiramente humedecido Não exponha o aparelho à chuva e nunca o utilize em am bientes húmidos ou molhados Segure sempre o cabo de alimentação pela ...

Page 141: ...létrica antes de encher o depósito de água AVISO PERIGO DE FERIMENTOS Coloque sempre o ferro de engomar sobre a superfície de colocação da estação base Retire a ficha da tomada se interromper a engomagem PERIGO DE ESCALDÕES OU QUEIMADURAS Cuidado superfície quente Enquanto o ferro de engomar está ligado bem como alguns minutos depois de o desligar a placa metálica do ferro está muito quente Nunca t...

Page 142: ... a mangueira de ligação entrem em contacto com a placa metálica do ferro quente Não risque a placa metálica do ferro de engomar Evite o contacto da placa metálica do ferro de engomar com peças metálicas como p ex botões ou fechos de correr Utilize o ferro de engomar a vapor e a estação base apenas sobre uma superfície estável reta e plana Dados técnicos Estação de engomar a vapor Alimentação de te...

Page 143: ...e aquecimento Mangueira de ligação Superfície de colocação Placa metálica do ferro Figura B Cobertura do compartimento Filtro anticalcário Tampa do depósito de água Depósito de água Figura C Luz de controlo de vapor eco 3 Luz de controlo de vapor max Luz de controlo anti calc Tecla RESET 0 Tecla Ligar Desligar 6 Tecla intensidade de vapor ...

Page 144: ...do da embalagem e inspeção de transporte Por norma o aparelho é fornecido com os seguintes componentes Ferro com caldeira Fita velcro para fixar o cabo de alimentação Manual de instruções NOTA Verifique a integralidade do produto fornecido e a existência de eventuais danos visíveis Caso falte algum componente ou se verifiquem danos resultantes de emba lagem defeituosa ou do transporte contacte a linh...

Page 145: ...iais de embalagem que já não são necessários de acordo com os regulamentos locais em vigor NOTA Se possível conserve a embalagem original durante o período de garantia para que possa embalar o aparelho corretamente em caso de acionamento da mesma Requisitos em relação ao local de instalação A superfície de trabalho sobre a qual coloca a estação base tem de ser estável plana e resistente ao calor L...

Page 146: ... acumulações de calcário podem prejudicar o funcionamento do aparelho Misture a água canalizada com água destilada de acordo com a tabela Dureza da água Percentagem de água destilada para água canalizada muito suave suave média 1 1 dura 2 1 muito dura 3 1 Água com aditivos como goma perfume amaciador ou outros químicos não pode ser introduzida no depósito de água O aparelho poderia ficar danificado ...

Page 147: ... Ligar Desligar 0 para ligar o aparelho A luz de controlo in tegrada na tecla Ligar Desligar 0 acende se e a luz de controlo do vapor max 3 pisca 2 Rode o regulador de temperatura e ajuste assim a temperatura de engomar desejada 3 A luz de controlo de aquecimento acende se durante o aquecimento Logo que a luz de controlo de aquecimento se apaga a temperatura ajustada foi atingida e pode começar a ...

Page 148: ...e a luz de controlo de vapor eco estiver acesa é expelido menos vapor Assim que a luz de controlo de vapor eco ou max 3 consoante o ajustamento estiver acesa definitivamente pode começar a engomar a vapor 5 Enquanto está a engomar a peça desejada pode premir e manter premida a tecla de vapor para dar vapor constantemente da placa metálica do ferro sobre a peça a engomar Para terminar a saída de vap...

Page 149: ...ontrolo de vapor max 3 estiver acesa é expelido muito vapor Se a luz de controlo de vapor eco estiver acesa é expelido menos vapor Assim que a luz de controlo de vapor eco ou max 3 consoante o ajustamento estiver acesa definitivamente pode começar a engomar a vapor 5 Segure no ferro de engomar na posição vertical e prima a tecla de vapor 6 Toque no tecido levemente com a placa metálica do ferro e v...

Page 150: ...midade no apa relho para evitar danos irreparáveis no mesmo Não utilize na limpeza das superfícies produtos de limpeza abrasivos ou solventes fortes nem uma escova de arame ou outros objetos abrasivos Substituir filtro anticalcário INDICAÇÕES Observe as seguintes indicações no manuseamento do filtro anticalcário Não é adequado para consumo beber Guarde o filtro anticalcário fora do alcance de criança...

Page 151: ...ire o para fora do compartimento do filtro anticalcário 6 Coloque o novo filtro anticalcário no compartimento do filtro anticalcário e prima o para baixo de modo que fique bem fixo 7 Feche a cobertura do compartimento 8 Insira a ficha numa tomada e ligue o aparelho com a tecla Ligar desligar 0 9 Prima a tecla RESET aprox 3 segundos A luz de controlo anti calc apaga se A substituição do filtro anticalcári...

Page 152: ...ada durante muito tempo ou vai ser usada pela primeira vez Prima durante mais tempo a tecla vapor O vapor necessita de algum tempo para sair da placa metálica do ferro Pinga água da placa metálica do ferro Se a engomagem for interrom pida por pouco tempo o vapor arrefecido condensa se na mangueira de ligação Isto provoca a formação de gotas Isto é normal Segure no ferro de engomar sobre um pano ou...

Page 153: ...zene o aparelho num local limpo e seco Eliminação do aparelho Nunca deposite o aparelho no lixo doméstico comum Este produto está sujeito à Diretiva Europeia 2012 19 EU REEE Resíduos de Equipamentos Elétricos e Eletrónicos Entregue o aparelho num Ponto Eletrão autorizado ou num Centro de Receção de REEE do seu município Respeite os regulamentos atualmente em vigor Em caso de dúvida entre em contac...

Page 154: ...s substituídas e reparadas Danos e defeitos que possam eventualmente já existir no momento da compra devem ser imediatamente comu nicados após retirar o aparelho da embalagem Expirado o período da garantia quaisquer reparações necessárias estão sujeitas a pagamento Âmbito da garantia O aparelho foi fabricado segundo diretivas de qualidade rigorosas com o maior cuidado e testado escrupulosamente an...

Page 155: ...ico indicado em seguida telefonicamente ou por e mail De seguida pode enviar gratuitamente o produto registado como defeituoso incluindo o comprovativo da compra talão de compra e indique o defeito e quando este ocorreu para a morada do Serviço de Assistência Técnica que lhe foi indicada Em www lidl service com poderá descarregar este manual de instruções e muitos outros bem como vídeos sobre os p...

Page 156: ...duto SDBS 2400 A1 Filtro anticalcário Encomende as peças sobresselentes através da nossa linha direta de Assistência Técnica ver capítulo Assistência Técnica ou confortavelmente no nosso Web site em www kompernass com NOTA Tenha o número IAN que se encontra na capa deste manual de instru ções à mão para a sua encomenda ...

Page 157: ...SE 21 DE 44867 BOCHUM GERMANY www kompernass com Stand der Informationen Last Information Update Version des informations Stand van de informatie Stav informací Estado de las informaciones Estado das informações 05 2017 Ident No SDBS2400A1 032017 2 ...

Reviews: