background image

6

GB

Operation

*See also paint manufacturer’s instructions

Preparing paint container 

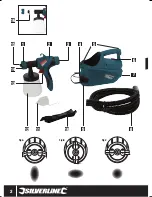
1. Unscrew Paint Container (12) from Spray Gun (2)
2. Align the feed tube in the container as follows:-  

For horizontal spraying (e.g. walls): turn feed tube so that it faces towards the 

surface to be sprayed- To spray surfaces overhead (e.g. ceilings): turn feed 

tube so that it faces away from the surface to be sprayed

3. Fill Paint Container with paint to be sprayed. Place Paint Container on level 

surface. Stir the prepared paint so that it is thoroughly mixed together. 

Carefully fill the Paint Container to a maximum capacity of 700ml

4. Screw Paint Container tightly back onto Spray Gun 

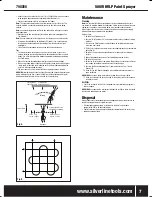
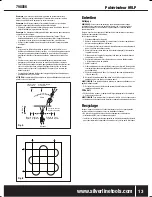
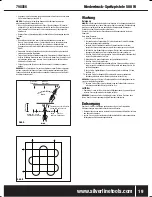
Adjusting the spray pattern

Three settings are available to meet different spraying requirements:
•  Vertical flat jet (A) for spraying onto vertical surfaces (e.g. onto walls)
•  Horizontal flat jet (B) for spraying onto horizontal surfaces (e.g. onto ceilings)
•  Circular jet (C) for spraying into corners, edges and hard-to-reach areas

Fig A 

- Spray Pattern Adjusters (15) horizontal and raised

Fig B


- Spray Pattern Adjusters vertical and raised

Fig C 

- Spray Pattern Adjusters  flat with Air Cap (14). May be in horizontal or 

vertical position

WARNING:

 Never pull the Trigger (13) whilst adjusting the spray pattern

1. Unscrew the Nozzle Assembly Cap (1) slightly
2. Rotate the Air Cap (14) to the required position
3. Set the Spray Pattern Adjusters on the Air Cap to required setting (see 

Settings above)

4. Tighten the Nozzle Assembly Cap

IMPORTANT: 

The Spray Pattern Adjusters adjust between 0 - 45° only.

Preparing to spray

•  Insert plug into mains outlet
•  Place the Spray Gun (2) in the gun holder on the Turbine Unit (9)
•  Lift the machine and place the strap over your shoulder if carrying. Adjust for 

comfort

•  Remove Spray Gun from gun holder and check you can comfortably reach all 

areas for spraying

Switch the machine on

•  Set the On/Off Switch (6) to the ON position to switch on power
•  To switch off power after use, set the On/Off Switch to the OFF position and 

remove the mains plug from the mains socket

Adjusting the flow rate 

•  The flow rate of the paint can be adjusted by using the Air Volume Adjuster (3) to 

increase or decrease the amount of paint sprayed

•  Turn Air Volume Adjuster anti-clockwise to reduce flow rate
•  Turn Air Volume Adjuster clockwise to increase flow rate

NOTE:

 For most wall paints, an average flow setting provides best results

Spraying technique

•  Test the Spray Gun (2) on cardboard or a similar surface to find the correct 

flow rate 

•  Squeeze the Trigger (13) to start spraying. Release the Trigger to stop spraying
•  Start at the edge of the area to be sprayed
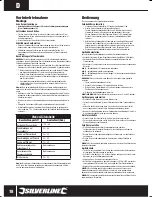
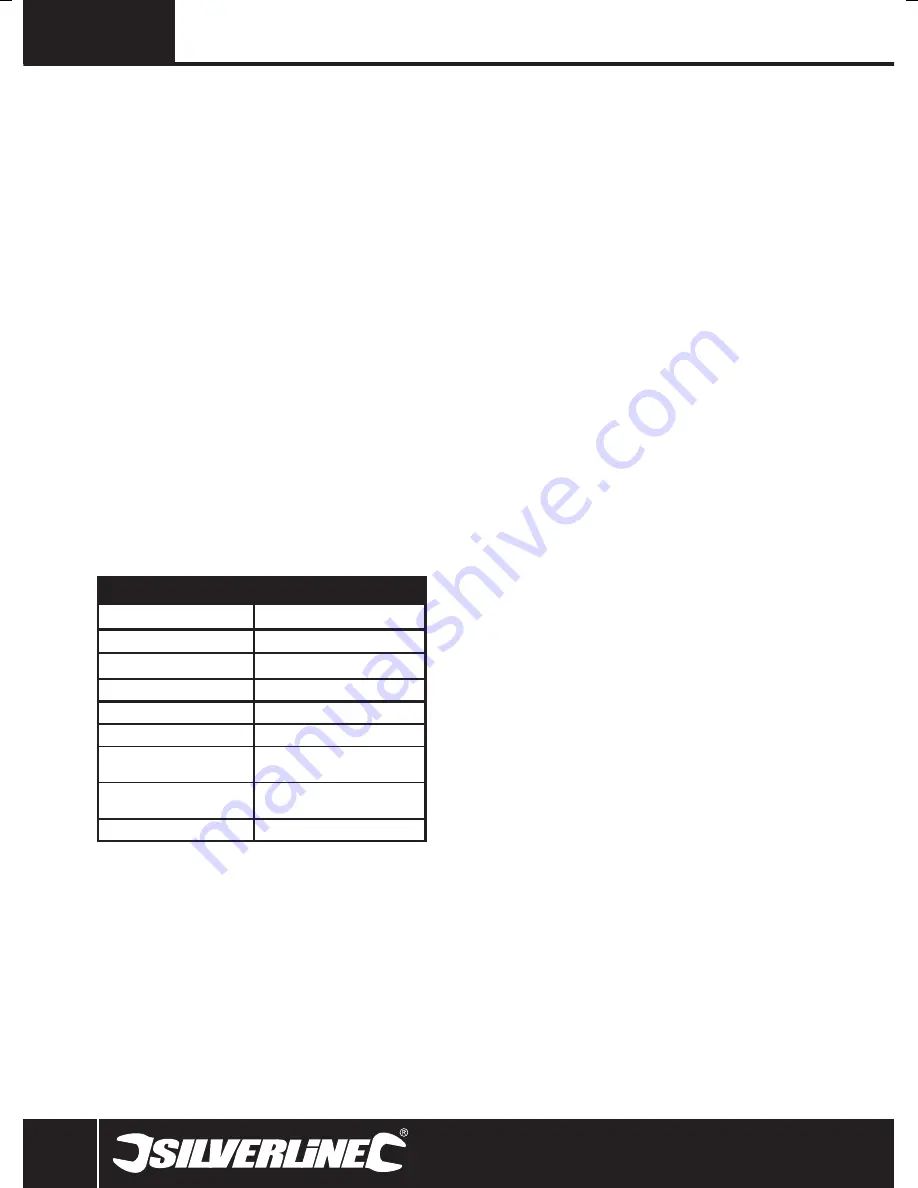
Viscosity table

Coating

Draining Time (secs)

Water-based paints*

20 - 40

Water-based primers

25 – 40

Water-based varnishes

20 – 35

Oil-based primers

25 – 40

Oil-based varnishes

15 – 40

Wood preservatives, 

strippers, oils

use undiluted

Disinfectants, plant 

protectants

use undiluted

Automobile spray paint

20 – 35

Before Use

Assembly

Attaching shoulder strap 

•  Attach Shoulder Strap (10) to the Shoulder Strap Mounts (5) on the Turbine 

Unit (9)

Connect the air hose

•  Push-fit the Air Hose (8) into the Air Outlet (7) on the Spray Machine (9) and Air 

Inlet/Volume Regulator (3) on the Spray Gun (2) 

•  Insert air hose tightly to ensure a secure connection

Preparation of work area

•  Cover all surfaces and objects that are not to be sprayed, or remove them from 

the work area

•  Silicate paint corrodes glass and ceramic surfaces upon contact. If you are 

using silicate paint, ensure you completely cover all such surfaces

Paint preparation

WARNING

: This sprayer is not compatible with textured wall paints, latex paint, 

caustic solutions, acidic coatings or paint or solutions containing granules or solids.
•  Before use, most paints and other coatings need to be thinned (diluted) to the 

proper viscosity for use with the Spray Gun (2):
1. Stir the paint thoroughly, then dip the Viscosity Test Cup (11) fully in the paint
2. Lift the Viscosity Test Cup out of the paint and measure the time in seconds 

that it takes for the liquid to drain fully out of the cup

3. Refer to the viscosity table below for required draining times. If the coating 

drains too slowly, it requires thinning 

Note:

 When mixing colours make a note of the mix quantities to ensure that 

subsequent mixes are consistent with the first mix 
•  Dilute the paint in a separate container with suitable thinner or water until the 

paint achieves the required draining time

•  Only mix a small quantity of paint at a time
•  Always recheck viscosity before refilling the Spray Gun
•  If the feed rate of the paint is too low even at maximum flow setting, dilute in 

steps of 5 – 10% until the feed rate meets requirements

Note: 

The maximum viscosity of paint that can be used is 50din/sec but it is 

recommended to keep to 40din/sec as shown in the chart above as the maximum 

for general use.

798866_Z1MANPRO1.indd   6

04/07/2013   11:09

Summary of Contents for 500W HVLP

Page 1: ...98866 500WHVLPPaintSprayer 500W HVLP Paint Sprayer Pulv risateur HVLP 500 W Niederdruck Spritzpistole 500 W Pulverizador de baja presi n HVLP 500 W Spruzzatore a vapore HVLP 500 W HVLP spuitsysteem 50...

Page 2: ...2 10 2 1 14 Fig A Fig B Fig C 7 6 3 4 5 15 16 13 8 9 11 12...

Page 3: ...www silverlinetools com 3 English 4 Fran ais 10 Deutsch 16 Espa ol 22 Italiano 28 Nederlands 34 500WHVLPPaintSprayer...

Page 4: ...finger on the switch or energising power tools that have the switch on invites accidents d Remove any adjusting key or wrench before turning the power tool on A wrench or a key left attached to a rot...

Page 5: ...ment Use of spray guns Do not aim a spray gun at people or animals When spraying keep away from heat and naked flames WARNING Solvents and paints are harmful and can even be toxic Some solvents and pa...

Page 6: ...flow rate NOTE For most wall paints an average flow setting provides best results Spraying technique Test the Spray Gun 2 on cardboard or a similar surface to find the correct flow rate Squeeze the T...

Page 7: ...this point Correct Wrong Coating should be even and wet when spraying 200 250mm Maintenance Cleaning Note It is essential that this spray equipment is cleaned thoroughly after each use in order to ma...

Page 8: ...unning or drips on surface Too much paint applied Adjust air volume downwards Paint too thin Check viscosity Motor louder than normal Spray Gun 2 not clean or possible blockage Disassemble Spray Gun a...

Page 9: ...iage charges or by replacement with a tool in perfect working order Retained tools or parts for which a replacement has been issued will become the property of Silverline Tools The repair or replaceme...

Page 10: ...Eviter le contact corporel avec les surfaces mises la terre telles que tuyaux radiateurs cuisini res et r frig rateurs Le risque de d charge lectrique est plus important si le corps est mis la terre c...

Page 11: ...que autre que celle pour laquelle il a t con u peut entra ner des situations risque R vision a Ne faire r parer votre appareil lectrique que par un r parateur qualifi utilisant uniquement des pi ces d...

Page 12: ...tilisant le r gulateur du volume d air 3 pour augmenter ou r duire la quantit de peinture pulv ris e Faire tourner le r gulateur dans le sens inverse des aiguilles d une montre pour r duire le d bit F...

Page 13: ...s ci dessous pourra annuler la garantie Toujours s assurer que l appareil est d branch de l alimentation secteur avant d effectuer toute proc dure d entretien Apr s chaque utilisation 1 Eteindre et d...

Page 14: ...rifier la viscosit La peinture coule sur la surface Trop de peinture appliqu e R duire le volume d air Peinture trop liquide V rifier la viscosit Le moteur fait plus de bruit que d habitude Le pistole...

Page 15: ...duit est li e un vice de mat riau ou de fabrication Les frais de port ne seront pas rembours s Les articles retourn s doivent tre convenablement propres et s rs pour tre r par s et devraient tre embal...

Page 16: ...t vermeidbar ist verwenden Sie einen Fehlerstromschutzschalter Der Einsatz eines Fehlerstromschutzschalters vermindert das Risiko eines elektrischen Schlages Sicherheit von Personen a Seien Sie aufmer...

Page 17: ...werkzeuge nur in gut bel fteten Bereichen oder speziellen Spritzkabinen Beachten Sie dass Luftschl uche eine Stolpergefahr darstellen k nnen Legen Sie Schl uche stets so dass die Gefahr m glichst geri...

Page 18: ...en erzielt man mit mittlerer Durchflussmenge die besten Ergebnisse Spritztechnik Testen Sie die Spritzpistole 2 auf Karton oder einem hnlichen Untergrund um die geeignete Durchflussmenge zu ermitteln...

Page 19: ...rbeiten stets vom Stromnetz Nach jedem Gebrauch 1 Schalten Sie das Ger t aus 2 Schrauben Sie den Farbbeh lter 12 ab und entfernen Sie die R ckst nde des Beschichtungsstoffs vollst ndig 3 Reinigen Sie...

Page 20: ...viel Beschichtungsstoff aufgebracht Luftvolumen verringern Beschichtungsstoff zu d nnfl ssig Viskosit t berpr fen Motor ungew hnlich laut Spritzpistole 2 verschmutzt oder verstopft Spritzpistole ausei...

Page 21: ...frist gemachten Forderungen werden von Silverline Tools daraufhin berpr ft werden ob es sich bei den M ngeln um einen Material oder Fertigungsfehler handelt Versandkosten werden nicht zur ckerstattet...

Page 22: ...el cable de alimentaci n para transportar la herramienta el ctrica tirar de ella o desenchufarla Mantenga el cable de alimentaci n alejado de fuentes de calor del aceite de los bordes afilados o de la...

Page 23: ...o estas instrucciones las utilicen Las herramientas el ctricas son peligrosas en manos de usuarios que no hayan recibido capacitaci n e Mantenga sus herramientas el ctricas Revise que no haya piezas e...

Page 24: ...en de pintura 3 Gire el ajuste de volumen de pintura hacia la izquierda para disminuir la cantidad de pintura Gire el ajuste de volumen de pintura hacia la derecha para incrementar la cantidad de pint...

Page 25: ...tos invalidar la garnt a del producto Aseg rese siempre que la m quina est desconectada de la red el ctrica antes de realizar cualquier procedimiento de mantenimiento Despu s de cada uso 1 Apague la t...

Page 26: ...osidad Chorretes y derrames Demasiada pintura aplicada Disminuya el volumen de aire Pintura demasiado diluida Compruebe el nivel de viscosidad Motor m s ruidoso de lo habitual Pistola 2 sucia o bloque...

Page 27: ...presentadas dentro del periodo de garant a deber n ser verificadas por Silverline Tools con el fin de establecer si las deficiencias son consecuencia de los materiales o de la mano de obra del produc...

Page 28: ...routensile Non usare adattatori con gli elettroutensili dotati di collegamento di messa a terra L uso delle spine originali non modificate e delle prese corrispondenti ridurr il rischio di scosse elet...

Page 29: ...ti Ci garantisce la sicurezza dell utensile elettrico Sicurezza della pistola a spruzzo Ambiente pericoloso Assicurarsi che ci sia sufficiente spazio libero attorno alla zona di lavoro Utilizzare solo...

Page 30: ...re regolata mediante l uso del Regolatore del Volume dell Aria 3 per aumentare o diminuire la quantit di vernice spruzzata Girare il Regolatore del Volume Aria in senso antiorario per ridurre la porta...

Page 31: ...qui sotto questo pu invalidare la vostra garanzia Assicuratevi sempre di disconnettere la macchina dalle prese di corrente prima di effettuare procedure di manutenzione Dopo ogni utilizzo 1 Spegnere l...

Page 32: ...occiola sulla superficie Troppa vernice applicata Regolare il volume dell aria verso il basso Vernice troppo fina Controlla viscosit Motore pi rumoroso del normale Pistola a Spruzzo 2 non pulita o ha...

Page 33: ...coperti dalla garanzia Silverline Tools provveder a riparare l utensile gratuitamente esclusi i costi di spedizione o a propria discrezione a sostituirlo con un nuovo utensile Gli utensili o le parti...

Page 34: ...ers en passende stopcontacten vermindert het risico op een elektrische schok b Vermijd lichamelijk contact met geaarde oppervlakken zoals pijpen radiatoren fornuizen en koelkasten Het risico op een el...

Page 35: ...gen aanpast toebehoren verwisselt of het elektrische gereedschap opbergt Dergelijke voorzorgsmaatregelen verminderen het risico op het per ongeluk starten van het elektrische gereedschap d Berg elektr...

Page 36: ...B Voor de meeste muurverf geeft de gemiddelde stroominstelling de beste resultaten Spuittechniek Test het spuitpistool 2 op een stuk karton of iets dergelijks om de juiste toevoersnelheid te bepalen K...

Page 37: ...voordat u onderhoud gaat uitvoeren Na elk gebruik 1 Schakel de motoreinheid 9 uit 2 Schroef de verfcontainer 12 los en leeg deze indien nodig 3 Maak de container en toevoerslang vast een beetje schoon...

Page 38: ...Verf loopt uit of drupt op het werkstuk Te veel verf aangebracht Verlaag het luchtvolume Te dunne verf Controleer de vloeibaarheid Motor luider dan normaal De verfspuit 2 is niet schoon en mogelijk ve...

Page 39: ...open om te kijken of het probleem een kwestie is van de materialen of de fabricage van het product De verzendkosten worden niet vergoed De geretourneerde items moeten voor de reparatie in een redelijk...

Page 40: ...es 3 Jahre Garantie Innerhalb von 30 Tagen online registrieren Es gelten die Allgemeinen Gesch ftsbedingungen 3 a os de garant a Registre su producto online durante los primeros 30 d as Se aplican t...

Reviews: