


www.silverlinetools.com
7
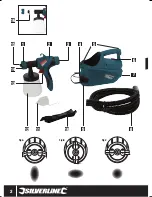
500W HVLP Paint Sprayer
798866
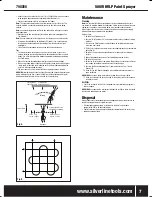
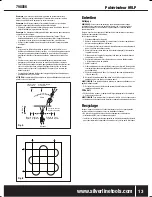
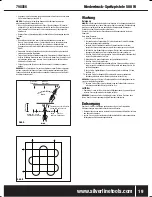
• Hold the Spray Gun so that the Air Cap (14) is 250 to 300mm from the surface
to be sprayed, depending on the required width of the spray jet
• Start the spray movement first, then squeeze the Trigger
Note:
The spray movement should come from the arm, not just the wrist. This
helps to maintain a uniform distance between Spray Gun and surface being
sprayed.
Note:
An uneven distance between Spray Gun and surface will result in uneven
paint application.
• Move the Spray Gun evenly across the surface and avoid interruptions. See
Fig. A below.
Note:
An even movement of the Spray Gun will achieve an even surface quality.
• If coating material builds up on the Nozzle (16) and Air Cap, cease spraying,
turn off power, disassemble and clean both parts with solvent or water as
appropriate
• Clean Spray Gun thoroughly as soon as you have finished spraying
Tips
• The most effective way to spray a vertical surface is to use a ‘cross-coat’
method, spraying in a zigzag pattern first in horizontal bands, then in vertical
bands. Use a flowing, serpentine motion as opposed to stopping and starting.
See Fig. B below.
• Move a flat section of cardboard parallel to the paint jet to mask edges
• When using strong colour shades, or painting over strong shades with a lighter
colour, apply at least two coats, allowing each coat to dry before applying the
next. This will ensure good coverage
• You can also use a cut-out stencil technique to paint shapes on the wall
WARNING:
Immediately after use the Spray Gun must be cleaned to prevent paint
drying within the Spray Gun. If you wish to mix or dilute another batch of paint
only do so without cleaning if there is no risk of the paint drying.
Coating will be
light at this point
Start
stroke
Pull
trigger
Release
trigger
End of
Stroke
Coating will be
heavy at this point
Correct
Wrong
Coating should be even
and wet when spraying
200-250mm
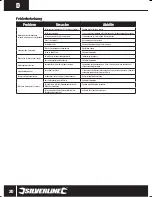
Maintenance
Cleaning
Note:
It is essential that this spray equipment is cleaned thoroughly after each
use in order to maintain trouble-free operation. Failure to clean and maintain your
equipment in accordance with advice below may invalidate your guarantee.
Always ensure that the machine is disconnected from the mains power supply
before performing any maintenance procedures
After each use:
1. Switch off the Turbine Unit (9)
2. Unscrew Paint Container (12) and empty container of any residue of coating
material
3. Pre-clean the Paint Container and feed tube with suitable solvent or warm
water and a soft brush
4. Fill the Paint Container with warm water (or suitable solvent) and reassemble
Spray Gun (2)
5. Switch on the machine and spray the water (or solvent) into a container
or cloth
6. Repeat the above procedure until the liquid being sprayed is clear
7. Switch off the machine
8. Empty the Paint Container completely. Always keep the container seal free of
any residue of coating material and check for any damage
9. Unscrew the Nozzle Assembly Cap (1) and remove the Air Cap (14) and
Nozzle (16)
10. Clean Air Cap and Nozzle thoroughly with suitable solvent or warm water
and a soft brush.
WARNING:
Never use a sharp metal object to clean the nozzle or air holes
11. Clean the exterior of the Spray Gun and Paint Container with a cloth soaked
in solvent or water
Air filter
• Check the air filter in the Air Filter Compartment (4) periodically and replace if
dirty or clogged
WARNING:
Never operate the wall sprayer without the air filter in place; dirt could
be sucked in and damage the motor
Disposal
Always adhere to national regulations when disposing of power tools that are no
longer functional and are not viable for repair.
• Do not dispose of power tools, or other waste electrical and electronic
equipment (WEEE), with household waste
• Contact your local waste disposal authority for information on the correct way
to dispose of power tools
Fig. A
Fig. B
798866_Z1MANPRO1.indd 7
04/07/2013 11:09


