background image

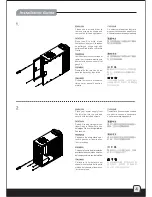
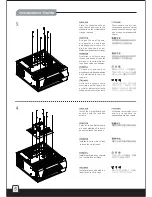
Special feature: door hinge and spring in the PS01-E can be removed to enable the 
front door to open on either side. 

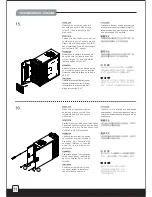
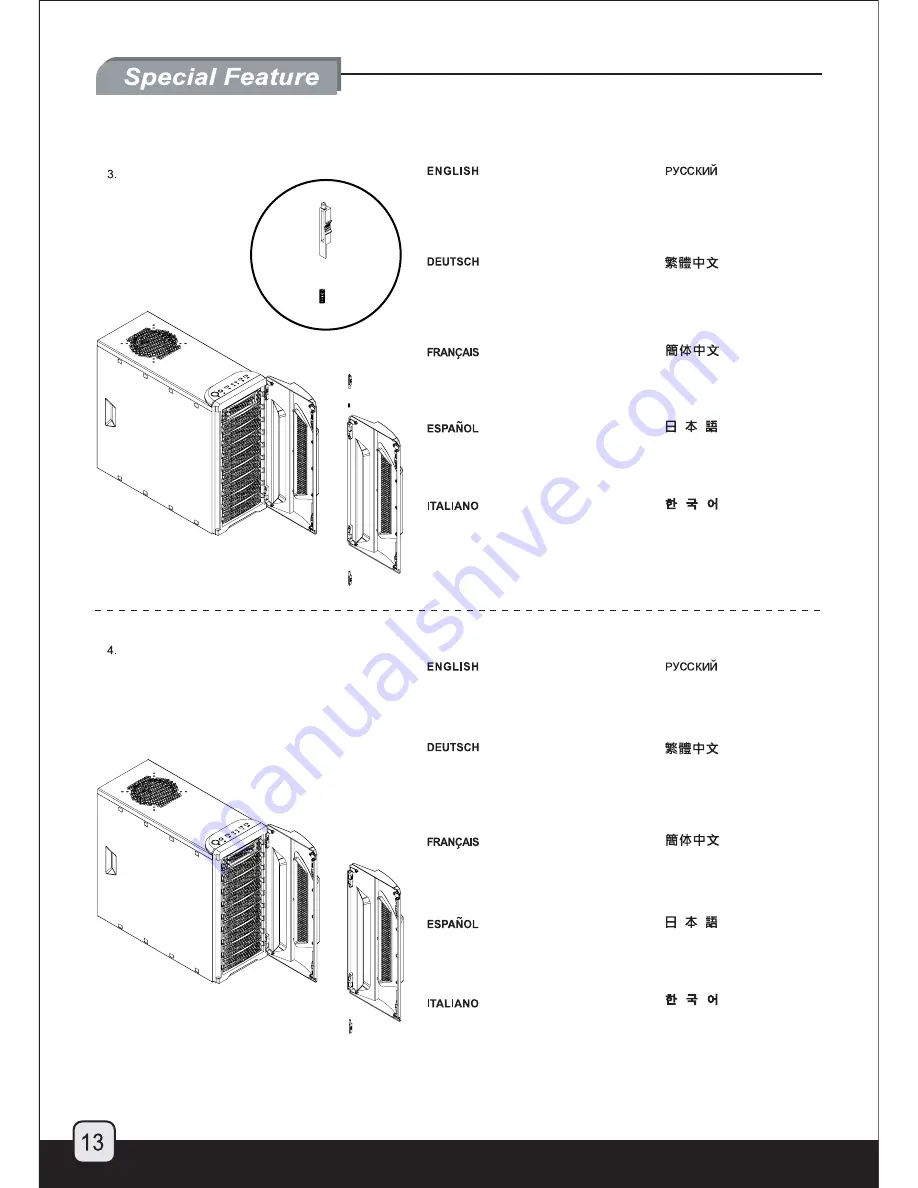
Place the spring into the slot on the 
other side. Then press the point as 
shown to reinstall the hinge.

Поместите


пружину


в


гнездо


на


другой


стороне


дверцы

Затем


нажмите


на


рычажок

как


показано


на


рисунке

и


установите


дверную


петлю

.

Legen Sie den Feder in den Schlitz 
auf der anderen Seite ein. Dann 
drücken Sie den Punkt wie gezeigt, 
um das Scharnier wieder zu installieren.

將彈簧放入另一側門閂槽,並
依圖示點下壓裝回門閂。

Mettez le ressort dans l'emplacement 
situé de l'autre côté. Puis appuyez sur 
le point comme montré pour réinstallez 
la charnière.

将弹簧放入另一侧门闩槽,并
依图示点下压装回门闩。

Coloque el muelle en su posición al 
otro lado de la puerta. Empuje el 
punto que se muestra para reinstalar 
la bisagra.

スプリングをもう

一方

のスロ

ットに

れます

。図

のように

ポイントを

しながらヒンジ

けます

Posizionare la molla nella parte 
opposta della porta. Premere sul 
punto indicato per reinstallare il 
cardine.

반대방향에 있는 슬롯에 
스프링을 위치시킨 후, 
그림에서와 같은 지점을 
누 른   후 ,   경 첩 을   재  
설치하십시요.

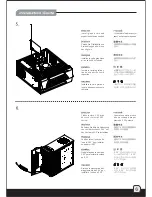
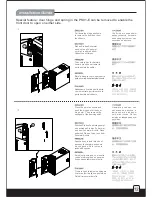
Reinstall the door to the chassis.

Поставьте


на


место


дверцу


корпуса

.

Installieren Sie die Tür wieder 
im Chassis.

將前門裝回機殼。

Remettez la porte au boîtier.

将前门装回机壳。

Reinstale la puerta sobre el chasis.

ハッチをケースに戻します。

Reinstallare la porta sul chassis.

케이스에 도어를 다시 
장착합니다.

Summary of Contents for Precision PSO1-E

Page 1: ...PS01 E...

Page 2: ...erience With a heritage of conservative premium tower chassis as the basis the PS01 E takes a slightly different styling direction to achieve a look akin to having heightened spirit This new look is t...

Page 3: ...strength plastic front door SECC body ATX Micro ATX External Internal Front Rear Top 7 USB2 0 x 2 IEEE1394 x 1 Audio x 1 MIC x 1 1 x Optional standard PS2 ATX Full size long cards capable 12 200mm W x...

Page 4: ...NT I O USB2 0 x 2 SPK MIC IEEE 1394 3 5 CONVERTER BRACKET 5 25 BAY TO 3 5 BAY COVER 3 5 COVER FRONT DOOR 12025 FAN HDD CAGE SCREWS Secure motherboard 3 5 device adapter Secure 3 5 device SCREWS Secure...

Page 5: ...la fuente de alimentaci n insertandola desde le lado derecho delchasisysujetelaconlostornillos Collocare l alimentatore nel chassis inserendolo dalla parte sinistra del chassis e fissare con le viti c...

Page 6: ...esoins Coloque el chasis como se muestra y sujete los separadores de la placa madre como se requiere Collocare il chassis come mostrato e quindi fissare ed avvitare i distanziatori sulla scheda madre...

Page 7: ...e le card d espansione come richiesto Please remove 5 25 drive bay cover to install 5 25 device 5 25 Entfernen Sie bitte die Abdeckung von Laufwerkschacht 5 25 um das Laufwerk 5 25 zu installieren 5 2...

Page 8: ...incluidas Inserire l unit ottica dal pannello frontale nel chassis e fissarla con le viti e le rondelle incluse To release 3 5 drive bay cover please first remove the 5 25 drive cover 3 5 5 25 Um die...

Page 9: ...per sganciare la mascherina dell alloggiamento da 3 5 da quella dell alloggiamento da 5 25 3 5 5 25 Install the included 3 5 device adapter onto 3 5 device and secure with included screws and washers...

Page 10: ...les avec les vis incluses puis r installez le cache de la baie 5 25 3 5 3 5 5 25 Inserte el disco de 3 5 con el conversor en el ch sis y reinstale la tapa de la bah a de 5 25 3 5 5 25 Inserire l unit...

Page 11: ...rato e rimuovere le viti dal box dell hard disk Quindi estrarre il box dal chassis 3 5 25 5 25 Entfernen Sie die drei Abdeckungen von Laufwerk 5 25 wie gezeigt und entfernen Sie die Schrauben von Geh...

Page 12: ...em Laufwerk wieder in Chassis ein und sichern Sie es mit Schrauben Schritt 13 dann installieren Sie die Abdeckungen von Laufwerk 5 25 wieder 13 5 25 Make sure all necessary cables and wires are connec...

Page 13: ...e il cardine della porta come mostrato per rimuovere la porta frontale dal chassis Press the point as shown and push the hinge out of the door hinge slot Then remove the spring out of the door hinge s...

Page 14: ...zu installieren Mettez le ressort dans l emplacement situ de l autre c t Puis appuyez sur le point comme montr pour r installez la charni re Coloque el muelle en su posici n al otro lado de la puerta...

Page 15: ......

Page 16: ...Issue date January 2010 NO G11211390...

Reviews: