background image

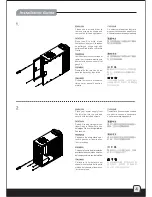
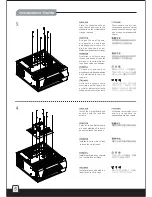
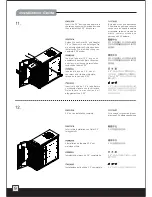
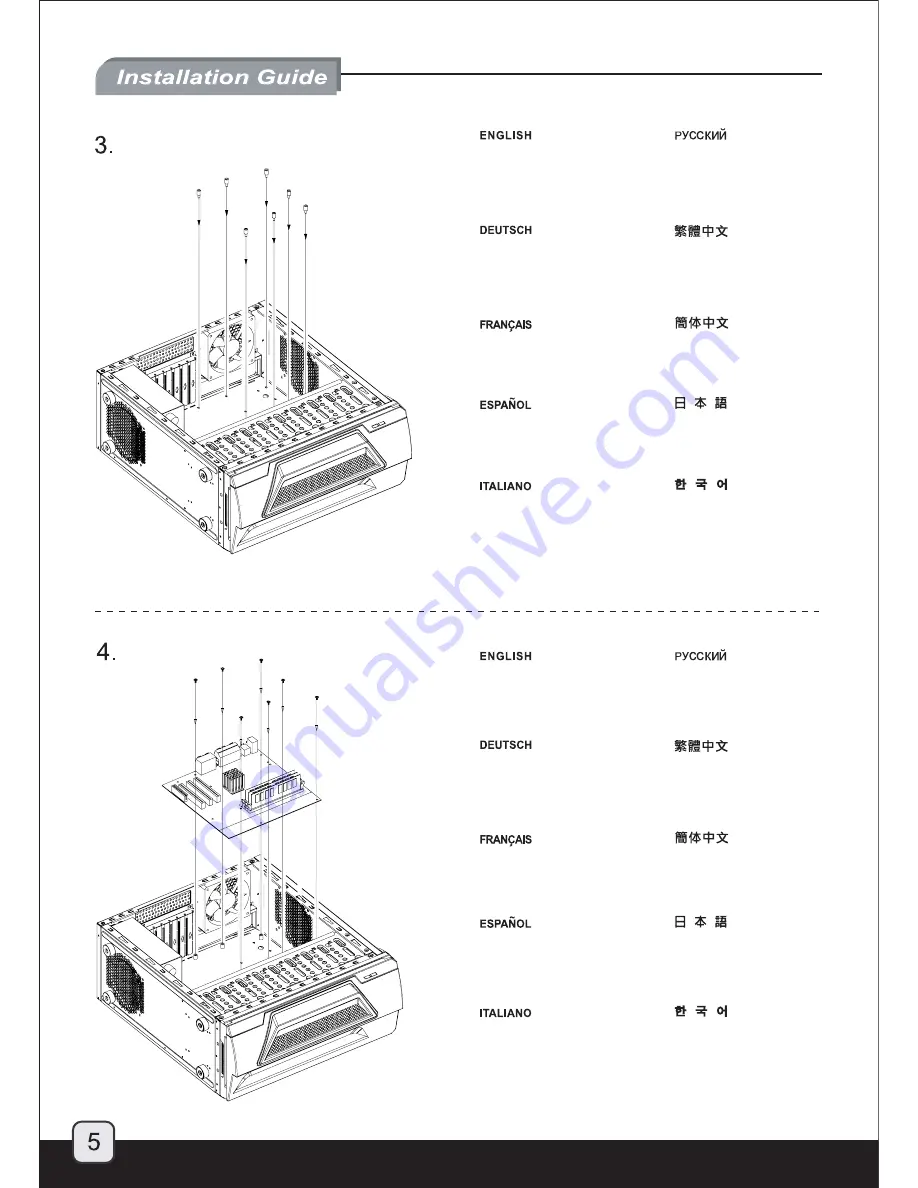
Place the chassis as shown 
then fasten and secure the 
standoffs on the motherboard 
tray as required.

Расположите


корпус

как


показано


на


рисунке

затем


надежно


закрепите


опоры


на


лотке


для


материнской


платы

.

Bringen Sie das Chassis, 
wie gezeigt, an und dann 
befestigen und sichern Sie 
d i e   A b s t a n d s b o l z e n   a m  
Motherboardboden wie verlangt.

請依圖示放置機箱後依需求
鎖固螺柱於主機板托盤。

Remettez le boîtier comme 
illustré puis serrez et fixez les 
plots pour  la carte mère sur 
le support selon vos besoins.

请依图示放置机箱后依需求
锁固螺柱于主机板托盘。

Coloque el chasis como se 
muestra y sujete los separadores 
de la placa madre como se 
requiere.

のようにケースを

マザーボードトレイに

必要

なスペーサーを

けます

Collocare il chassis come 
mostrato e quindi fissare ed 
avvitare i distanziatori sulla 
scheda madre come richiesto.

그림에서와


같이


케이스를


위치시키고

필요한


만큼


메인보드


트레이에


지지대를


조이고


고정시키십시요

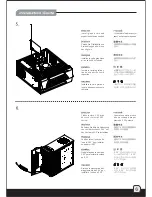
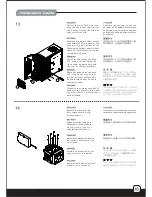
Install the motherboard and 
secure it with the included 
screws.

Установите


материнскую


п л а т у


и


з а к р е п и т е


е е


прилагаемыми


шурупами

.

Setzen Sie das Motherboard 
ein und befestigen Sie es mit 
den enthaltenen Schrauben.

安裝主機板並以內附螺絲鎖固。

Installez la carte mère et fixez
-la avec les vis incluses.

安装主机板并以内附螺丝锁固。

Instale la placa base y sujetela 
con los tornillos incluidos.

マザーボードを

、付属

のネジで

固定

します

Installare la scheda madre e 
fissarla con le viti incluse.

메인보드를


설치하고

동봉된


나사로


고정시키십시요

Summary of Contents for Precision PSO1-E

Page 1: ...PS01 E...

Page 2: ...erience With a heritage of conservative premium tower chassis as the basis the PS01 E takes a slightly different styling direction to achieve a look akin to having heightened spirit This new look is t...

Page 3: ...strength plastic front door SECC body ATX Micro ATX External Internal Front Rear Top 7 USB2 0 x 2 IEEE1394 x 1 Audio x 1 MIC x 1 1 x Optional standard PS2 ATX Full size long cards capable 12 200mm W x...

Page 4: ...NT I O USB2 0 x 2 SPK MIC IEEE 1394 3 5 CONVERTER BRACKET 5 25 BAY TO 3 5 BAY COVER 3 5 COVER FRONT DOOR 12025 FAN HDD CAGE SCREWS Secure motherboard 3 5 device adapter Secure 3 5 device SCREWS Secure...

Page 5: ...la fuente de alimentaci n insertandola desde le lado derecho delchasisysujetelaconlostornillos Collocare l alimentatore nel chassis inserendolo dalla parte sinistra del chassis e fissare con le viti c...

Page 6: ...esoins Coloque el chasis como se muestra y sujete los separadores de la placa madre como se requiere Collocare il chassis come mostrato e quindi fissare ed avvitare i distanziatori sulla scheda madre...

Page 7: ...e le card d espansione come richiesto Please remove 5 25 drive bay cover to install 5 25 device 5 25 Entfernen Sie bitte die Abdeckung von Laufwerkschacht 5 25 um das Laufwerk 5 25 zu installieren 5 2...

Page 8: ...incluidas Inserire l unit ottica dal pannello frontale nel chassis e fissarla con le viti e le rondelle incluse To release 3 5 drive bay cover please first remove the 5 25 drive cover 3 5 5 25 Um die...

Page 9: ...per sganciare la mascherina dell alloggiamento da 3 5 da quella dell alloggiamento da 5 25 3 5 5 25 Install the included 3 5 device adapter onto 3 5 device and secure with included screws and washers...

Page 10: ...les avec les vis incluses puis r installez le cache de la baie 5 25 3 5 3 5 5 25 Inserte el disco de 3 5 con el conversor en el ch sis y reinstale la tapa de la bah a de 5 25 3 5 5 25 Inserire l unit...

Page 11: ...rato e rimuovere le viti dal box dell hard disk Quindi estrarre il box dal chassis 3 5 25 5 25 Entfernen Sie die drei Abdeckungen von Laufwerk 5 25 wie gezeigt und entfernen Sie die Schrauben von Geh...

Page 12: ...em Laufwerk wieder in Chassis ein und sichern Sie es mit Schrauben Schritt 13 dann installieren Sie die Abdeckungen von Laufwerk 5 25 wieder 13 5 25 Make sure all necessary cables and wires are connec...

Page 13: ...e il cardine della porta come mostrato per rimuovere la porta frontale dal chassis Press the point as shown and push the hinge out of the door hinge slot Then remove the spring out of the door hinge s...

Page 14: ...zu installieren Mettez le ressort dans l emplacement situ de l autre c t Puis appuyez sur le point comme montr pour r installez la charni re Coloque el muelle en su posici n al otro lado de la puerta...

Page 15: ......

Page 16: ...Issue date January 2010 NO G11211390...

Reviews: