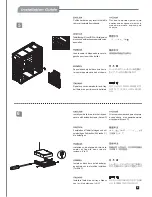
background image

12 

11 

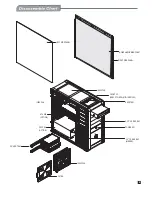
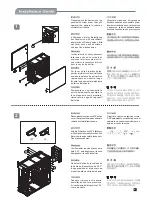
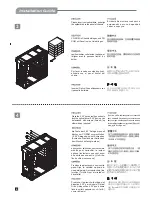
Make sure all necessary cables and 
wires are connected, then reinstall 
the panels and secure with screws.

Убедитесь

что


все


необходимые


провода


и


кабели


подключены

затем


установите


на


место


панели


и


закрепите


их


шурупами

.

在確認所有的線材都已連接後,將
左、右側板裝回機殼,並以螺絲鎖
固。

在确认所有的线材都已连接后,将
左、右侧板装回机壳,并以螺丝锁固。

必要なケーブルおよびリード線を全
て接続したことを確認してから、パネ
ルを元に戻しネジで固定します。

필요한 케이블과 선이 모두 연결되었는
지 확인합니다. 이후, 패널을 모두 재설
치한 후 나사로 고정시킵니다.

muss man sicher sein,dass alle 
notwendige Kabel und Leitung in 
Verbindung gebracht werden.und 
dann das Panel wieder einlegen und 
mit Schrauben befestigen.

vérifiez bien que tous les câbles sont 
bien connectés, puis réinstallez les 
panneaux et fixez-les avec des  vis.

Asegúrese de que todos los cables 
necesarios están conectados, luego 
reinstale los paneles y fíjelos con 
tornillos.

Assicurarsi che tutti i cavi e i fili 
metallici siano ben collegati, montare 
di nuovo i pannelli bloccandoli con 
viti.

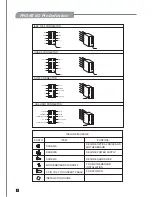
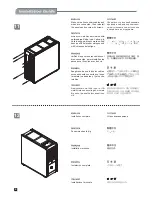
Installation complete.

Установка


завершена

.

組裝完成。 

组装完成。

インストール完了。

설치가 완료 되었습니다.

Zusammenbau fertig.

installation terminée.

Instalación completa.

Installazione terminata.

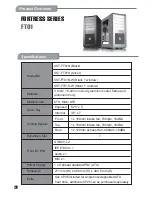
Summary of Contents for SST-FT01B

Page 1: ...MANUAL FORTRESS SERIES FT01...

Page 2: ...2 IEEE1394 x 1 audio x 1 MIC x 1 Power Supply 1 x Optional standard PS2 ATX Dimension 211 mm W x 486 mm H x 494 5 mm D One CP05 included for single hot swappable SATA hard drive additional CP05 can b...

Page 3: ...TER 3 5 HDD TRAY PS2 PSU OPTION ATX MB OPTION 12025 FAN 18032 FAN FRONT I O USB2 0 2 SPK MIC IEEE 1394 RESET SW 5 25 5 DRIVE BAY POWER SW 3 5 7 DRIVE BAY HIDDEN LEFT SIDE PANEL RIGHT SIDE PANEL NOISE...

Page 4: ...REW C MOTHERBOARD STANDOFF USB 5V LP LP GND NC USB 5V LP LP GND Pin Pin Pin AGNU NC NC PIN Pin Pin AUD GND PRESENCE SENSE1_RETURN SENSE2_RETURN NO PIN PORTIL PORTIR PORTZR SENSE_SEND PORT2L NC MIC2 MI...

Page 5: ...rales para quitarlos del chasis Rimuovere con un cacciavite le sei viti dai pannelli e spostare la leva di apertura come mostrato rimuovere in seguito i pannelli dal telaio Please release the screws o...

Page 6: ...ew A on other side as required A SCREW A SCREW A A ScrewA die Taste der 5 25 Anlage manuell dr cken um CD ROM zu verschlie en 5 25 Anlage kann mit Schrauben Schraube A auf anderer Seite nach dem Wunsc...

Page 7: ...Spostare verso sinistra la leva tray dell hard drive per rimuoverlo dal telaio Install your hard drive into the tray and secure with included screws Screw C C SCREW C SCREW C C SCREW C Festplatte auf...

Page 8: ...erStone SST CP05 puo essere compatibile con il SATA hard drive Fasten and secure included standoffs on the motherboard tray as required then install your motherboard and secure with included screws Sc...

Page 9: ...io Rimuovere il rivestimento della slot di espansione installare la scheda di espansione e avvitarla come richiesto Install your power supply as shown and then secure with included screws Screw B B SC...

Page 10: ...festigen v rifiez bien que tous les c bles sont bien connect s puis r installez les panneaux et fixez les avec des vis Aseg rese de que todos los cables necesarios est n conectados luego reinstale los...

Page 11: ......

Page 12: ...July 2008 Issue date G11207500...

Reviews: