

7
8
7
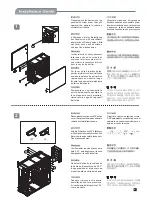
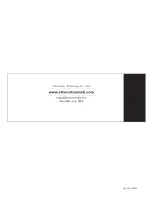
Reinstall the hard drive tray into chassis.
(optical SilverStone SST-CP05 can support
upto SATA hard drive.)
Установите
корзину
с
жестким
диском
обратно
в
корпус
(
при
желании
можно
использовать
кабель
SilverStone SST-CP05,
который
дает
возможность
задействовать
функцию
горячего
подключения
SATA-
дисков
.)
將硬碟拖盤放回機殼內(可選用CP05
轉接線模組,可升級成熱插拔SATA
硬碟。)
将硬盘拖盘放回机壳内(可选用CP05
转接线模块,可升级成热插拔SATA硬
盘。)
ハードディスクドライブトレイをケース
に戻します。
(SATAホットスワップ対応
機能にはオプションのSilverStone
SST-CP05が使用可能です。)
하드 드라이브 트레이를 케이스에 재
장착합니다. (옵션으로 실버스톤의
SST-CP05를 사용하여, SATA 핫스왑
기능을 사용할 수 있습니다. )
Festplattetablett wieder in Chassis
installieren.Optisch SilverStone SST-
CP05 kann SATA Festplatte unterstützen.
réinstallez le disque dur dans le boîtier
(le SilverStone SST-CP05 peut être
utilisé pour offrir la capacité de
démontage à chaud en option.)
Reinstale la bandeja del disco duro
en el chasis (el sistema opcional
SilverStone SST-CP05 puede usarse
para permitir la capacidad SATA de
cambio en caliente.)
Installare l’hard drive ed il tray nel
telaio ( l’Optical SilverStone SST-
CP05 puo’ essere compatibile con
il SATA hard drive.)
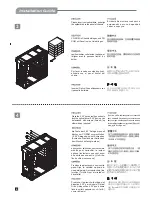
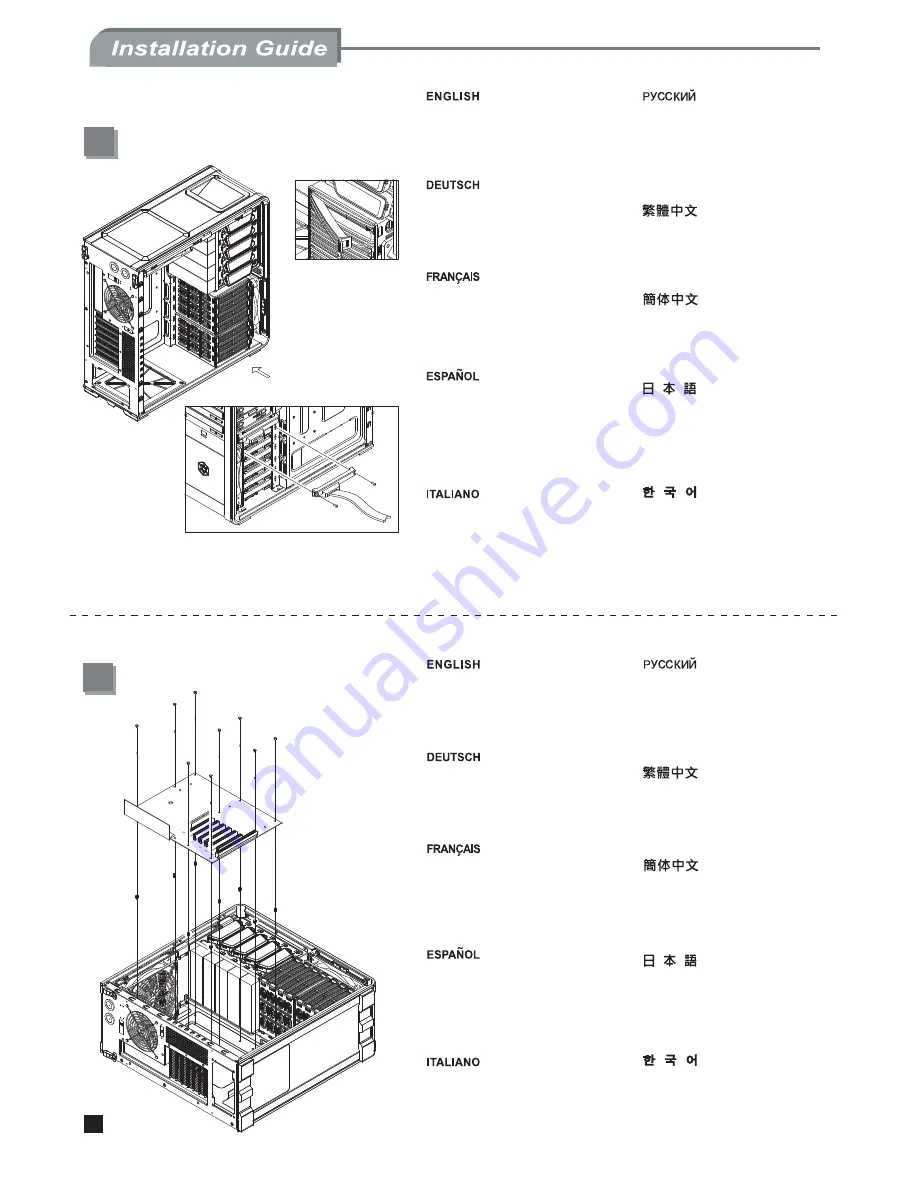
Fasten and secure included standoffs
on the motherboard tray as required,
then install your motherboard and
secure with included screws.(Screw A)
Надежно
закрепите
прилагаемые
опоры
материнской
платы
,
затем
установите
материнскую
плату
и
зафиксируйте
ее
прилагаемыми
шурупами
. (
Шуруп
A)
請依需求將主機板螺柱鎖固在主機板
底板,再放入主機板,並用螺絲
(SCREW A)將其鎖固。
请依需求将主板螺柱锁固在主板底板
,再放入主板 ,并用螺丝(SCREW
A)将其锁固。
必要に応じて付属のスペーサーをマザ
ーボードトレイに取り付け、
付属のネジ
(ネジA)
でマザーボードを取り付けます。
메인보드 지지대를 필요한 만큼 설치한
후, 메인보드를 동봉된 나사 (ScrewA)로
고정시킵니다.
Stand off zuerst auf dem Grudplatte der
Hauptplatine nach dem Wunsch befestigen.
danach die Hauptplatine einlegen,und dann
mit Schrauben(Schraube A) die befestigen.
Sérrez et fixez les plots inclus sur le
support de la carte mère selon vos
besoins, puis installez votre carte
mère et fixez-la avec les vis incluses.
(Vis A)
Encaje y asegure los anclajes
incluidos en la placa base según
sea necesario, luego instale su
placa base y fíjela con los tornillos
incluidos. (Tornillo A)
Fissare accuratamente, sul tray della
scheda madre, gli appositi standoff
come richiesto e installare la scheda
madre fissandola con le viti in dotazione.
(viti A)
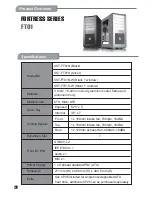
Summary of Contents for SST-FT01B
Page 1: ...MANUAL FORTRESS SERIES FT01...
Page 11: ......
Page 12: ...July 2008 Issue date G11207500...