29
ht5000HB - pro5dl
You can purchase the following optional accessories at your
Dealer:
- CEILING MOUNTING KIT
- OPTIONAL LENSES
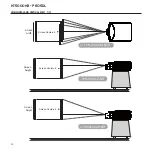
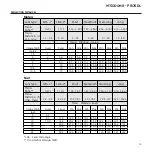
A range of lenses are available from our dealers to satisfy
varying installation and projection distance needs. See the
Additional Information chapter for further details on projection
distance and enlargement ratios.
11 OPTiONAL ACCESSORiES
Always contact our service centre to have the lens replaced.
Use only original or
SiM2 Multimedia
approved accessories.
wARNiNg: for ceiling/wall installation, using a suspension
bracket, carefully follow the instructions and safety regula-
tions provided with the bracket in the packaging.
incomplete image around the edges (vertical or horizontal)
• Check compatibility of the video or graphic signals with the
technical specifications of the system, and in particular,
with the specifications of the selected input.
• Open the automatic image adjustment function by press-
ing the key A on the remote control or
◀
on the projector’s
keypad.
• Adjust the horizontal or vertical position of the image with
the IMAGE/POSITION menu (if available for the input in ques-
tion).
• Adjust the image width and height, selecting Aspect in the
IMAGE /ASPECT menu.
• Adjust the overscan setting applied to the image on the
IMAGE/OVERSCAN menu.
image too dark/pale or unnaturally coloured
• Check compatibility of the video or graphic signals with the
technical specifications of the projector, and in particular,
with the specifications of the selected input.
• Adjust the CONTRAST, BRIGHTNESS, COLOUR and TINT parameters
in the PICTURE menu.
• If necessary, adjust COLOUR TEMPERATURE and GAMMA CORREC-
TION (IMAGE menu).
graphic image with poor quality vertical detail
• Check compatibility of the video or graphic signals with the
technical specifications of the projector, and in particular,
with the specifications of the selected input.
• Press key A on the remote control or
◀
on the projector
keypad to execute automatic adjustments.
• Adjust the FREQUENCY and PHASE settings in the IMAGE menu
to optimise the vertical details of the image (if available
for the input in question).
Video image with colours not aligned with vertical details
• Check compatibility of the video or graphic signals with the
technical specifications of the system, and in particular,
with the specifications of the selected input.
• Adjust Y/C DELAY settings in the IMAGE menu to reduce colour
misalignment.
Remote control does not work
• Check remote control battery power and that they are
inserted correctly.
• Ensure the area between the infrared sensors (on the front
panel of the projector) and the remote control is free from
obstructions.
• Make sure the infrared sensors on the front and rear of the
projector are not exposed to very bright light levels.


