ENGLISH
•
Check the engine oil level.
•
Open the fuel cock.
•
Close the choke. (There is no need to close it if the engine is warm or temperature is high.)
•
Put the choke lever halfway in a light accelerating position.
•
Turn the engine switch to ON position.
•
Release the stop button turning it upwards. This button is additional to the motor switch and allows stopping and
starting the machine with more ease.
• For details on operations in the engine, see your instruction book.
•
Lowering the milling drum as shown in this manual and start working
To stop the machine lift the machine by lifting system fast, slow down completely and put the
engine switch OFF. Close fuel valve.
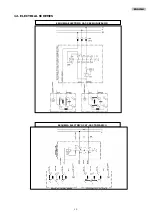
For versions with electric motor will proceed as follows:
• Raise the milling drum so that it does not rub on the floor as shown in this manual.
• Connect the air base of the extension cord to the main plug.
• Start the engine by pressing the green button from the outlet.
• lowering the milling drum as shown in this manual and start working.
• To stop the machine lift the machine by quickly lifting system, stop the engine by pressing the
red button on the outlet. Disconnect the extension cable.
6.5
WORK PERFORMANCE. MILLING DIRECTION.
For best results with simple operation should be performed always milling forward. Traverse the work area in stages.
Not regulate the machine for milling depth too high. If necessary, repeat the process several times.
With the appropriate depth, the mills operate more evenly and avoid premature wear. If you use an inappropriate
setting may appear excessive vibrations and uneven performances.
7.
SAFETY RECOMMENDATIONS
• Any machine handling should be done with the engine stopped.
• Always consider the safety recommendations mentioned in this manual as well as appearing on the gasoline engine
.• Grease every 40 hours the lifting screw.
• In gasoline-powered versions control the engine oil level with the machine always placed in a horizontal plane.
Gasoline engines mounted CAT models, are alarmed by low oil level, so that when the level falls below the minimum,
to the engine will not start until you have added enough oil.
• To use the engine oil SAE 15W-40.
• Clean the machine as often as necessary and see if anomalies or malfunctions it inspected by a qualified technician.
• Be sure to remove the machine tools and devices used in each maintenance operation.
• If the machine is not covered, cover it with waterproof material.
Prohibited any modification in any of the parts or elements of the machine that the user independently.
SIMA SA shall in no way responsible for any consequences that may result from failure of these
recommendations.
8.
TIGHTENING AND REPLACING THE TRANSMISSION BELT
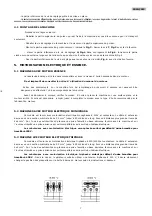
The transmission belts C, Fig.8 are elements that cab loosened by the time and frequent usage.
Therefore, it should be checked after some time and then should be adjusted if necessary. Check frequently the belt
tension and place finger pressure on the top of the belt.
•
Remove the guard of the pulleys P, T Fig.8 loosening the screws, Fig.8
• Operate the R, Fig. 8 tensor , manipulating engine nuts, tightening or loosening the belt to replace.
• Replace damaged by a new strap.
10
Summary of Contents for CAT 202
Page 1: ...CAT 202 CAT 202 E 1 ...
Page 2: ...ESPAÑOL 2 ...
Page 15: ...ESPAÑOL 15 ...
Page 16: ...16 ESPAÑOL ...
Page 17: ...ESPAÑOL 17 ...
Page 20: ...ESPAÑOL 20 ...
Page 33: ...ENGLISH 15 ...
Page 34: ...16 ENGLISH ...
Page 35: ...ENGLISH 17 ...
Page 38: ...ENGLISH 20 ...
Page 51: ...FRANÇAIS 15 ...
Page 52: ...16 FRANÇAIS ...
Page 53: ...FRANÇAIS 17 ...
Page 56: ...FRANÇAIS 20 ...
Page 69: ...15 PORTUGUÊS ...
Page 70: ...16 PORTUGUÊS ...
Page 71: ...PORTUGUÊS 17 ...
Page 74: ...PORTUGUÊS 20 ...
Page 87: ...DEUTSCH 15 ...
Page 88: ... 16 DEUTSCH ...
Page 89: ...DEUTSCH 17 ...
Page 92: ......
Page 105: ...POLSKI 15 ...
Page 106: ...POLSKI 16 ...
Page 107: ...POLSKI 17 ...
Page 110: ...POLSKI 20 ...
Page 123: ...ITALIANO 15 ...
Page 124: ...16 ITALIANO ...
Page 125: ...ITALIANO 17 ...
Page 128: ...ITALIANO 20 ...
Page 141: ...15 РУССКИЙ ...
Page 142: ...16 РУССКИЙ ...
Page 143: ...РУССКИЙ 17 ...
Page 146: ...РУССКИЙ 20 ...
Page 147: ...РУССКИЙ 21 ...


