background image

Table of Contents

TABLE OF CONTENTS......................................................................................................................................................2
INTRODUCTION................................................................................................................................................................3
LIST OF MATERIALS..........................................................................................................................................................4
SELECTING A SETUP SITE...............................................................................................................................................4
UNPACKING THE SCREEN...............................................................................................................................................5
INFLATING THE SCREEN...........................................................................................................................................5,6,7
SCREEN INSTALLATION WITH VELCRO PATCHES....................................................................................................8
SETTING UP THE INFLATABLE HOME THEATER FOR FRONT AND REAR PROJECTION..............................9
SECURING THE SCREEN  AND FILLING WATER BALLASTS.................................................................................10
SCREEN DEFLATION & REPACKING............................................................................................................................11
TROUBLESHOOTING GUIDE.........................................................................................................................................12
SPECIFICATIONS SHEET..................................................................................................................................................13
CONSUMER WARRANTY AND DEFECTIVE RETURN POLICY..............................................................................14

Page 2

Summary of Contents for XL-72

Page 1: ...Sima XL 72 Theater Inflatable Indoor Outdoor Projection Screen w w w s i m a p r o d u c t s c o m...

Page 2: ...FLATING THE SCREEN 5 6 7 SCREEN INSTALLATION WITH VELCRO PATCHES 8 SETTING UP THE INFLATABLE HOME THEATER FOR FRONT AND REAR PROJECTION 9 SECURING THE SCREEN AND FILLING WATER BALLASTS 10 SCREEN DEFLA...

Page 3: ...on is required Do not use screen during high winds in excess of 15 mph or threat of lightning Do not smoke near the screen Keep away from fire Do not use sharp objects in any manner around the XL 72 T...

Page 4: ...rly focus and size the projected image The screen will stand nearly 63 inches in height Allow approximately 6 to 8 feet in front or behind for rear projection of the screen to adjust the projector Be...

Page 5: ...ction FIG 2 2 Plug the AC air pump into an AC power outlet NOTE POWER SUPPLY MUST BE 120V AC 60 Hz USE A PROPERLY GROUNDED GFI OUTLET IF USING THE PRODUCT OUTDOORS 3 Locate the air inlet outlet valves...

Page 6: ...PUMP ISN T IN USE FOR MORE THEN 10 MINUTES IT CAN OVERHEAT WARNINGS Never attempt to disassemble or close the openings while pump is operating Never leave pump unattended while in use Never allow san...

Page 7: ...lored material from which the Inflatable Theater Frame is construction tends to absorb the heat from the sun which causes the air inside the frame to warm up and expand if the screen is used on a sunn...

Page 8: ...ro patches for easy attachment Starting with a top corner attach the screen using the Velcro patches Continue to attach the screen across the top of the inflated frame pulling it taut Continue to atta...

Page 9: ...l for projector distance For 4 3 screen use 1 25x Follow the projector manufacturer s instructions Projector Angle Attempt to position the projector so that it is parallel to the inflatable screen Car...

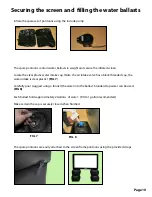
Page 10: ...the air intake valve has a black threaded cap the water intake is clear plastic FIG 7 Carefully pour suggest using a funnel the water into the ballast Standard tap water can be used FIG 8 Each ballas...

Page 11: ...base 6 Turn the pump to the on position for the next few steps 7 Layout the frame as shown in figure 12 8 Fold each base in half Now begin to roll the frame from one base down to the next base FIG 13...

Page 12: ...g and roll it back up for storage 2 Setup the screen and frame in a warm environment Sunlight to remove the wrinkles from the screen 1 Be sure to remove the air pump hose after inflating Air can leak...

Page 13: ...ion capable Hi Definition bright white vinyl material Velcro patches for attaching to frame Other Accessories Included 1 Air Inflator Deflator UL Listed with Hose 120v AC 1 Set of additional height ad...

Page 14: ...itation of Liability and Remedies Sima shall have no liability for any damages due to lost profits loss of use or anticipated benefits or other incidental consequential special or punitive damages ari...

Reviews: