background image

09

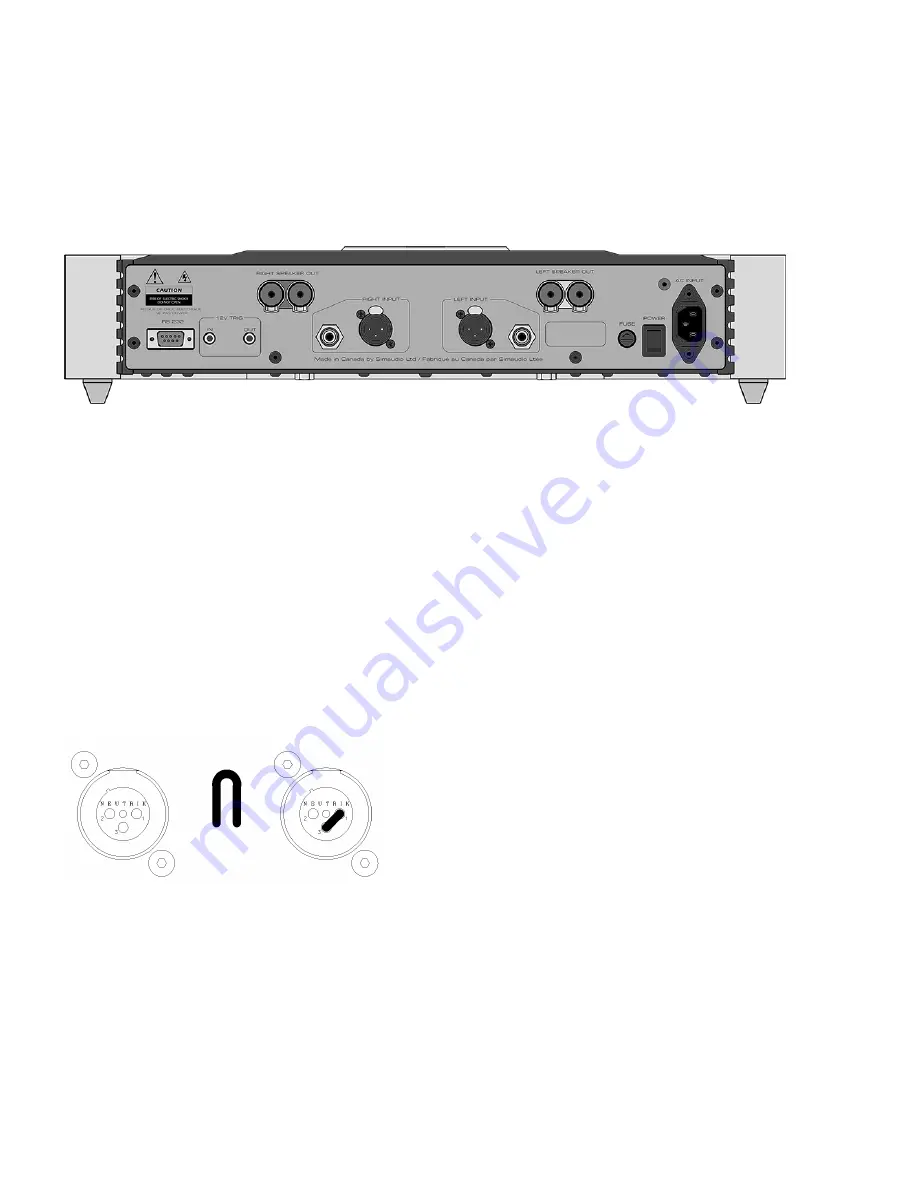
Rear Panel Layout

Figure 1: 760A Backpanel

When you’re using the balanced XLR inputs, you 
must first remove the factory installed “dummy” 
XLR jumpers (see figure 2 below) from the back 
panel XLR connectors and store them in a safe 
place. These jumpers are required ONLY when 
using the single-ended RCA inputs. If you decide 
to switch to single-ended input mode, you must 
reinstall the XLR jumpers (between pins 1 and 3) 
exactly as show below:

There are two pairs of heavy duty gold-plated 
speaker binding posts for each channel to 
accommodate bi-wiring. They are each labelled 
“Right Speaker Out” and “Left Speaker Out”. 

The lower left section has an RS-232 input on a 
DB9 connector. To the right of this connector are 
two 12 Volt triggers, each on a 1/8” mini-jack; 
one input and one output, the latter for use in 
the event that wish you to “daisy chain” a second 
power amplifier on the same trigger circuit. The 
lower right section has from left to right; the “AC 
Fuse” socket cover; the power “main switch”; 
and the “AC Input” IEC receptacle for the power 
cord.

The rear panel will look similar to Figure 1 (above). Each channel has one balanced (differential) input on an 
XLR connector and one unbalanced (single-ended) input on a RCA connector. There is no switch to toggle 
from balanced mode to single-ended mode. You may operate the amplifier in either mode, but only one mode 
at one time for each channel.

Figure 2: XLR connector without

and with jumper accessory

Summary of Contents for MOON 760A

Page 1: ...The performance of a lifetime Owner s Manual MOON 760A Power Amplifier...

Page 2: ...d 1345 Newton Road Boucherville Qu bec J4B 5H2 CANADA Date Code 20182106 WARNING To prevent the risk of equipment damage or personal harm use only Class 2 rated loudspeaker wire properly terminated an...

Page 3: ...S 02 INTRODUCTION 04 DESIGN FEATURES 06 UNPACKING 08 INSTALLATION PLACEMENT 08 REAR PANEL LAYOUT 09 CONNECTING THE UNIT 10 BALANCED OPERATION 10 BRIDGED MONO OPERATION 11 OPERATING THE UNIT 12 REMOTE...

Page 4: ...the apparatus or the apparatus has been exposed to rain or moisture does not operate normally or has been dropped 15 No naked flame sources such as candles should be placed on the apparatus WARNING TO...

Page 5: ...with any liquid If a liquid substance does enter your unit immediately disconnect it from the AC mains and take it to your MOON dealer for a complete check up 7 NEVER spill or pour liquids directly on...

Page 6: ...mance of your 760A will continue to improve during the first 300 hours of listening This is the result of a break in period required for the numerous high quality electronic parts used throughout this...

Page 7: ...05...

Page 8: ...oidal transformer design with lower magnetic electrical and thermal loss yielding an improved power transfer and lower regulation factor resulting in increased current speed and better dynamics Fully...

Page 9: ...07...

Page 10: ...ate heat when driven hard Consequently it should be placed in a location with empty space around it for proper heat dissipation You should never place another component on top of this amplifier As wel...

Page 11: ...er left section has an RS 232 input on a DB9 connector To the right of this connector are two 12 Volt triggers each on a 1 8 mini jack one input and one output the latter for use in the event that wis...

Page 12: ...cables Poor quality speaker cables can degrade the overall sonic performance of your system 3 Connect the supplied AC power cable to the IEC receptacle located on the amplifier s rear panel Ensure th...

Page 13: ...3 One lead from the Y adapter must plug into right channel input and the other lead must plug into left channel input As well you must use the positive terminal of each output binding post exactly as...

Page 14: ...your preamplifier TROUBLESHOOTING The blue LED located on the front panel also indicates the operational status of your MOON 760A Dual Mono power amplifier When the LED starts blinking on and off dur...

Page 15: ...ected together via their respective 12V triggers The 12V trigger output on the 740P is connected to the 12V trigger input on the 760A using a 1 8 mini jack cable When you turn on the 740P via remote c...

Page 16: ...Output Power Bridged Mono at 8 500 W Frequency Response 10Hz 200kHz 0 3dB Gain 31dB Signal to noise Ratio 104dB full power Crosstalk 1kHz 102dB Intermodulation Distortion 0 01 THD 20Hz 20kHz 1 W 130 W...

Page 17: ...15 If you require the IR or RS 232 codes for the MOON 760A please visit the Contact Us section in the support page on our website at www simaudio com...

Page 18: ...Simaudio Ltd 1345 Newton Rd Boucherville Quebec J4B 5H2 CANADA T 450 449 2212...

Reviews: