background image

2683

4

GB

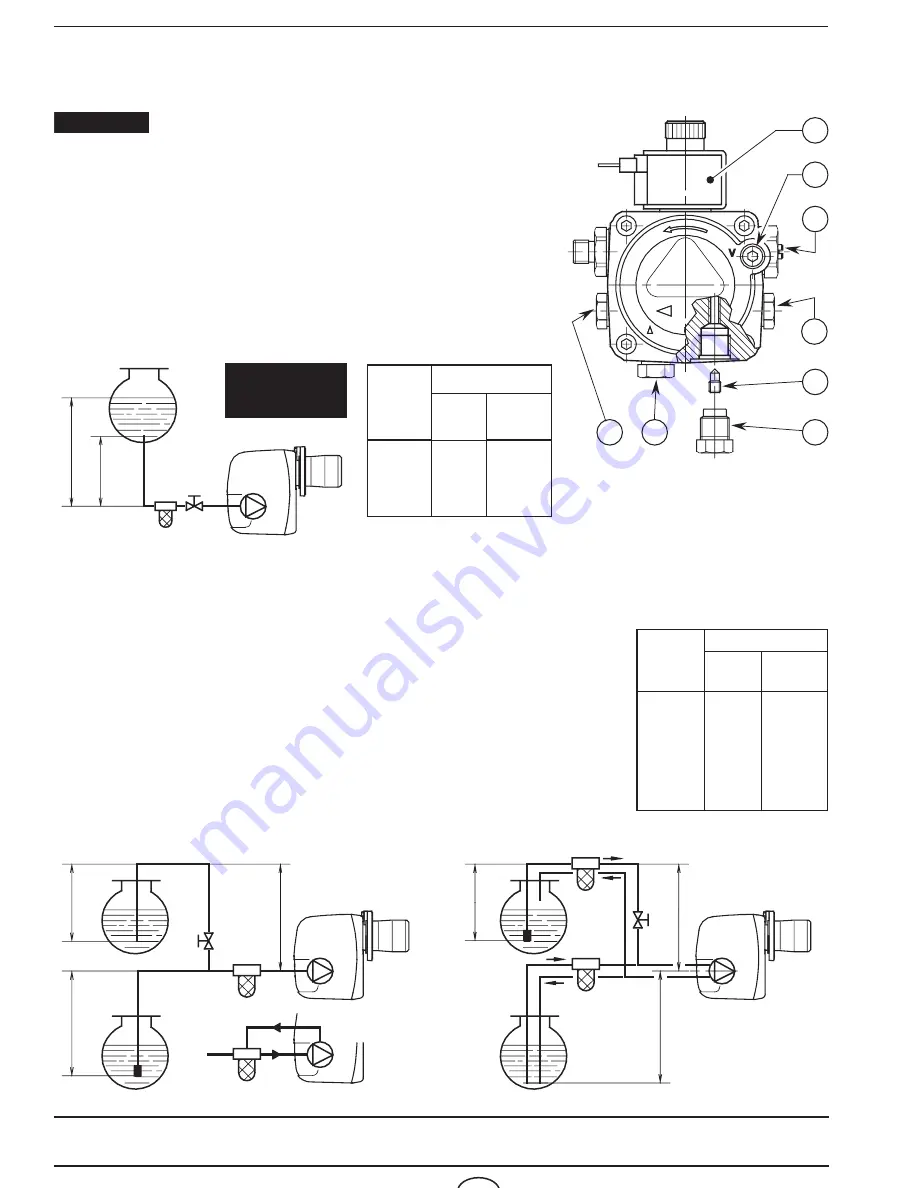
3.2 HYDRAULIC SYSTEMS

The burner is designed to allow entry of the flexible oil-lines on either side of the burner. 

H

 = difference of level;

L

 = max. length of the suction line;

I. D.

 = internal diameter of the oil pipes.

PRIMING PUMP:

On the system in fig. 5

 it is sufficient to loosen the suction gauge

connection (6, fig. 4) and wait until oil flows out.

On the systems in fig. 6 and 7

 start the burner and wait for the priming.

Should  lock-out occur prior to the arrival of the fuel, await at least  20 seconds
before repeating the operation.
The pump suction should not exceed a maximum of 0.4 bar (30 cm Hg).
Beyond this limit gas is released from the oil. Oil pipes must be completely tight.
In the vacuum systems (fig. 7) the return line should terminate within the oil tank
at the same level as the suction line. In this case a non-return valve is not re-
quired. Should  however  the  return  line  arrive  over  the fuel level, a non-return
valve is required.
This solution however is less safe than previous one, due to the possibility of
leakage of the valve. 

It is necessary to install a filter on the fuel supply line.
The standard filter code 6276200 and that one with recirculation
code 6276201 are available on request

.

The pump is designed to allow working with two pipes. 
In order to obtain one pipe working it is necessary to unscrew the
return plug (2), remove the by-pass screw (3) and then screw
again the plug (2), (see fig. 4).

Before  starting  the  burner  make  sure  that  the  return  pipe-line  is
not  clogged.  An  excessive  back  pressure  would  cause  the
damage of the pump seal.

WARNING:

1

 -  Suction line

2

 -  Return line

3

 -  By-pass screw

4

 -  Gauge connection

5

 -  Pressure adjuster

6

 -  Suction gauge connection

7

 -  Oil valve

8

 -  Auxiliary pressure test point

Fig.  4               

D5912

2

3

4

7

6

5

1

8

H

meters

L meters

I. D.

8 mm

I. D.

10 mm

0.5

1

1.5

2

10
20
40
60

20
40
80

100

H

meters

L meters

I. D.

8 mm

I. D.

10 mm

0

0.5

1

1.5

2
3

3.5

35
30
25
20
15

8
6

100
100
100

90
70
30
20

SYSTEM  NOT

IN  GERMANY

H

m

a

x

4

 m

m

a

x

4

 m

H

H

H

D6285

Fig. 6

Fig. 7

Fig. 5

H

m

a

x

4

 m

D6284

PERMITTED

Summary of Contents for 8099000

Page 1: ...iften Installation use and maintenance instructions Oil burners Br leurs oul Stookoliebranders CODE MODEL MODELE TYPE 8099000 SIME MACK 3 514 T1R 8099010 SIME MACK 4 515 T3R 8099030 SIME MACK 5 515 T5...

Page 2: ...4...

Page 3: ...aulic systems 4 3 3 Electrical wiring 5 4 WORKING 6 4 1 Combustion adjustment 6 4 2 Nozzles recommended 6 4 3 Electrodes setting 7 4 4 Air damper adjustment 7 4 5 Pump pressure 7 4 6 Fuel heating 7 4...

Page 4: ...7A 2850 rpm 298 rad s Capacitor 4 F Ignition transformer Secondary 8 kV 16 mA Pump Pressure 7 15 bar Absorbed electrical power 0 165 kW 0 185 kW 0 8 0 0 4 Pressure in the combustion chamber mbar Light...

Page 5: ...ng gasket holes 5 Fix the ange 1 to the boiler door 4 using screws 2 and if necessary the nuts 3 interposing the insulating gasket 5 see g 3 Model A B C D E F G MACK 3 268 229 208 86 89 170 10 MACK 4...

Page 6: ...non return valve is required This solution however is less safe than previous one due to the possibility of leakage of the valve It is necessary to install a filter on the fuel supply line The standar...

Page 7: ...shut down of the burner by opening the ther mostats CONTROL BOX To remove the control box from the burner loosen screw A fig 8 and pull to the arrow direction after removing all components the 7 pin p...

Page 8: ...nd room temperature of 20 C BOILER BURNER Nozzle Pump pressure Burner output Air damper adjustment Code Model GPH Angle bar kg h 4 Set point Rond Estelle 3 8099000 MACK 3 0 55 60 S 12 2 1 3 7 Rond Est...

Page 9: ...recommended to proceed as follows Adjust the air damper as indicated in the table Mount the cover Check smoke number and CO2 Should it become necessary to modify the air output remove the cover by loo...

Page 10: ...s Clean the filter in the oil suction line and in the pump Clean the photoresistance see fig 9 page 5 Check for correct fuel consumption Replace the nozzle see fig 10 page 6 and check the correct posi...

Page 11: ...SOLUTION All led are off and the burner does not start Lack of electrical supply Check presence of voltage in the L1 N clamps of the 7 pin plug Check the conditions of the fuses Check that thermostat...

Page 12: ...Fonderie Sime S p A via Garbo 27 37045 Legnago Vr Italy Tel 39 0442 631111 Export Division fax number 39 0442 631293 Sime Service fax number 39 0442 631292...

Reviews: