background image

8

SD5X

 digital drum kit User manual

The First Name in Electronic Drums.

connections

CAUTION!

To prevent electric shock and damage to the device, make sure the power is switched  

OFF on the sound module and all related devices before making any connection.

Pads and Pedal 

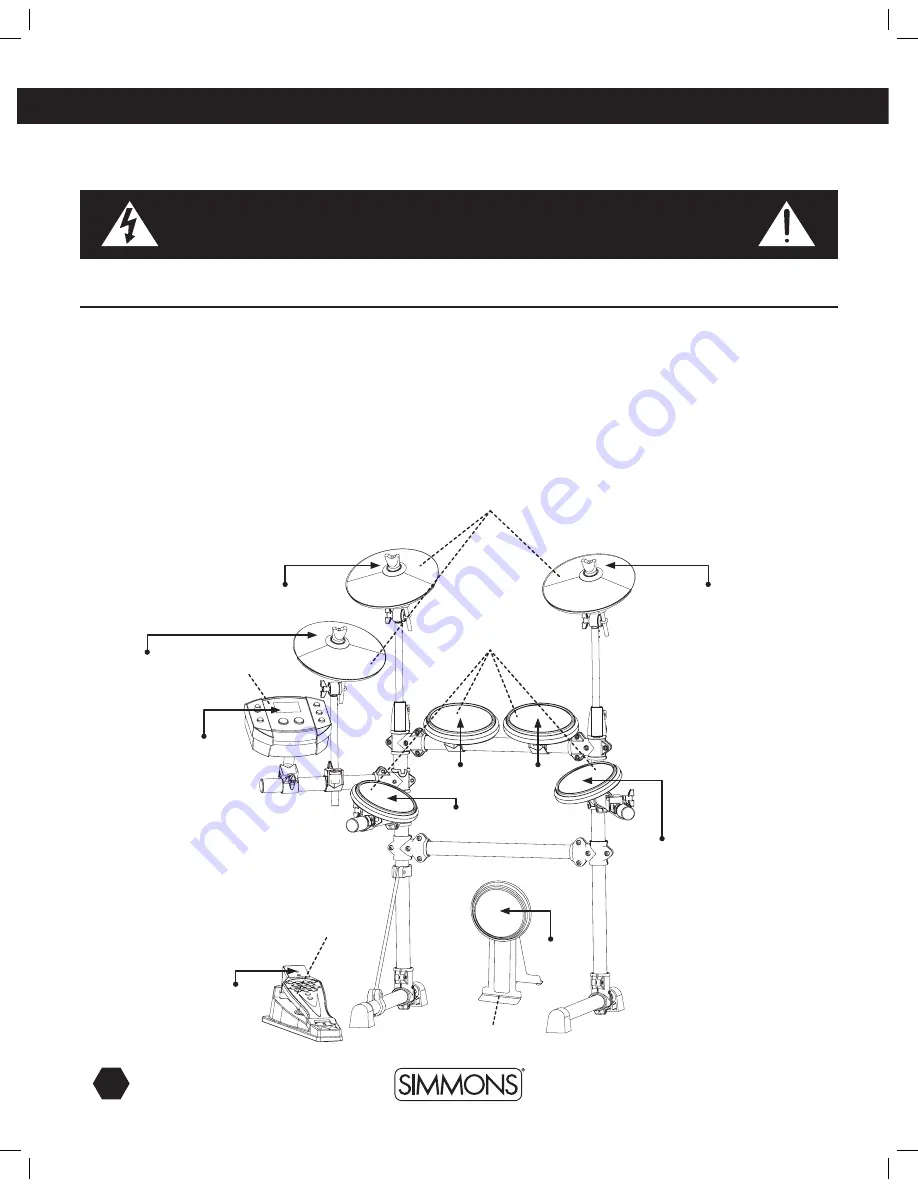
Using the provided cables, connect the 1/4” jacks to the corresponding drum 

pads, cymbal pads and kick pad. The pin connection will attach to the serial 

port of the sound module. (See illustration.)

Note: The voice of the hi-hat pad is controlled by the hi-hat pedal. Similar to 

a real drum kit, the hi-hat pad functions as an ‘open hi-hat’ when the pedal is 

released. When the pedal is pressed down, it functions as a ‘closed hi-hat’.
Note: The striking area of cymbal pad (ride, crash or hi-hat) is near the edge 

of the pad. One of the cymbal pads has a choke function (indicated by raised 

pattern at cymbal edge.) Grab this area to stop cymbal from sounding.

Cymbal Pad

Drum Pad

Hi-Hat Pedal

Drum Module

Bass Drum

To Ride

To Tom 3

To Kick

To Hi-Hat 

control

From Drum 

Module

To Hi-Hat

To Crash

To Tom 1

To Snare

To Tom 2

9681 Simmons SD5X Electronic Drum Set Manual.indd   8

3/16/12   3:42 PM

Summary of Contents for SD5X

Page 1: ...lectronic Drum Kit user manual The First Name in Electronic Drums www simmonsdrums net SD5X Electronic Drum Kit www simmonsdrums net 9681 Simmons SD5X Electronic Drum Set Manual indd 1 3 16 12 3 42 PM...

Page 2: ...adio TV technician for help Two 2 Year Limited Warranty Subject to the limitations set forth below Simmons hereby represents and warrants that the components of this product shall be free from defects...

Page 3: ...s power switch and all related devices prior to connecting or disconnecting cables Handling and Transport Never apply excessive force to controls connectors and other parts Unplug cables by gripping...

Page 4: ...4 SD5X digital drum kit User manual The First Name in Electronic Drums 9681 Simmons SD5X Electronic Drum Set Manual indd 4 3 16 12 3 42 PM...

Page 5: ...2 Drum Kit Selecting a kit 13 Adjusting the kit volume 13 Toggling reverb on off 13 Voice Selecting the voice 14 Adjusting the voice volume 14 Adjusting the MIDI note 15 Tempo Adjusting the tempo 15 C...

Page 6: ...CLICK button to start stop the click Hold the CLICK button 2 seconds to enter the demo mode and play the demo 5 MODE Button Press MODE button to select the mode from PATTERN KIT VOICE CLICK 6 PAGE But...

Page 7: ...ack Connect with external sound module 5 Line Output Jacks R L MONO Right channel output and left channel output Left channel used as mono line output 6 AUX In Connect with external sound source 7 Pho...

Page 8: ...voice of the hi hat pad is controlled by the hi hat pedal Similar to a real drum kit the hi hat pad functions as an open hi hat when the pedal is released When the pedal is pressed down it functions...

Page 9: ...along with a pre recorded track 2 The volume of the external signal is adjusted with the VOLUME knob Headphones An optional set of stereo headphones can be connected with the PHONES jack located on th...

Page 10: ...r musical horizons will be greatly enhanced MIDI connection MIDI OUT This terminal transmits data from this instrument to other MIDI devices USB connection The USB connector allows you to connect the...

Page 11: ...e been completed lower the volume minimum volume level before switching the power on Set the power switch to ON position to turn on the power Display shows the kit s number and its indicator lights Se...

Page 12: ...he accompaniment volume A22 3 Press button to adjust the value Range 0 32 Adjusting the Drum Volume In pattern mode pattern drum volume 0 032 1 Press MODE button to select the pattern mode the pattern...

Page 13: ...automatically be saved upon exit Range 0 32 Toggling Reverb On Off 1 Press MODE button to select the kit mode the kit LED indicator will light 2 Press the PAGE button to select the kit reverb page re...

Page 14: ...atically be saved upon exit Adjusting the Voice Volume In voice mode voice volume 0 32 1 Press MODE button to select the voice mode the voice LED indicator will light 2 Press PAGE button to select the...

Page 15: ...pon exit Range 0 99 The Default MIDI Note Numbers The tempo range is 30 280 BPM Adjusting the Tempo 1 Press both MODE and PAGE buttons the 3 digit LED will display the tempo page for 3 seconds 2 Press...

Page 16: ...indicator will light 2 Press PAGE button to select the click instrument page the 3 digit LED will display the click instrument CL1 3 Press to adjust the value Range CL1 CL5 Adjusting the Click Volume...

Page 17: ...tern 1 Press START STOP button to play the selected patterns 2 Press START STOP button again to stop play Playing the Click 1 Press the CLICK button to start the click The click indicator will light t...

Page 18: ...e Click Mode Page Demo Tempo Volume Display LED Display Connections Phones Aux In Output R L MONO MIDI Out USB On Off Power Supply AC Adaptor 9V 500mA appendices Restoring Factory Presets Restoring th...

Page 19: ...sion Lead 108 1 013 Fusion Groove II 106 1 014 Funky Groove 90 1 015 Nite Rhythm 86 9 016 Trip Hop 108 9 017 Electronic Ride 86 1 018 House 120 9 019 Drum Bass 130 1 020 Club Latin 106 1 021 Straight...

Page 20: ...ronic Tom 2 063 Electronic Tom 3 064 Electronic Tom 4 065 Electronic Tom 5 066 Electronic Tom 6 067 Simmons V1 Tom 1 068 Simmons V1 Tom 2 069 Simmons V1 Tom 3 070 Simmons V2 Tom 1 071 Simmons V2 Tom 2...

Page 21: ...Hit BRASS 057 Trumpet 058 Trombone 059 Tuba 060 Muted Trumpet 061 French Horn 062 Brass Section 063 Synth Brass 1 064 Synth Brass 2 REED 065 Soprano Sax 066 Alto Sax 067 Tenor Sax 068 Baritone Sax 069...

Page 22: ...Tom 3 Room Tom 3 Rock Tom 3 Funk Tom 3 48 C3 Standard 1 Tom 2 Standard 2 Tom 2 Room Tom 2 Rock Tom 2 Funk Tom 2 49 C 3 Standard 1 Crash 1 Standard 2 Crash 1 Room Crash 1 Rock Crash 1 Funk Crash 1 50...

Page 23: ...Tom 4 808 Tom 4 House Tom 4 Jazz Tom 4 Brush Tom 4 46 A 2 Electronic Hi hat Open 808 Hi hat Open House Hi hat Open Jazz Hi hat Open D 47 B2 Electronic Tom 3 808 Tom 3 House Tom 3 Jazz Tom 3 Brush Tom...

Page 24: ...3 120 121 123 X X X X X X X X X X X X X X X X X X O O O O O O O O O O O O O O O O O O Bank Select Modulation Portamento Time Data Entry Volume Pan Expression Sustain Pedal Portamento On Off Sostenuto...

Reviews: