background image

12

13

OWNER’S MANUAL

TITAN 20 DRUM MODULE OPERATION

TOP PANEL

4

6

12

13

14

7

5

1

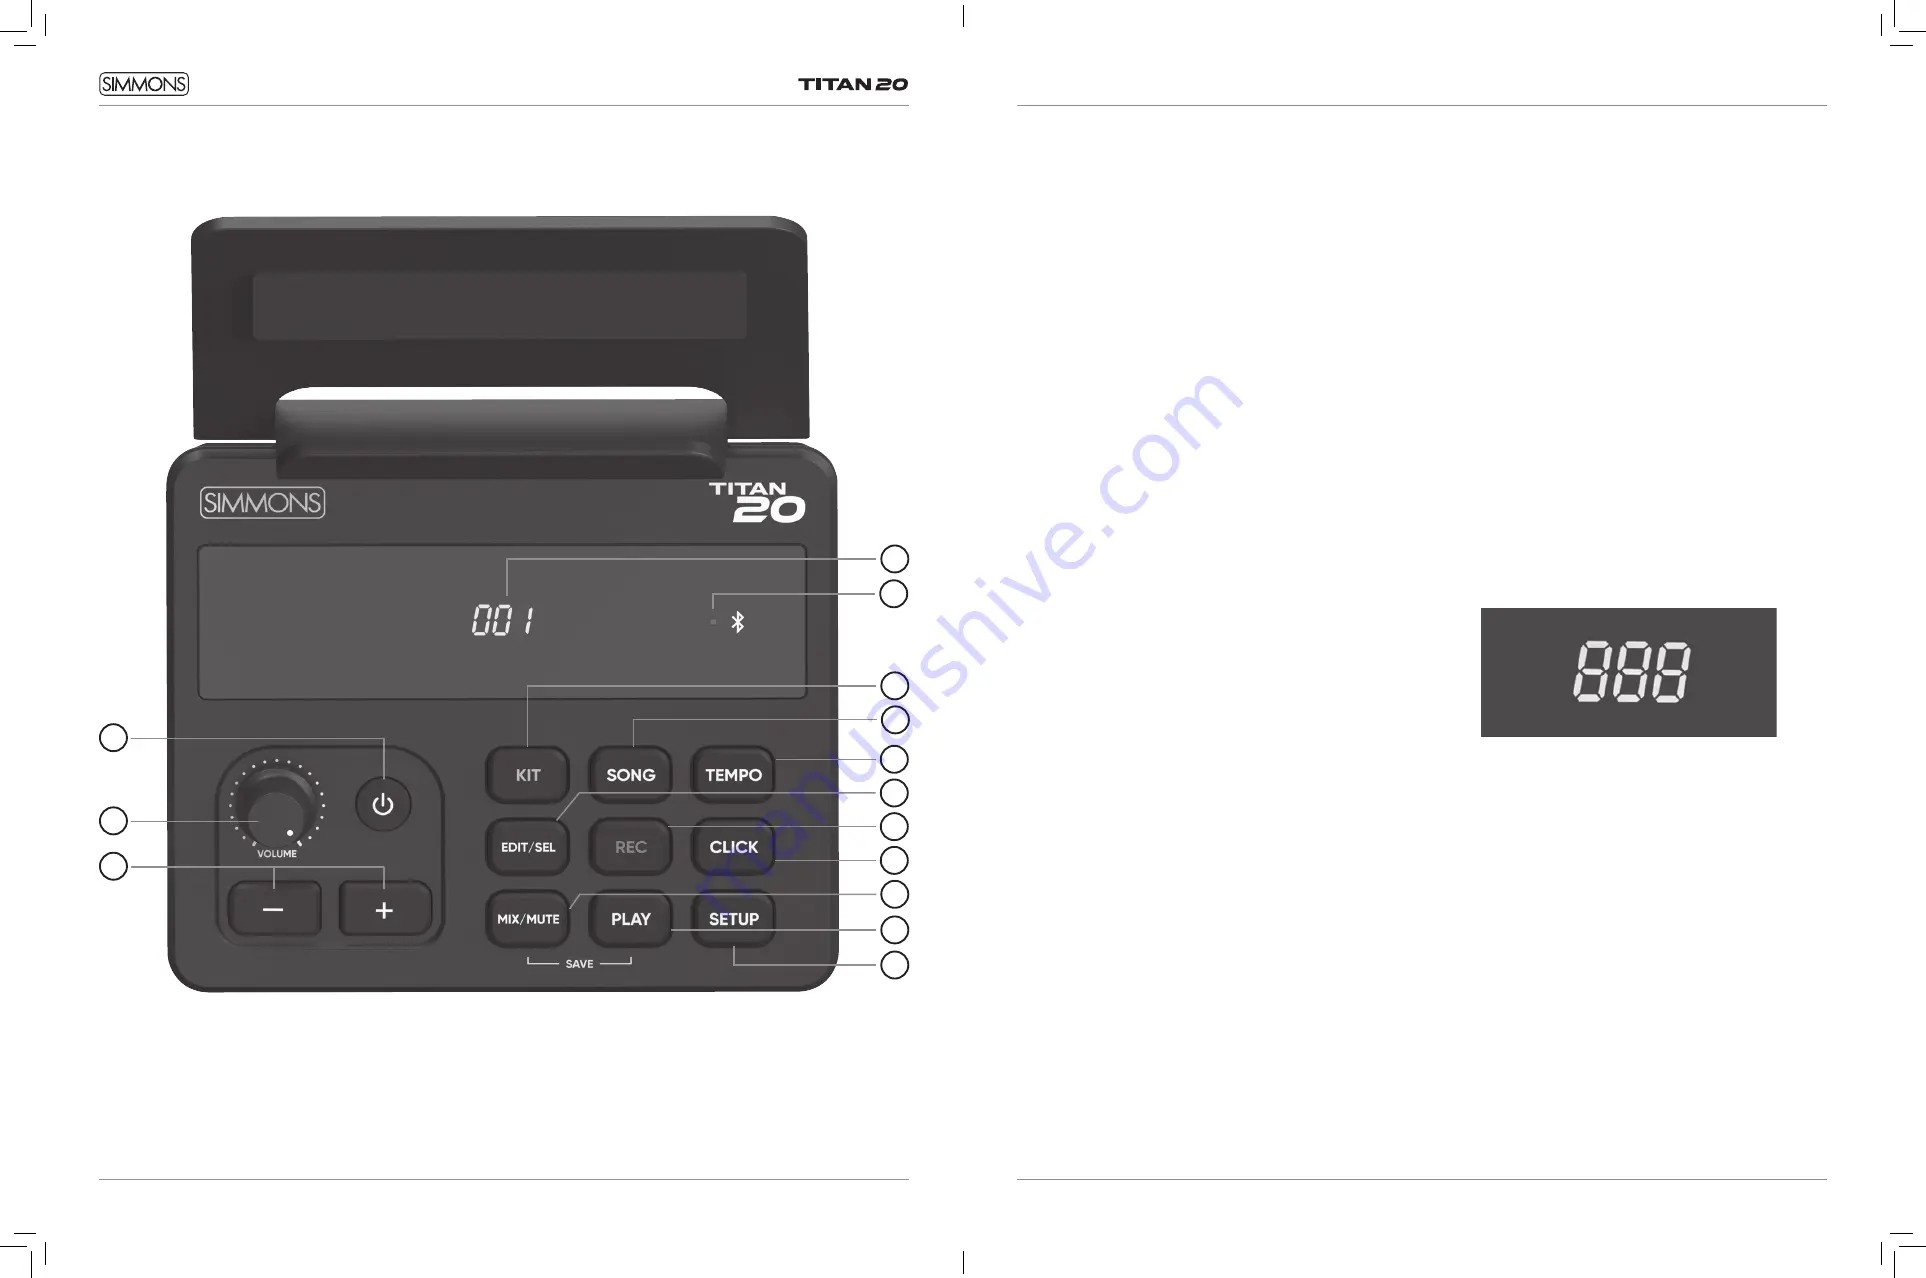
TOP PANEL

1. 

Power Button:

 Switches the module on and off.

2.  

Volume Knob:

 Controls the level of the headphone and 

line outputs.

3.  

+ / - Buttons:

 These buttons change values depending 

on the mode. The default is changing Kits in Kit Mode. 

4.  

LED Display:

 This shows the currently selected Kit, Song, 

or value.

5.  

Bluetooth Indicator:

 This LED turns on when a Bluetooth 

connection has been established.

6. 

Kit Button:

 Press this button and then + and – to change 

to a different drum kit.

7. 

Song Button:

 Press this button and then + and – to 

select a song for playback or recording. Press and hold 

this button to enter Practice Mode. 

8.  

Tempo Button:

 Press this button and then use + and – to 

set the tempo of the song or metronome. Tap this button 

in rhythm to automatically set the tempo. The Tempo 

light will flash at the currently-selected tempo.


9. 

Edit/Sel Button:

 Press this button to edit the drum kit.

10.  

Rec Button:

 Press this to start recording your playing to 

the User song.

11. 

Click button:

 Press this to turn on the metronome. 

12. 

Mix/Mute Button:

 Press this to change the volume or 

pan of the drums. Press and hold to mute the drum part 

during song playback. 

13. 

Play Button:

 Starts playback of the currently-selected 

song. Press both Mix/Mute + Play to save your drum kit 

to the user kit. 

14. 

Setup Button:

 Press this to adjust trigger and MIDI 

functions.

TITAN 20 DRUM MODULE OPERATION

LED DISPLAY

The buttons on the module indicate the KIT or SONG mode 

status. When Kit mode is selected, that button lights up 

and the current kit number is shown in the display. When 

Song is selected, that button lights up and the song number 

appears in the display. 

3

2

8

11

9

10

Summary of Contents for TITAN 20

Page 1: ...SimmonsDrums net OWNER S MANUAL ELECTRONIC DRUM KIT WITH MESH HEADS...

Page 2: ...ure does not operate normally or has been dropped WARNING To reduce the risk of fire or electric shock do not expose this apparatus to rain or moisture CAUTION Apparatus shall not be exposed to drippi...

Page 3: ...anel 14 Back Panel 14 GETTING STARTED Switching the Power On 15 Basic Operations and Navigation 15 KIT MODE Selecting a Kit 16 Editing a Drum Sound 16 Editing the Drum Mix 16 SONG MODE Selecting a Son...

Page 4: ...Zone Crash Cymbal Pad 10 Single Zone Ride Cymbal Pad EXTERNAL CONNECTIONS 1 8 Headphone Output 2 Master Outputs 1 8 Stereo Aux Input USB Connection for MIDI via computer SEQUENCER Preset Songs 10 Use...

Page 5: ...ilter assemblies Put the felt on next then screw down the cymbal nut to attach STEP 4 ATTACH DRUM MODULE Loosen the wing screw on the module mount located on the crossbar Place the drum module into th...

Page 6: ...zed to receive and transmit Audio and MIDI messages through a single USB cable The Titan 20 module will appear as Titan 20 in the USB device options of your software NOTE When the USB is connected to...

Page 7: ...the song or metronome Tap this button in rhythm to automatically set the tempo The Tempo light will flash at the currently selected tempo 9 Edit Sel Button Press this button to edit the drum kit 10 R...

Page 8: ...module 1 Select the parameter to be adjusted 2 Adjust the value using buttons TITAN 20 DRUM MODULE OPERATION REAR PANEL 1 Trigger Input Jacks The included multipin cable connects the pads and the peda...

Page 9: ...ou want to play PLAYING A SONG 1 Press PLAY to play a song 2 Press the PLAY button again to stop playback of the song NOTE You can temporarily change the tempo of a song while playback is in progress...

Page 10: ...g it then becomes easy for sounds to be omitted when the drums is played fast like during a drum roll Set this to the lowest value possible while still ensuring there are no repeated hits or double tr...

Page 11: ...gh the module s line out and headphone out simply choose the Titan 20 device from your smartphone tablet or computer Again the Bluetooth LED on the front panel will light when a Bluetooth connection i...

Page 12: ...sh 603 ZilKSw17 Crash 604 ZilKDk18 Crash 605 ZilChina18 Percussion 701 Cajon Percussion 702 CongaOp Percussion 703 CongaSl Percussion 704 Cowbell Percussion 705 Drumsticks Percussion 706 Maracas Percu...

Page 13: ...sible for compliance could void the user s authority to operate the equipment 2 Note This equipment has been tested and found to comply with the limits for a Class B digital device pursuant to Part 15...

Reviews: