Assembly instructions for kit #8
All rights reserved. 2001 Simple Motors, LLC
♦
♦
6
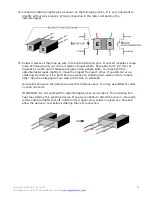
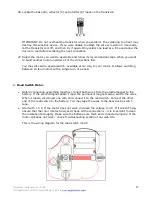
14. Locate the optointerrupter pins as shown on the following picture. It is very important to
identify all four pins properly. Wrong connection in the motor will destroy the
optointerrupter.
15. Solder 4 pieces of the hook-up wire to the optointerrupter pins. If your kit includes 1 large
piece of hook-up wire, cut it into 4 pieces of equal length. Strip about 3/8" (10 mm) of
insulation on each end of these wire pieces using a sharp knife. You may bend the
optointerrupter leads slightly to move them apart from each other. If you did not use a
soldering iron before it is a good idea to practice on soldering two pieces of wire to each
other. See the Links page at our web site for tips on soldering.
Wire colors shown on the picture are used for reference only. You may use different colors
or even one color.
IMPORTANT: Do not overheat the optointerrupter when you solder it. The soldering iron
heat may destroy this sensitive device. If you were unable to attach the wire in 3 seconds,
let the optointerrupter cool off, and then try it again. Only solder one lead at a time and
allow the device to cool before soldering the next connection.


