background image

SWIVEL OFFICE CHAIR

MODEL # 

AXCOCHR-14-DSTB

FOLEY / PARKS / ANDERSON

1

Summary of Contents for FOLEY AXCOCHR-14-DSTB

Page 1: ...SWIVEL OFFICE CHAIR MODEL AXCOCHR 14 DSTB FOLEY PARKS ANDERSON 1 ...

Page 2: ... SPEAK WITH US 1 866 518 0120 MONDAY TO FRIDAY 9 AM TO 5 PM EST EMAIL US customerservice simpli home com Other ways to contact us 1 Open your phone s camera 2 Point your phone s camera at the QR code to scan 3 Click on the pop up 4 You ll be taken to our customer service page 5 Fill the form with your order information and issue 6 Submit form 7 A customer service associate will contact you 2 ...

Page 3: ...peted floor to avoid scratches If using power tools set the tool to low torque to avoid damage May require 2 people for ease of assembly SAFETY INFORMATION CARE and MAINTENANCE Wipe regularly with clean water and a damp clean soft white cloth General cleaning can be done as needed with a mild detergent and water solution Always rinse with clean water and dry For heavy soiling dampen a soft white c...

Page 4: ... QTY 1 C B A SEAT QTY 1 LEFT ARM QTY 1 MECHANISM QTY 1 F E D GAS LIFT QTY 1 BASE QTY 1 CASTER QTY 5 H G GAS LIFT CAP QTY 1 I RIGHT ARM QTY 1 PRE ASSEMBLY INFORMATION PART DESCRIPTION 4 MODEL AXCOCHR 14 DSTB ...

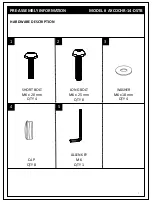
Page 5: ...2 1 3 5 4 SHORT BOLT M6 x 20 mm QTY 4 LONG BOLT M6 x 25 mm QTY 8 WASHER M6 x 18 mm QTY 4 CAP QTY 8 ALLEN KEY M6 QTY 1 PRE ASSEMBLY INFORMATION HARDWARE DESCRIPTION 5 MODEL AXCOCHR 14 DSTB ...

Page 6: ...Place the Base G upside down on a flat smooth surface 2 Attach the Casters H to the Base G 3 Turn the Base G right side up and attach Gas Lift F and Gas Lift Cap I to the Base G ASSEMBLY 6 MODEL AXCOCHR 14 DSTB ...

Page 7: ...ace the Seat B on its back on a flat smooth surface 2 Attach the Mechanism E to the bottom of the Seat B using Bolts 1 and four Washers 3 3 Use Allen Key 5 to tighten ASSEMBLY 7 STEP 2 MODEL AXCOCHR 14 DSTB ...

Page 8: ...Seat B right side up on the Gas Lift F 2 Attach the Left Arm C and Right Arm D to the Seat B using two Long Bolts 1 on the bottom two holes of each Arm C and D 3 Use Allen Key 5 to tighten ASSEMBLY 8 MODEL AXCOCHR 14 DSTB ...

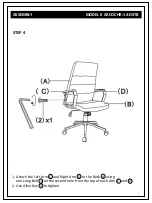
Page 9: ...STEP 4 1 Attach the Left Arm C and Right Arm D to the Back A using one Long Bolt 1 on the second hole from the top of each Arm C and D 2 Use Allen Key 5 to tighten ASSEMBLY 9 MODEL AXCOCHR 14 DSTB ...

Page 10: ...Back A to an upright position 2 Complete attaching the Left Arm C and Right Arm D to the Back A using one Long Bolt 1 on the first hole of top of each Arm C and D 3 Use Allen Key 5 to tighten ASSEMBLY 10 MODEL AXCOCHR 14 DSTB ...

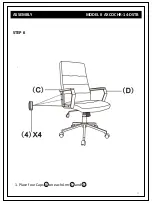
Page 11: ...STEP 6 1 Place four Caps 4 on each Arm C and D 11 ASSEMBLY MODEL AXCOCHR 14 DSTB ...

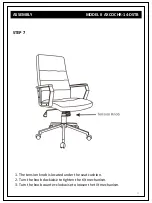
Page 12: ...SEMBLY 1 The tension knob is located under the seat cushion 2 Turn the knob clockwise to tighten the tilt mechanism 3 Turn the knob counter clockwise to loosen the tilt mechanism STEP 7 MODEL AXCOCHR 14 DSTB ...

Page 13: ... reach underneath the right side of the chair to lift the handle up slowly with a clockwise twisting motion to allow the chair to rise to desired height 2 To lower seat lift the handle slowly with a clockwise twisting motion while seated STEP 8 MODEL AXCOCHR 14 DSTB ...

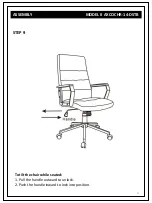
Page 14: ...14 ASSEMBLY To tilt the chair while seated 1 Pull the handle outward to unlock 2 Push the handle inward to lock into position STEP 9 MODEL AXCOCHR 14 DSTB ...

Page 15: ...ce line at 1 866 518 0120 Monday to Friday from 9 AM to 5 PM EST or visit our website at www simpli home com to submit a parts request We reserve the right to repair or replace the defective product at our discretion This product is guaranteed for 12 months if used for normal purposes Any warranty is invalid if the product has been overloaded or subject to neglect improper use or an attempted repa...

Reviews: